(Last updated on November 1st, 2022)
Are you trying to give your graphics and text in Adobe Illustrator some depth and boldness? A drop shadow may be just what you need for your project. We’ll go over how to apply such an effect in this step-by-step tutorial.
Illustrator comes loaded with several effects, including those more familiar to Photoshop. There’s a lot to choose from to help improve any project. This includes everything from 3D bevels to shape distortion.
A more common effect you may find yourself using quite often is the Drop Shadow effect. It can be used for text that you don’t want to blend in with the background. It can also be used for creating depth with your shapes.

Drop shadows are present in just about every Adobe design application. You may have used one with the blending layer options of Photoshop or for some motion graphics assembled in After Effects. If you don’t have this experience, relax, it’s not that hard to use in Illustrator.
Illustrator may have one of the most simplified versions of the drop-shadow effect within any Adobe program. If you’re just starting to use this program for graphic design, it’s an essential process you’ll want to learn. Considering there’s not much to it, it’s also worth your time to master.
Since drop shadow for text is often subtle and small, we’ll look at how to use a drop shadow on a shape. This way, we’ll actively see how our shadow can provide great contrast. It’s also good practice to learn drop shadows out of their more common usage for text.
Tutorial Rundown for Adding a Drop Shadow in Illustrator:
- Selecting Your Assets
- Applying A Drop Shadow
- Tweaking The Drop Shadow
- Finalizing Your Drop Shadow
Step 1: Selecting Your Assets
Let’s start by making a relatively simple project where we’d need a drop shadow. We’re going to create some shapes inside Illustrator that will be layered on top of each other. We’ll be using the draw shape tools but feel free to use your shape creation methods or use your assets.
Open up Illustrator and create a new project. You can select any canvas format you wish. For this tutorial, we’ll be using the standard website canvas template.

We’ll start by creating a blue box. Select the Rectangle Tool from our toolbar on the left. Then go into the Properties tab on the right to change the fill to blue. Click and drag on the canvas to create the box.
Click off the box you created, so it’s no longer selected. We’ll then select the Ellipses Tool by clicking and holding on the button for the Rectangle Tool. Change the fill in the Properties tab to teal.
Click and drag a circle inside your blue box with these options selected. It doesn’t have to be a perfect circle, but you can hold Shift while dragging to make it appear uniform. If you did this correctly, you should have a teal circle inside a blue square.
It looks pretty flat, doesn’t it? A drop shadow can come in handy for this situation where we’d want to create the illusion of depth. In this instance, we will try to make the teal circle look like it’s hovering above the blue box rather than being trapped inside it.
Step 2: Applying a Drop Shadow
The first thing we need to do is make sure that our teal circle is selected. To do this, navigate to your Layers tab on the right side of the interface. Find the Ellipse shape you created in the layer list and click the circle on the right side to select that shape.
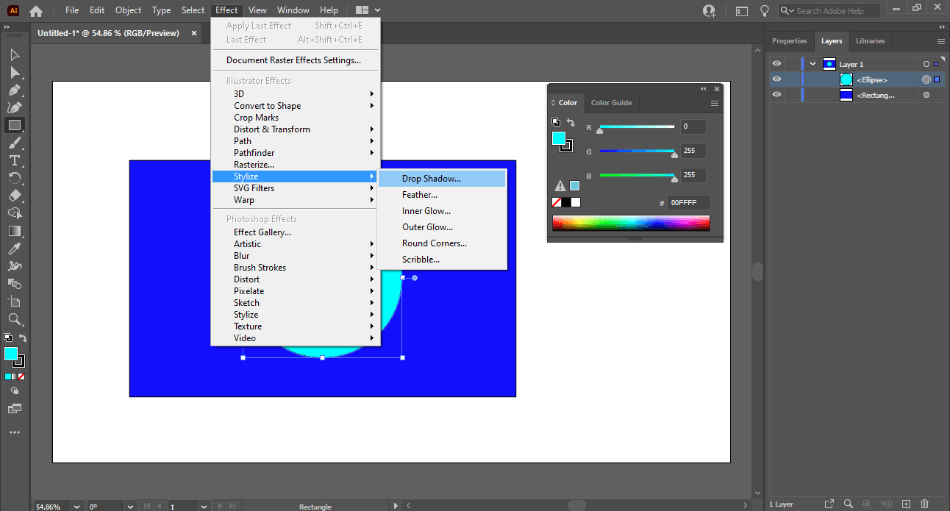
We can now apply the drop shadow effect with our assets currently selected. To add this, we will go to our top menu and find Effects. Click on that and then navigate down to the Illustrator effects area for Stylize, hover over it, and click on Drop Shadow.
When you click on Drop Shadow, a new mini window with drop shadow options. Make sure the Preview button is on in this window to actively see the changes we’re making as they are applied.
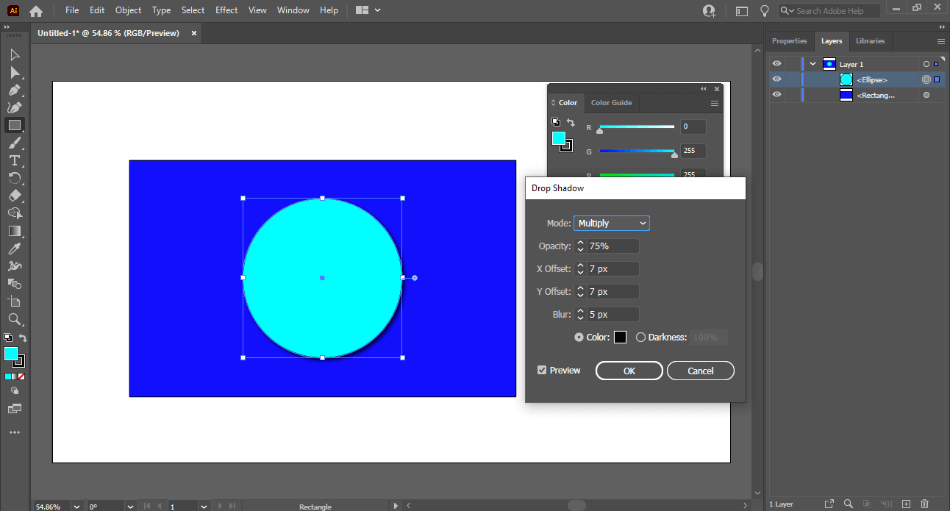
Here’s an Overview of What Each Option Does:
- Mode: This is the blending mode of how the drop shadow will blend in with the rest of your canvas. It’s a drop-down menu that will display options similar to those you’d see for layer blending and other effects.
- Opacity: This determines how visible your drop shadow will appear. This can be handy for giving your shadow a more faded look if you want it to be subtle.
- X Offset and Y Offset: These two counters determine your drop shadow’s distance from the selected object. The higher their numbers, the further away the shadow will appear.
- Blur: Blurring your shadow will soften the edges around it. This option can also be used to create the illusion of distance.
- Color: If you want your drop shadow to be any other color than the default black, use this option to select a different color from a palette.
- Darkness: If you change your drop shadow to a color other than black, you’ll want to change the percentage of the darkness. The lower the rate, the more visible the non-black color you selected, with 0% showing the full color.
Step 3: Tweaking the Drop Shadow
With the edit window for the Drop Shadow open, you’ll see you have several options to select from. We’ll be tweaking these to create a drop shadow that displays depth and softness to show distance.
Here Are the Options We’re Going to Set to Achieve This Effect:
- Mode: Multiply
- Opacity: 100%
- X Offset: 20px
- Y Offset: 20px
- Blur: 5px
- Color: Black
- Darkness: 100% (or not selected)
These changes will create a simple drop shadow for our teal circle. It’s a fair distance from the circle, making it appear as though it’s lifting the shape out of the blue box. It’s blurred slightly to give the appearance of falloff for a more believable shadow.
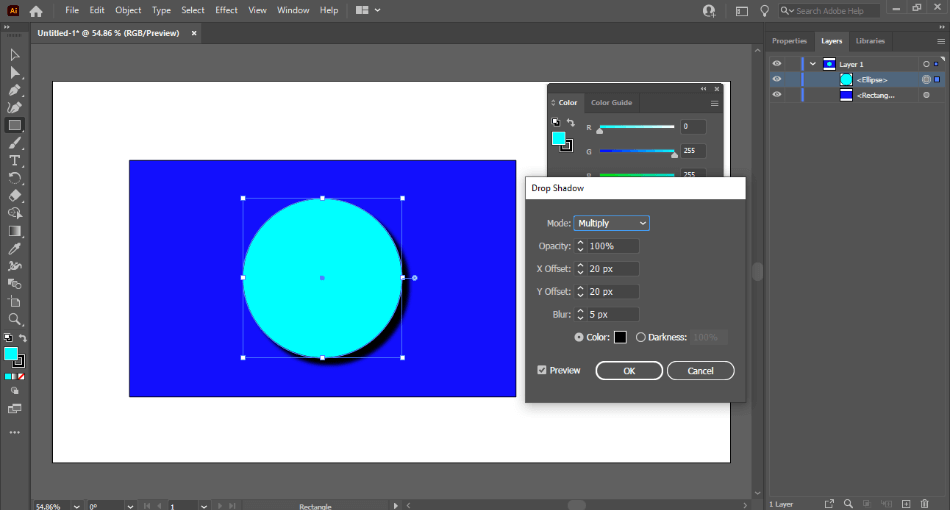
The color has been left at black to make the shadow still seem bold. We’ve also left the darkness unchanged to keep the black intact. As for the mode, it has been set to multiply to have an understated blending with the background.
Feel free to play around with these settings to find the right drop shadow that works for you. Don’t be afraid to experiment with how far you can push the offset and blur. Such experimentation can be helpful for future projects.
Step 4: Finalizing Your Drop Shadow
When all of these changes to the options have been applied, click Ok. This will finalize the drop shadow you’ve applied. Click off the shape and give it a good look to see how it appears.
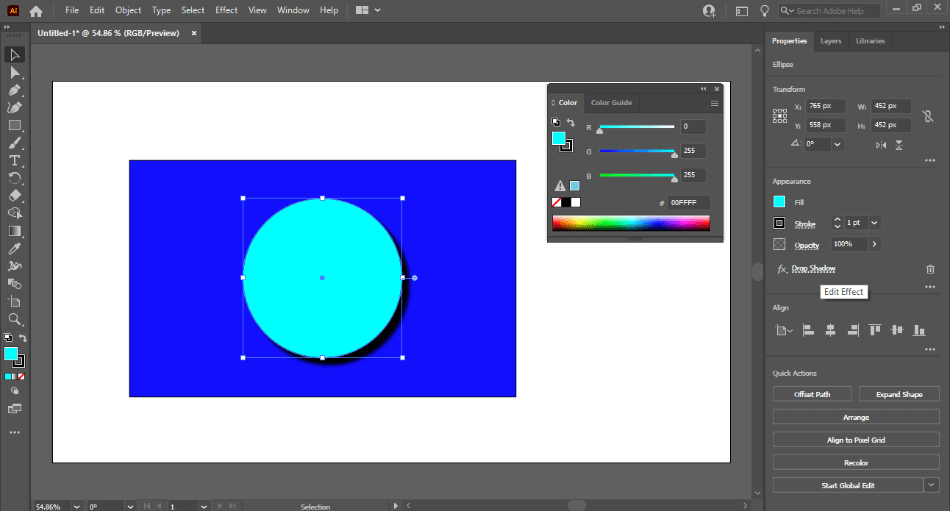
If you don’t like the drop shadow effect you’ve applied, you can always go back and change the options you’ve set. You can do this by clicking on the teal shape and navigating to the Properties tab. Scroll down and find Drop Shadow under the Appearance section.
When you click the Drop Shadow title, the mini window will open up again, and you can make your changes. Click Ok once you’re satisfied with the results. If you just don’t like the look of any drop shadow, you can get rid of it by clicking the trash can icon next to the title.
Keep this Appearance area in mind as it’s where most of your effects will be stored for your objects. The effects will be noted by the FX letters next to whichever effect you’ve applied. Think of it the same way you would treat a layers menu.
It’s important to note that you don’t just want to apply a new one when you want to edit your drop shadow. If you already have applied a drop shadow to an object and try to add it again, you’ll be given a prompt. The prompt will warn you that you already have this effect, and adding another one won’t change the shadow you just applied.
The prompt will also instruct you on how to go about editing the drop shadow you already have. It’s best to just work with one drop shadow as adding this effect multiple times can look off and create too much information. While doubling up on this effect can be intriguing, it’s best to stick with one for design purposes.
This is just one example of applying drop shadows in Illustrator. You can use this same effect on just about any object within Illustrator. This can extend from the artwork you create with the draw tools to graphical assets brought into the software.
Now that you know how to use this effect, you can try it out with plenty of examples. Try placing a yellow star in front of a black background and give it a white background. Place a header over a bright background and give it a soft shadow.
Knowing this technique isn’t just beneficial for Illustrator usage. Drop shadows are present in just about every Adobe graphics program. Photoshop, for example, has a similar array of options when it comes to applying drop shadows to layers.
You can also find drop shadows in use with everything from the artwork within Adobe Animate to the text tool of Adobe Premiere. Understanding the drop shadow options and what creates great depth will carry into other areas. No matter the range of software you’re using, drop shadows are a critical component for any type of design.
Frequently Asked Questions
Adobe Illustrator can create logos, print graphics, and mockups. The program uses vector art and CMYK colors which are ideal for print and web images. This is due to Illustrator’s ability to create artwork with plenty of information, making your art easy to tweak when it comes to lines, shapes, text, and colors.
Adobe Illustrator costs a monthly fee to use. The cost is $20.99 a month to use Illustrator with an annual plan. You can, however, use Illustrator for free with the seven-day trial. That trial period will let you use Illustrator professionally without spending anything. You’ll have to pay for the subscription to keep using it after that period.
Photoshop and Illustrator are many different programs for how they work. Photoshop is best suited for editing photographs and creating detailed drawings. Illustrator is best suited for creating artwork specifically for printing and websites. This is due to these applications having different color sets. Photoshop is raster-based for creating detailed brushwork, while Illustrator is vector-based for more straightforward artwork but with more information for better editing.
Adobe Illustrator costs $20.99 a month to use with an annual plan. The cost covers updates and patches for the program as long as you keep paying the subscription cost. You can also acquire Illustrator by purchasing the complete Adobe Creative Cloud package for $52.99 a month. The plan includes Illustrator and Photoshop, InDesign, Animate, and many other applications.

Mark McPherson has been working as a video editor and content writer for over ten years. His background started in animation and video editing before shifting into the realm of web development. He also branched out into content writing for various online publications. Mark is an expert in video editing, content writing, and 2D/3D animation.