(Last updated on February 2nd, 2023)
Photoshop’s drawing tools are great but can be improved with the right brush. But your choice of brushes isn’t limited by what the program offers. In this article, we’ll explain how to add brushes in Photoshop to create more articulate strokes.
Photoshop Brushes
Choosing the right brush can be crucial to a Photoshop project. Even with pressure sensitivity with a tablet pen, there are many settings to consider to get the right brush. For example, a detailed oil painting can be accomplished but only with the proper settings.
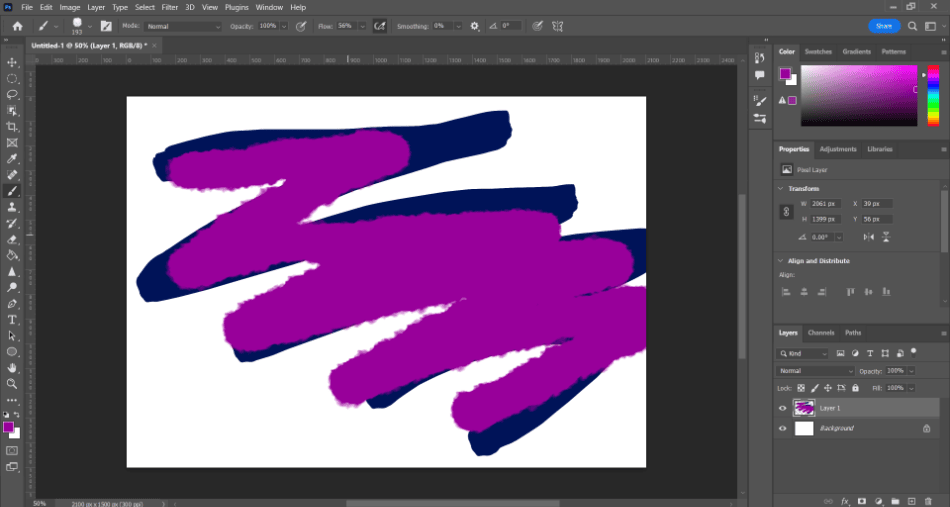
While Photoshop does have plenty of settings to play around with, it can be daunting when it comes to finding the right fit. Thankfully, you may not have to spend hours finding the right combination, as brush presets are available to download. You won’t even have to go far, as Adobe offers free brushes directly through their website.
How To Install Photoshop Brushes from Adobe
Custom Photoshop brushes from Adobe can be chosen and added directly with ease. While you have to open a browser to select new brushes from Adobe, you can start the process through Photoshop. Here’s the step-by-step guide for installation.
- With Photoshop open, navigate to Window > Brushes to open the Brushes panel.
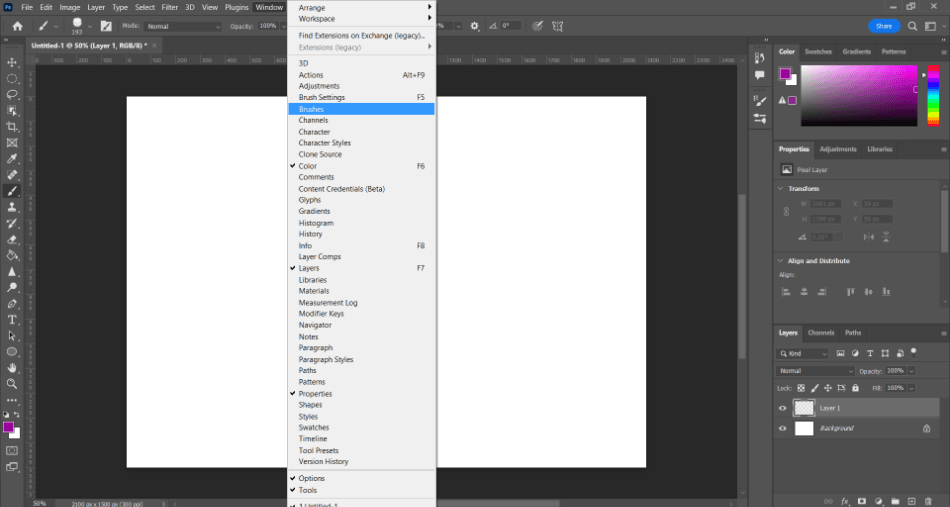
- In that panel with the Brushes tab open, click on the hamburger menu, and select Get More Brushes from there.
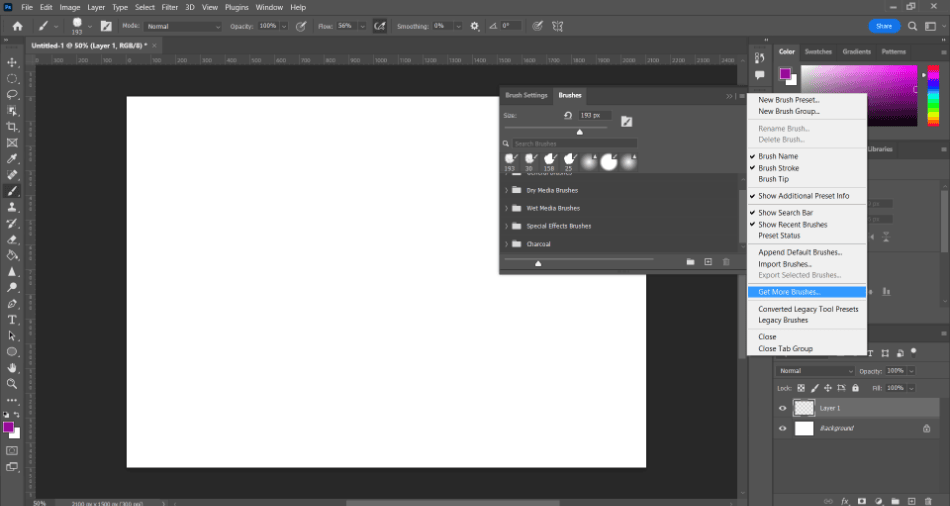
- After clicking Get More Brushes, a browser window should open. The browser page should direct you toward the Adobe website, where you can download brushes. If you’re not already logged into Adobe, do so. After logging in, you should see a variety of brushes listed on the page with options to download.
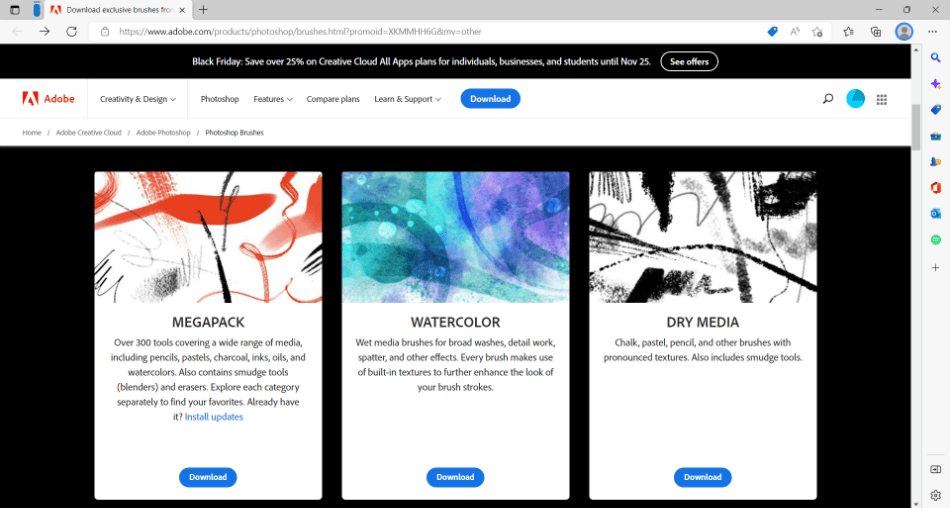
- Find the right brush you want through the Adobe website. Then click Download to start downloading the brush for Photoshop. Once you’ve clicked download, click Open File when prompted in your browser.
- After opening the file in your browser, you should be directed back to Photoshop. Look in your brush panel window and scroll down to see the brushes offered. The downloaded brush should be in that list, ready to select and use.
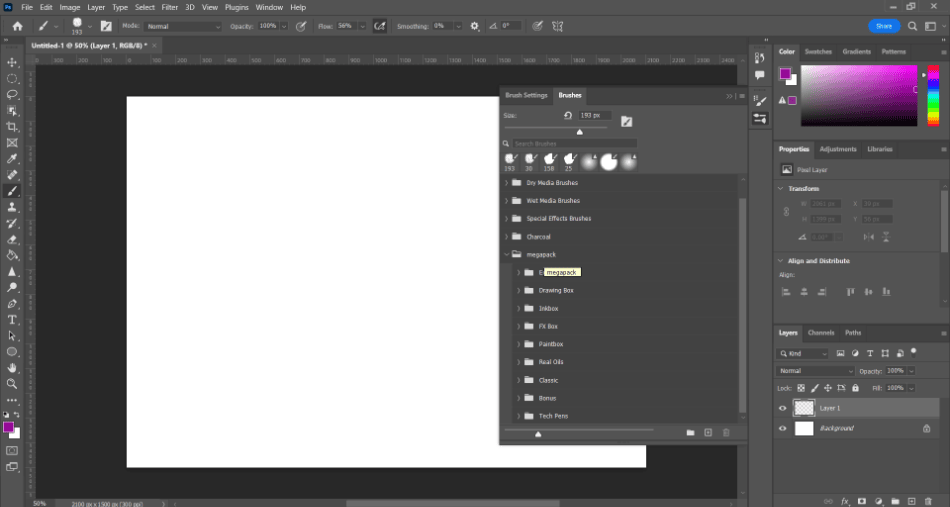
The brushes offered on the Adobe website constantly change, with new ones added every season. You can even take a look at older brushes from seasons past. Regarding the brushes offered, here’s a list of some of the best ones to consider.
- Megapack: This pack includes over 300 tools for replicating various media. The set has presets for pencils, pastels, charcoal, inks, oils, and watercolors. Different blending and erasing tools are also provided in this set.
- Watercolor: Watercolor paintings are much easier to produce with a tablet pen with this set of presets that can create various effects you’d only get with oil paints.
- Dry Media: Use this set if you want to duplicate the mediums of chalk, pastels, and pencils.
- Gouache: This throwback preset collection duplicates the look of classic Golden Books illustrations in the 1950s and 1960s.
- Splatter: This set comes with over 40 unique brushes designed to create more of a splatter effect when used on a Photoshop canvas.
- Charcoal: This preset creates a detailed texture effect to replicate the look of charcoal that you’d get from a chunk of charcoal or charcoal pencils.
- Runny Inkers: The small collection of Runny Inkers brushes creates a distinct and unpredictable look of blotty and dotty line work.
- Manga Brushes: This collection of brushes makes it easier to create artwork in the form of Japanese comic books.
- Halftones: An outstanding collection of over 100 brushes best suited for creating detailed patterns and screen tones.
How To Import Brushes
Adobe isn’t the only place you have to go for more Photoshop brushes. There are plenty of places online where developers have crafted their customized brushes. Here’s how to add photoshop brushes and install those third-party brushes.
- Open up the Brushes panel in Photoshop by navigating to Window > Brushes.
- In the Brushes panel, click the hamburger menu, but this time select Import Brushes.
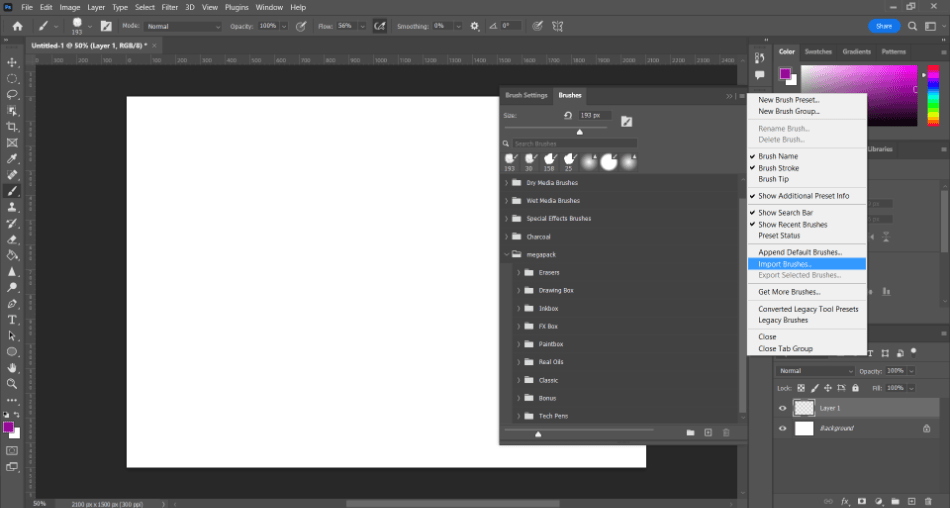
- Find the custom brush file you downloaded. It should be in the format known as an ABR brush pack. Once you’ve found it, click Open.
- The new brush should now be added to Photoshop under the listed brushes.
There are many brush sets to choose from, and it can become intimidating trying to find the right one. Here are third-party Photoshop brush sets that are worth downloading and How to add downloaded brushes to photoshop.
- KraftTone from True Grit Texture Supply ($39): Ever wanted to create a comic book that looks like it was from the golden or silver age? KraftTone has a variety of brushes to recreate that retro feel with nostalgic detail. The brushes replicate old comics’ bleeding color and screenprint paper texture.
- Perfect Oils by Creative Market ($12-$45): If you’re aiming to create artwork in Photoshop similar to oil paintings, Perfect Oils can make that happen. The pack comes with 24 brushes that duplicate the effects of oil and acrylic paint.
- Risograph Brush and Texture Kit by RetroSupply Co ($29): For those trying to create graphic designs that look like they were plucked right out of the 1970s, the Risograph brushes and textures can recreate that retro wonder. This perfect collection of presets can create a valuable nostalgic vibe for posters, comics, and more.
How To Create a Brush
If developers can create their brushes, making your customized brush might cross your mind. This can be handy if you ever need a specific type of brush you want to save for certain projects. Here’s how to go about saving your brush type in Photoshop.
- Open the Brush tool in Photoshop.
- Now navigate to the Brushes menu with Window > Brushes. When that panel opens, select the Brush Settings tab.
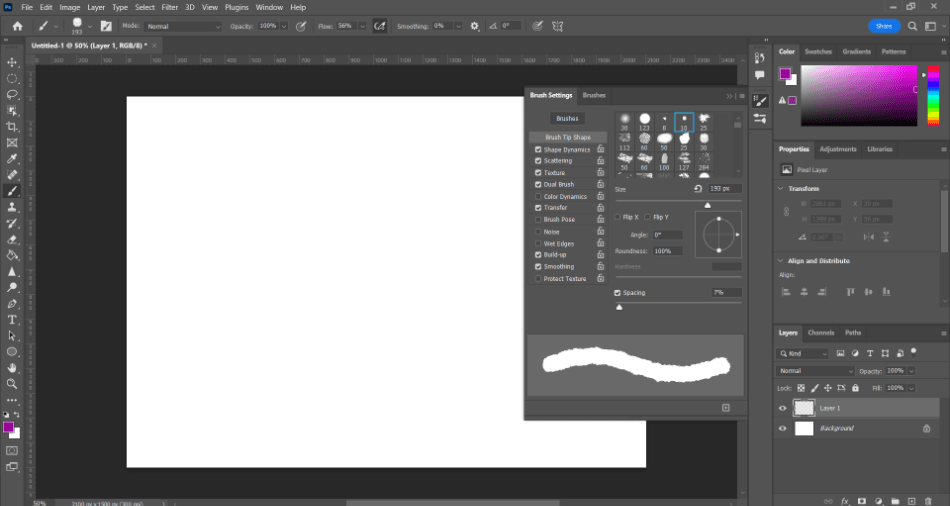
- From this panel, you’ll be able to customize better the type of brush you can use in Photoshop. Experiment with the settings to get the brush the way you like it.
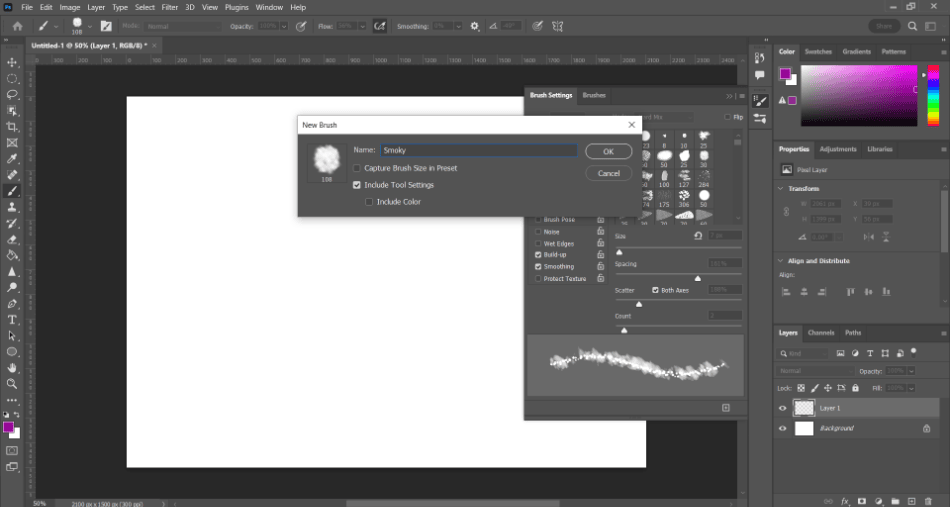
- Once you have a brush you’re happy with; it’s time to save it. Go to the hamburger menu in the panel and select New Brush Preset.
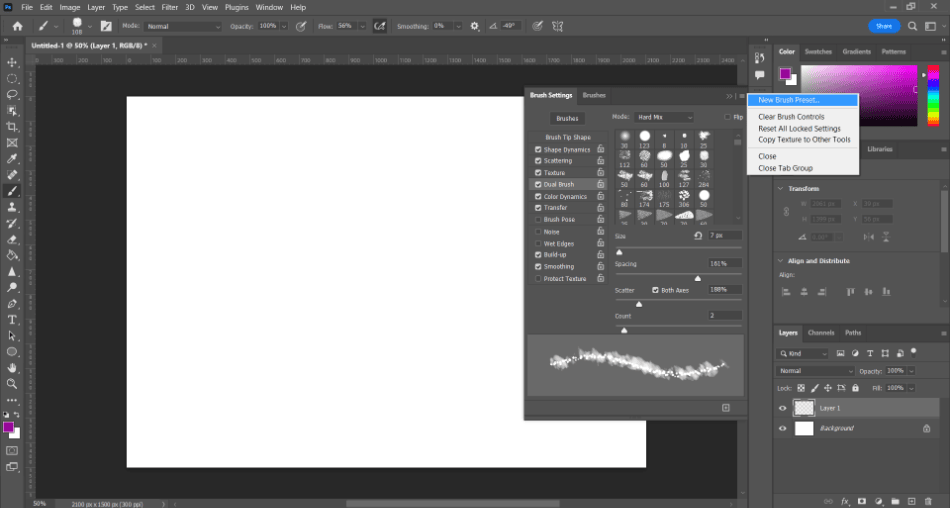
- You will then be asked to give your new brush a name. After typing in the title, click Ok to save the brush. The preset can now be selected from the Brushes tab.
There’s no limit on how many brushes presets you can save. Take advantage of this by crafting a series of brush types you’d most likely use. If you’re comfortable experimenting, you may not even have to install new brushes for your Photoshop projects.
Tips and Tricks
- Customize First: Before hunting for a brush outside of Photoshop, try creating it yourself. If you can figure out the brush settings, you can get away with simply saving a set of presets. This can be more useful as presets can be further customized.
- Determine Your Needs: Figuring out what type of project you’re working on ahead of time can better help you determine which brushes you need. From there, you can decide which brushes you’d be able to create in Photoshop and which ones you might need to download.
- Sync Your Brushes: Syncing your Photoshop brushes with the Adobe Creative Cloud will be helpful for users switching between different computers and mobile devices. If you sync, your brushes can quickly be loaded on all your desktop computers and mobile devices running Photoshop.
Frequently Asked Questions
Brushes can be added in Photoshop through the Brushes menu. The menu can be found in Window and then by selecting Brushes. After clicking on the hamburger-like menu, you can choose to either Get More Brushes which will direct you to Adobe’s brush portfolio, or Import Brushes if you have a set already downloaded.
If you download a brush directly onto your computer, you can load it by navigating to Window > Brushes, opening the hamburger menu, and selecting Import Brushes. This will let you choose your downloaded brushes from a file explorer and install them in Photoshop.
Adobe supplies Photoshop brushes that can be downloaded off their website. You can also search online for Photoshop brushes and kits that can be downloaded and imported into the program.
All brush information for Photoshop is stored in the Brushes panel, found in Window > Brushes. From that panel, you can select the various loaded brush presets and customize brushes through the Brush Settings tab of the panel.
If you can’t use a brush in Photoshop, you may have a layer locked, or the brush might not have the correct settings. Double-check that the layer can be altered with brushes and that your brush has no issues with clashing colors or low opacity.

Mark McPherson has been working as a video editor and content writer for over ten years. His background started in animation and video editing before shifting into the realm of web development. He also branched out into content writing for various online publications. Mark is an expert in video editing, content writing, and 2D/3D animation.
