(Last updated on January 9th, 2023)
Photoshop can be used to change the color of just about any photo. If you haven’t figured out how to do this, you’ll want to know this handy technique. This color change tutorial will be a real-time-saver.
Photoshop just keeps getting easier with its ability to manipulate images. The addition of Adobe Sensei has only the more elaborate edits go much faster. This advanced tech is just as helpful in swapping colors as it is changing the expression of faces.
Changing colors is one of the core aspects worth learning about Photoshop. It’s also a technique worth keeping updated on, considering all the improvements. You may have some familiarity with the process in the past, but there’s a better way with new tools to use.
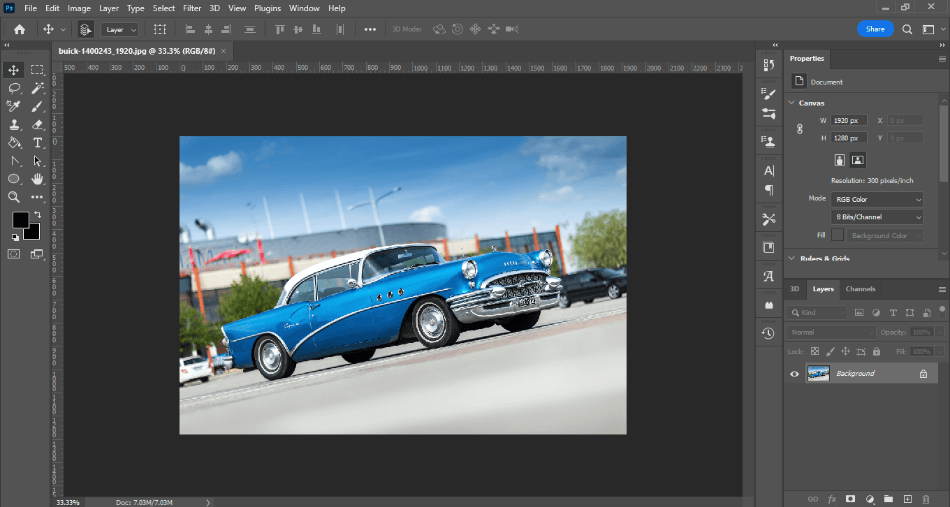
For this tutorial, we’ll be changing the color of a car. Let’s say we don’t like the teal color of this car and want to change it to red. We don’t have to paint each spec of red painstakingly or work tirelessly with rotoscoping the areas we want to be colored.
You might’ve had to use these methods in the past. However, the latest version of Photoshop has made changing an object’s color much more manageable. What was once a complex Photoshop process is now just a few quick steps.
This tutorial will explain how to make color changes with little effort. We’ll run through the process that involves new selection tools, familiar layers, blending modes, and level adjustments. It’s a surprisingly quick process that shouldn’t take longer than a minute or two.
1. Object Selection
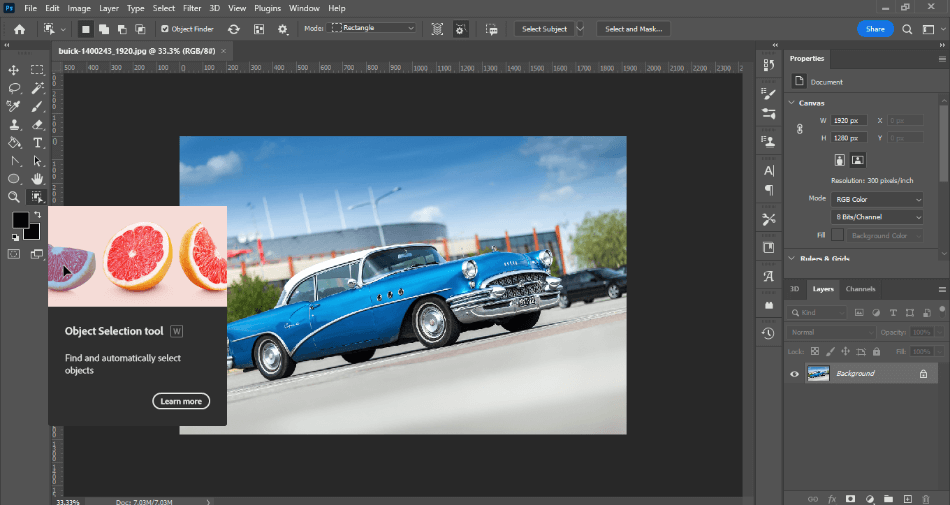
The first step is to isolate the part of the image where we’ll change the color. This will make it easier to change colors without affecting other areas. We’ll use either the Object or Quick Selection tool for this job.
If the area we want to change the color of is simple, we will use Quick Selection. This allows us to drag over an area to be selected quickly. You can use the alt button to drag and remove portions as well.
The other method is to use Object Selection. This is a new tool for Photoshop 2023 that uses smart technology to make an educated guess on the object to select. The tool is powerful enough to isolate a person or thing in the foreground.

Since the image we’ll be editing has a few more curves and details, we’ll use the Object Selection tool. Click on it in the toolbar and then hover over the subject we’ll change the color for. Click on the object, and you’ll have the car thoroughly selected within moments.
This process may take longer if you’re running Photoshop on an older computer. The Object Selection tool uses Adobe Sensei technology to accomplish this process. That kind of tech can be quite taxing on a computer with low memory.
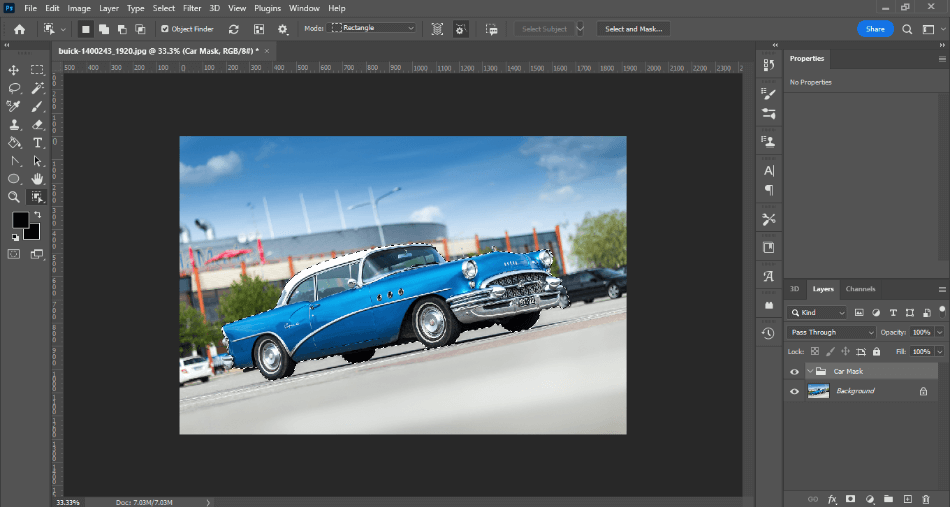
Once the selection finishes, notice how the entire area around the car is covered without any part of the background. Now that we’ve separated our vehicle, we can start building the grouping and layers to house it. This will make it easy for edits we can only make to selections within layers.
2. Creating a Group
With our object selected for color correction, we can now create a layer for it. In the Layers window, click the Create New Group button. This will be the group where we’ll keep everything organized for our car area.
Having this group is handy to keep your layers separated. For the future, you can quickly turn our entire color change off and on for comparisons. A group layer is also essential if you’re making multiple color changes.
You can name this group whatever you wish, but we’ll be naming this Car Mask. There isn’t anything in this group yet. The next step will be to fill it with a layer mask.
3. Adding a Layer Mask
We can turn the selection into a mask with the group folder still selected in the layer window. Next to the same buttons for creating a group layer, you’ll find the Add Layer Mask button. It will look like a rectangle with a hole in the middle.

Click the button to add a layer mask. You’ll notice that your group now houses your selection as a mask layer. The icon should have a small picture of the selected car in black against a white background.
With this mask created, our car is officially separated from the background. We can now do all sorts of things with it. For our purposes, we’ll next be adding the new color.
Read more:
4. Solid Color Fill Layer
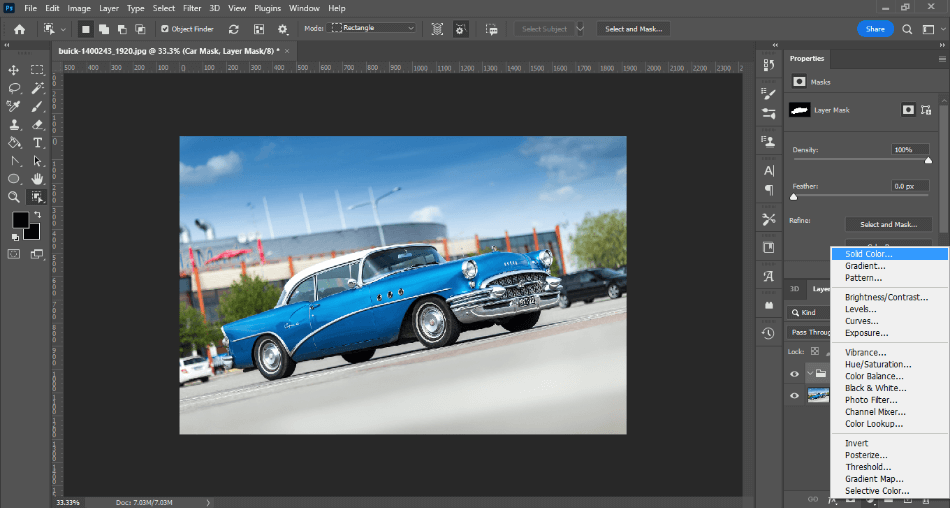
The first thing we’ll do with the new color is add a fill layer. We will add a solid color fill layer, so we don’t have to paint the entire image. You can manually paint the color you want to add, but this is faster if you want to cover a more extensive area.
In the same area of the layers window where we used the other tools, find the Create New Fill or Adjustment Layer button. Click it, and you’ll get a submenu of which type of layer to create. We will select Solid Color for our purposes.
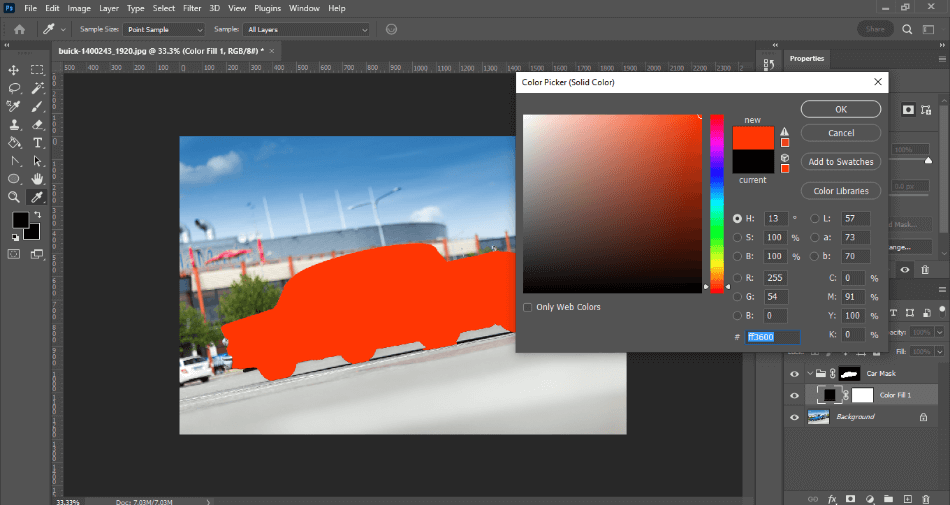
We should now have a new layer that is all one color we can select. You’ll see how it looks in the image as the car is entirely red. We’ve splashed a paint bucket all over our mask, turning our vehicle into a colorful silhouette.
So this looks okay if we make a cutout of the car all in one color. We don’t have any of the detail, though. To make the color more convincing, we’ll have to blend it with the rest of the image.
5. Color Fill Layer Blending Mode
Now comes the magical moment of making that color fit the car better. Select the color fill layer you just created. Now navigate to the dropdown menu in the layers panel for blending options.
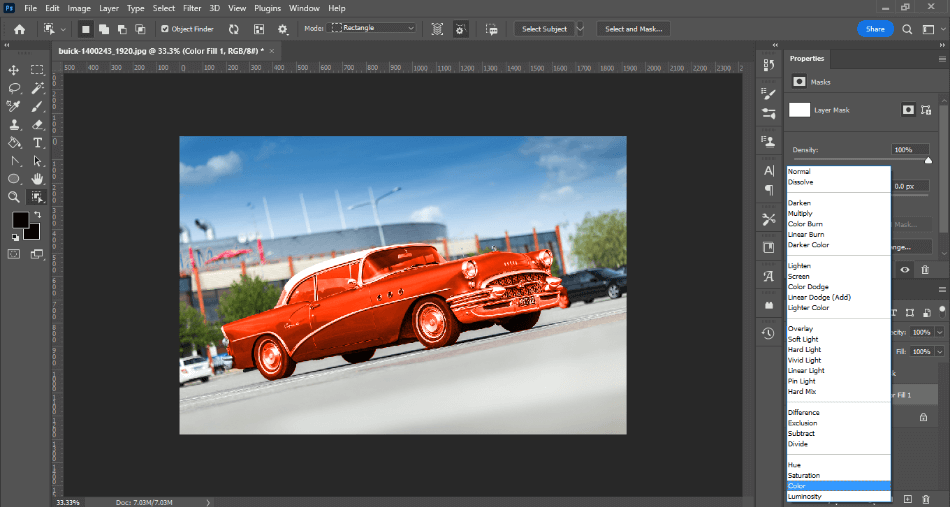
There is a variety of blending options to choose from to make the fill color blend in with the car. To focus on the color specifically, we’ll select the Color option. This will force the color we created to be applied to the car mask without losing much detail.
The car will now look like the color has changed from teal to red. You can simply change the color fill layer if it looks too red. If you want the red less pronounced, you can change the blending strength or layer opacity.
Now the car looks pretty good in its new red color. That said, it could still use more detail to shine through the color addition. Let’s make some minor adjustments to make the transition look more smooth.
6. Levels Adjustment Layer
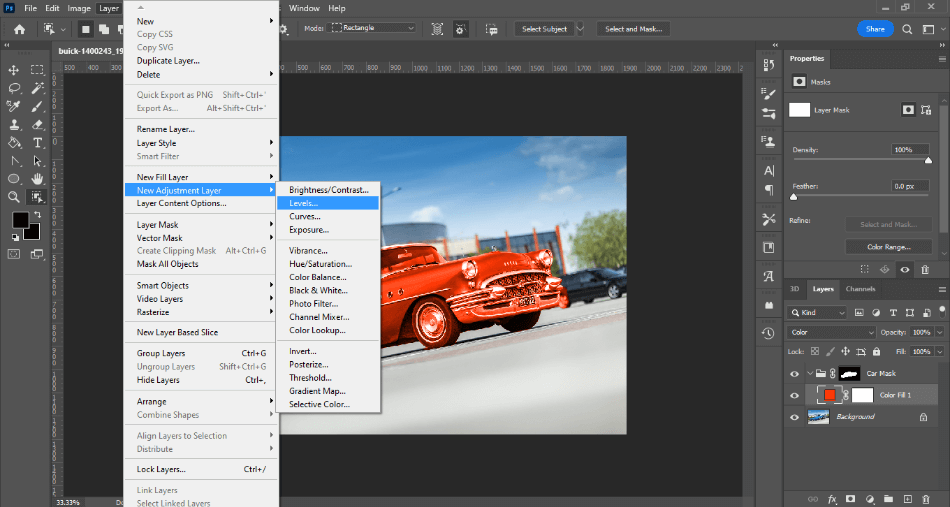
An adjustment layer will help us bring out more of the detail of the car. Find the Create New Adjustment Layer in the layers panel and click on it to open the submenu. Select Levels from the list.
We now have a Levels layer for our group. You’ll see in the panel above our layers window that we have some options for tweaking the levels. There will be about five sliders to play with that can change everything from the strength of the color to the brightness.
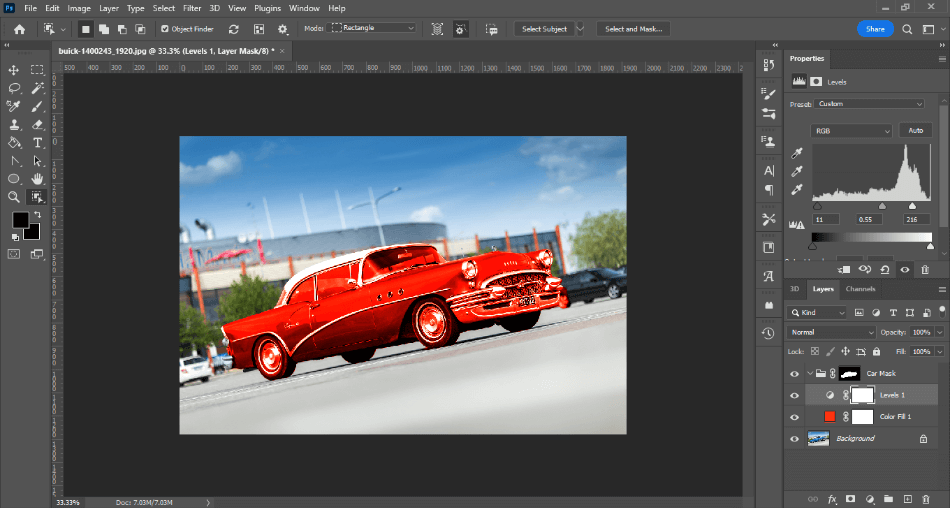
Play around with these sliders until the car looks just right. In this example, the contrast and brightness have been adjusted. This makes the car look a little bolder, and darker areas have less of that red and more black.
Now that we have a group layer with the mask, color, and levels layers, our edits are neatly organized. We can turn it on and off to see our progress. We can also tweak any aspect at any time or remove a particular layer if we want to try something different.
Quick Action Steps:
- Choose the Object Selection Tool from the toolbar.
- Click on the object you want to change the color for.
- Create a new layer group for the object selection.
- Click the Add Layer Mask button to add a mask layer for your selection.
- Click Create New Fill or Adjustment Layer and then select Solid Color.
- Choose the color you want for the selected object.
- Select the blend mode for this layer as Color.
- Add a Levels adjustment layer to fine-tune the details.
Experiment With It
With this knowledge, you can try various experiments with changing colors. Another example could be the absence of color. Let’s say we want to make this car seem more classic and appear in black-and-white against its colorful background.
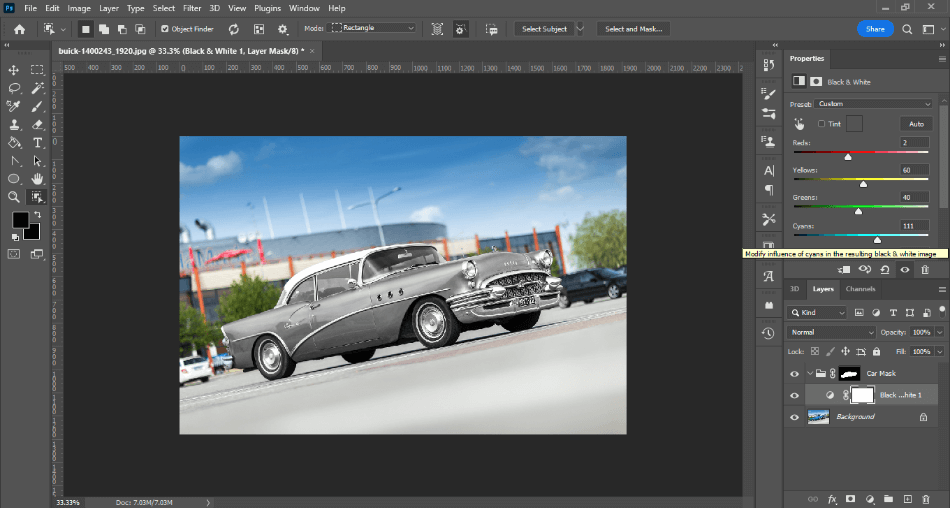
In this example, we’ve gone through the same process but swapped the Solid Colid fill layer for a Black and White fill layer. So instead of adding color, we’ll now make our car look like it drove right out of an old movie. The same blending mode and levels layers can still be applied.
The critical thing to keep in mind is your options for how to fill the mask. Look over all the options for the most effortless fit. While it is possible to get that black-and-white effect with a color fill layer and play around with blending modes, it’s easier to use the Black and White fill layer.
The possibilities are endless with this technique. It’s not just color that can change on an object but also the brightness and texture. You can even invert the mask to only change the color of the background.
With this speedy and organized method, making color changes can be a breeze. Clients who can’t decide on the best color will become much less annoying to deal with. This is thanks to the aid of the Object Selection Tool and the organization of Mask and Fill layers.
Frequently Asked Questions
You can change colors in Photoshop with Mask, Fill, and Adjustment Layers. That’s only one way to change colors in Photoshop, though. Other methods include using fill tools, paintbrushes, and filters. It all depends on the image you’re editing and how you want to change a particular color.
The most straightforward method for changing color is to select the area and create a layer mask. You can use the color replacement tool if you wish, but it requires duplicating the image. Creating a layer mask will keep your color changing more organized, making it the easiest choice.
The best way to recolor an image is to section it off with either the Object Selection Tool or Quick Selection Tool. You can then add a mask, a color fill layer, and blend it with the Color blending mode. There are a number of ways to change color in Photoshop, but this is one of the more efficient.
Yes, there is a tool in the toolbar explicitly designed for changing colors. It’s called the color replacement tool and works similarly to the cloning tool. It recognizes a specific color and lets you brush in the color you want to swap. It’s not ideal for organizational purposes, so you’ll have to duplicate the layer if you use this tool.
With your layer selected, create a Solid Color fill layer. Choose the color you want to add to the image. Then select the blending option for the layer as Color. You should now see your new color applied to that layer.
Photoshop supports both RGB and CMYK color types. You will have to choose which format you want to work in by selecting the image mode. Navigate to Image > Mode to find your options for choosing the color format you want to use in your Photoshop file.

Mark McPherson has been working as a video editor and content writer for over ten years. His background started in animation and video editing before shifting into the realm of web development. He also branched out into content writing for various online publications. Mark is an expert in video editing, content writing, and 2D/3D animation.