(Last updated on March 16th, 2023)
Can drawings in Procreate have opacity? The short answer is yes, but the long answer is that there are a few methods to consider. I will cover how to change the opacity in Procreate with just a few easy steps.
- Opacity in Procreate
- The Finger Technique For Opacity
- The Layer Settings Technique For Opacity
- The Multiple Layer Technique For Opacity
- Change the Opacity of Individual Procreate Elements
- Change the Opacity of the Entire Procreate Canvas
- Changing Opacity in Procreate Pocket
- Tips & Tricks
- Frequently Asked Questions
Opacity in Procreate
The opacity settings in Procreate used to be easily found in the Adjustments menu. This has changed since version 5 with a much different method depending on your device. There are ways to change the opacity of multiple layers and individual objects.
In this article, I’ll review a few ways to change opacity in Procreate. This includes the version of Procreate for iPads and Procreate Pocket for iPhones. Knowing these techniques can save you a lot of time in bringing opacity to your drawings.
The Finger Technique For Opacity
One of the fastest ways to alter the opacity in Procreate is using the finger gestures method. Here’s how easy it is to use this technique to change the opacity.
1. In your Procreate project, open the Layers panel and locate the layer you want to add opacity towards.
2. Take two fingers and double-tap on that layer. Doing so will open up the opacity slider.
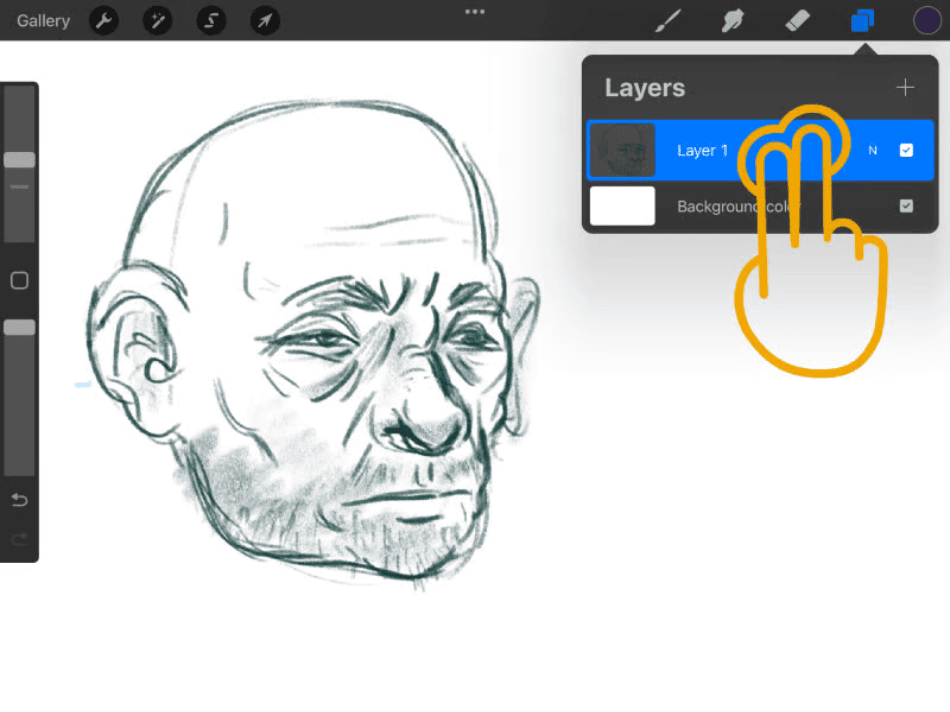
3. Look at the top of the interface and see a blue slider for the opacity. Slide it to the right to increase the opacity or to the left to make it more transparent.
And that’s all there is to it. With simple taps and swipes, you can quickly apply transparency to your layers within a few seconds. Use this for when you’re drawing and time is of the essence.
The Layer Settings Technique For Opacity
Your layers’ opacity settings can also be found in the layer settings. Here’s how to change opacity using the layer settings.
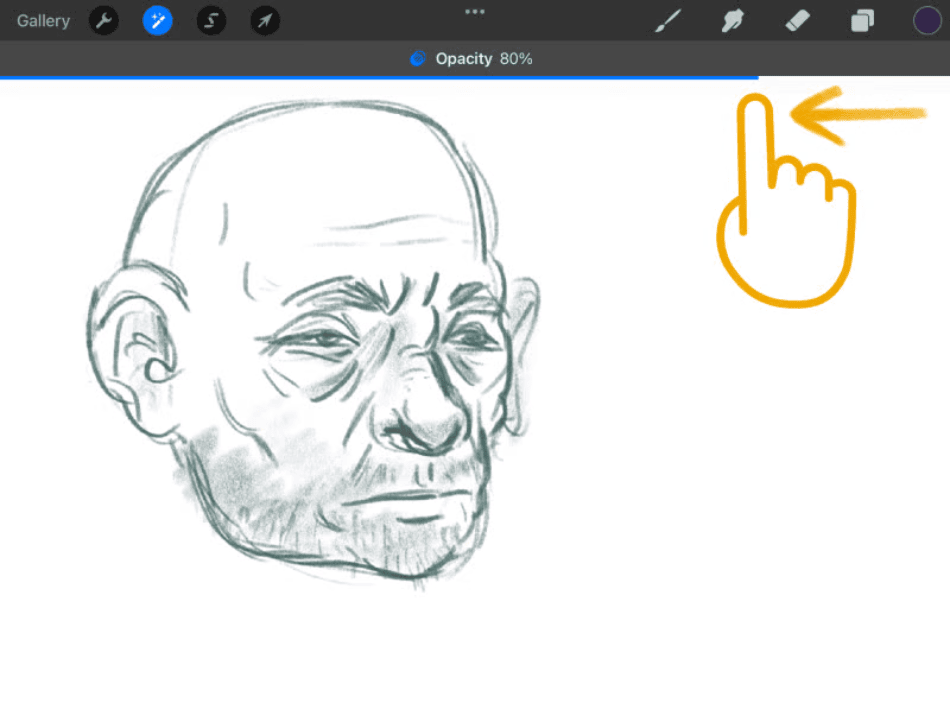
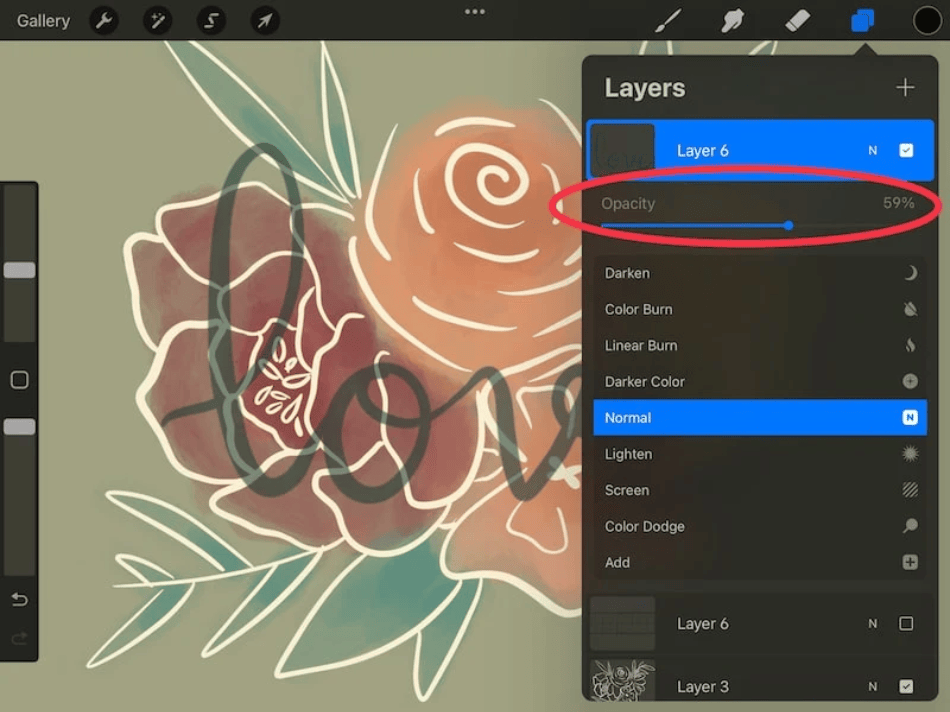
1. Locate the layer in the Layers panel where you want to alter the opacity.
2. You should see an N next to that layer’s name. The N stands for Normal, which refers to the current blend mode. Tap the N.
3. After tapping the N, the layer settings should pop below the layer. You should see Opacity with a slider at the top of the list of settings to change. Move the slider with your finger to change the opacity.
At this stage, you can also add some fill color in a layer.
The Multiple Layer Technique For Opacity
If you want to change the opacity for multiple layers, it can be cumbersome to perform one of the previous two techniques repeatedly. The bad news is that Procreate doesn’t have a simple solution for changing opacity on several layers. The good news is that there’s a workaround for this problem.
The best way to change the opacity of multiple layers is to merge them. Here’s how to do just that:
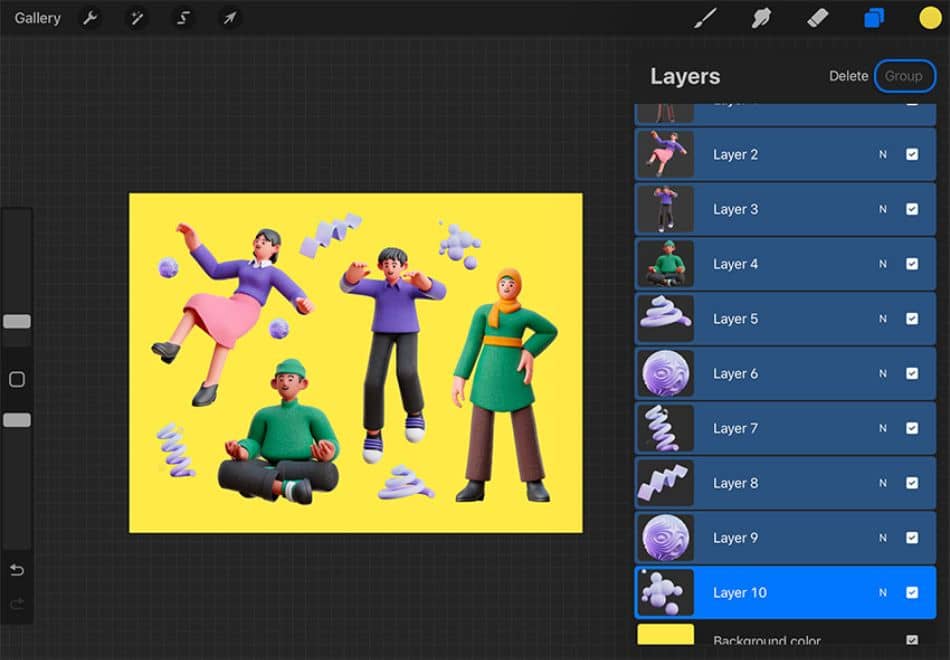
1. Open the Layers panel and locate all the layers you want to merge.
2. Select the top layer by swiping to the right. It should be highlighted in blue. Continue swiping for all layers you want to merge for the opacity change. The other layers should be selected.
3. With your layers all selected, look at the top right of the Layers panel, and you should see a button that says Group. Touch on this button to create a group of your selected layers together.
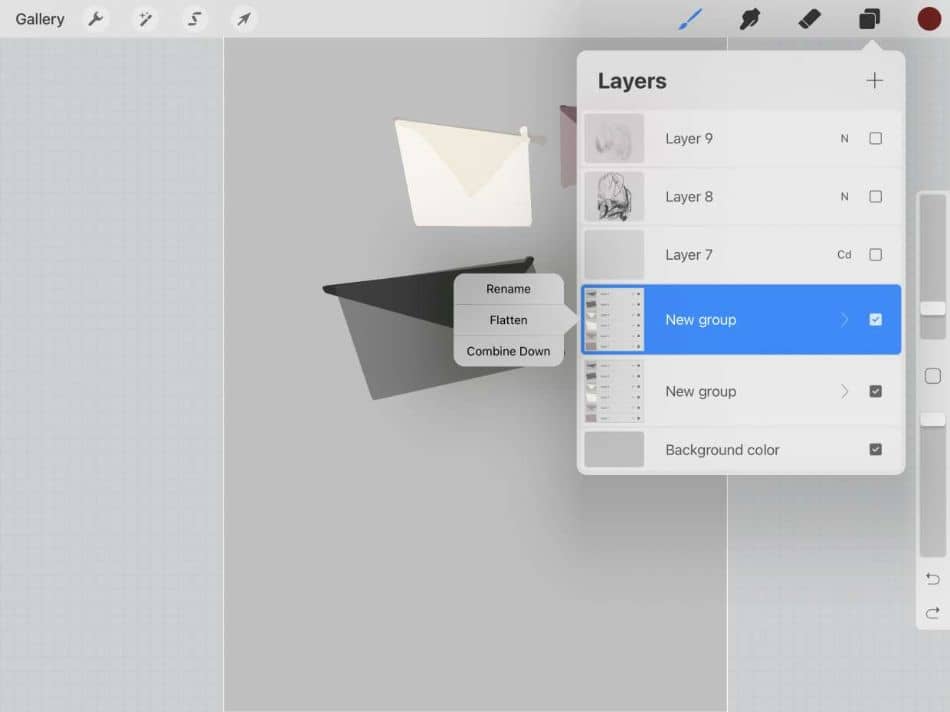
4. As a safety, it’s best to duplicate the group you just created so you have a saved version before merging. This duplicate can make it easy to go back and make changes if needed. You can tap the New Group button with your current group selected.
5. When you’re ready to merge the layer group, select it and tap the Flatten option. This will automatically merge the layer group into one layer.
6. With your layers now merged into one, you can apply the opacity to it by using either the finger method or layer settings.
There are limitations to this process, as it means you can’t make any changes to the individual layers once they’re merged.
Only go with this process if you’re sure you don’t need to make any changes to each layer and only need to change their opacity. If you’re additionally trying to mirror layers, there are simple tricks for that too.
Change the Opacity of Individual Procreate Elements
While changing the opacity of a layer can be easy, you may modify the opacity of one part of a layer.
The best way to do this is to isolate the portion to which you want to add transparency into a separate layer. Here’s how to make a layer for a particular selection in Procreate.
1. The first thing I need to do is select the portion of the layer I want to isolate. Start by selecting the layer from the Layers panel.
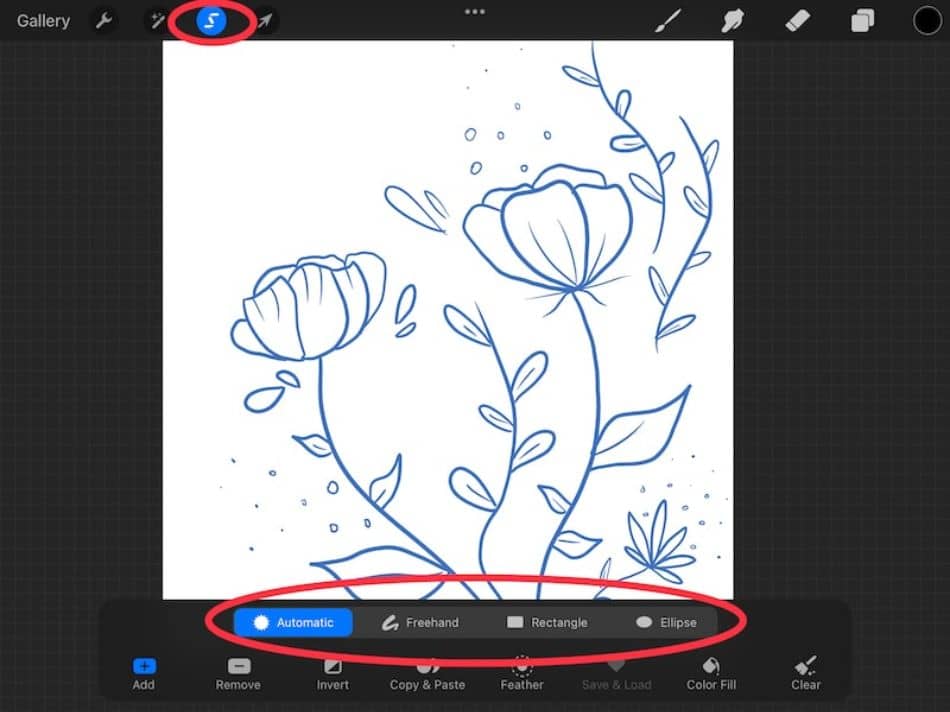
2. Find the S icon in the top-left part of the interface. Tapping this will bring up the Selection menu at the bottom of the screen.
3. In the Selection menu, you have two options to choose from when isolating a portion of the layer. Here are your options:
Automatic
This tool best suits specific elements of the background you want to isolate. The tool will automatically find and detect what areas to separate based on what part you click on the canvas. Use this tool for one-color or straightforward elements that can be easily selected.
Freehand
If the element you’re trying to isolate is too detailed, or you want complete control over what you select, the Freehand tool will give you the most control. This tool allows you to draw around the area you wish to isolate.
4. After you’ve selected the area you want isolated for opacity, it’s time to place it in a new layer. Tap the Copy and Paste button to automatically send your selection to a new layer.
5. Select the new layer created from your paste and change the opacity. Only that area of your canvas will now be altered for opacity.
Change the Opacity of the Entire Procreate Canvas
Let’s say you have a project where you want to change the opacity of everything on the canvas. Unfortunately, there is no way to do this with a simple technique. For changing the opacity on everything, you’ll need to repeat the merged-layer method but use it with every layer.
It’s important to note once more that this process should be one of your later choices in the design process. Only use this method if you are close to the end of a project and don’t need to make additional edits to individual layers.
Changing Opacity in Procreate Pocket
So far, I’ve mentioned all the opacity techniques for Procreate on the iPad. The iPhone version of Procreate, known as Procreate Pocket, has a much different way of adding opacity. Here’s how to add opacity to your Procreate projects on the iPad.
1. Select the layer you want to add opacity for.
2. Find the Modify tool (a magic wand) in the interface’s top menu. This will open the Adjustments window.
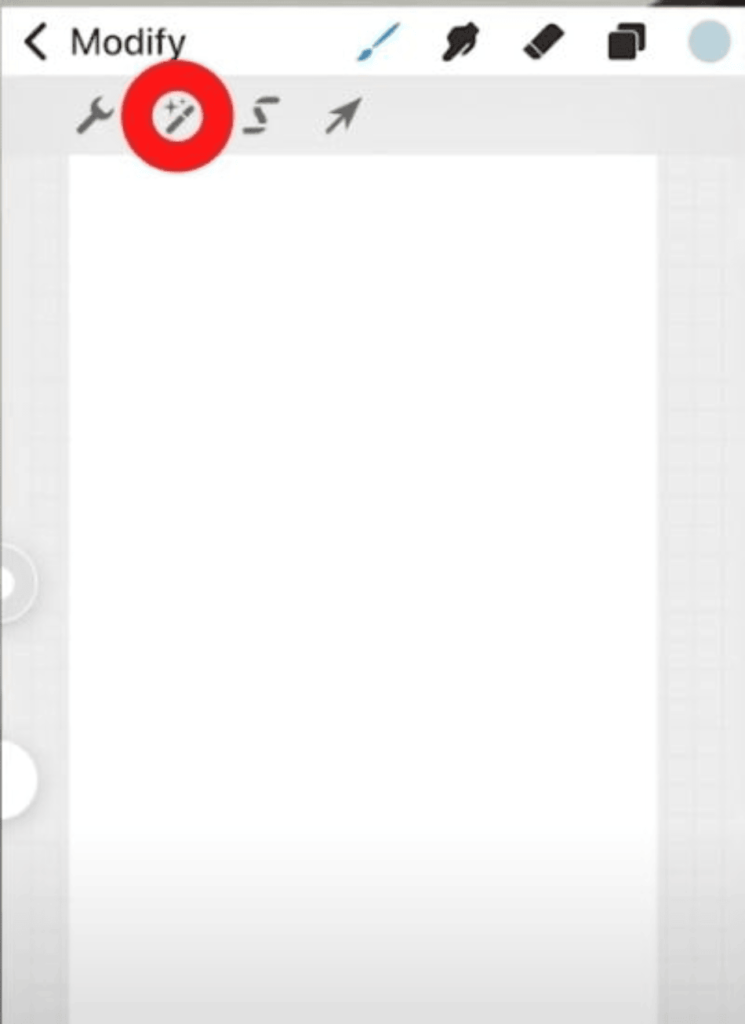
3. In the Adjustments window, find the Opacity option at the top of the list and tap it to open the opacity slider.
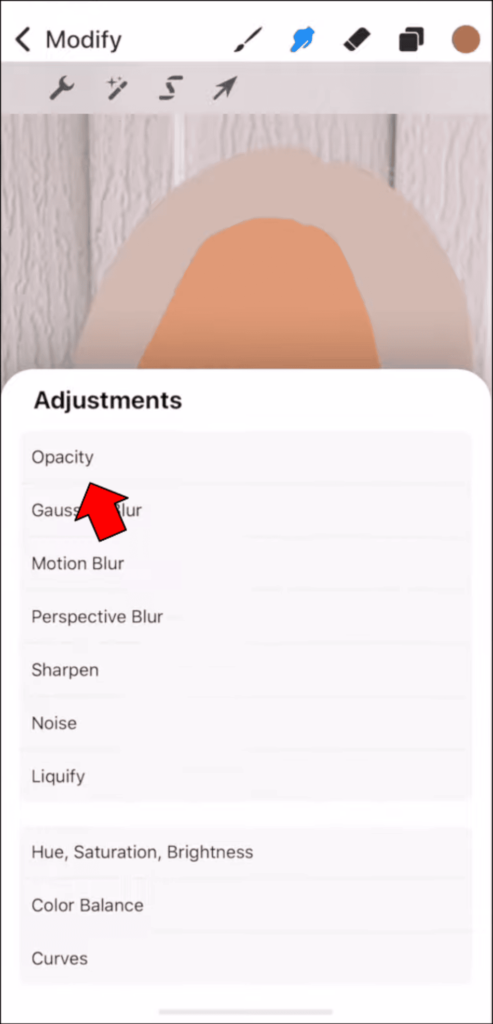
4. The opacity slider should now appear as a blue slider at the screen’s top. Move it around to change the opacity.
Tips & Tricks
Consider the Project
It’s always important to know what type of project you add opacity to. If you need a blank background around your subject, ensure the background layer is 100% transparent. If you want a little bit of bleedthrough for a layered project, experiment by having a colored layer below to see how the transparency will look against different backgrounds.
Think Before You Merge
While merging layers can make opacity changes easy for those layers, you always want to be sure you don’t need to make additional edits to each layer.
Duplicate
Never be afraid to create a copy if you’re not sure about the edits you’re making to your layers. Having backup layers can save you a lot of time if you make a mistake and need to return to a previous state. It can also be handy for experimenting with different types of layer altercations.
Frequently Asked Questions
A: If you’re using Procreate on an iPad, you can find the opacity tools in the layer settings. If you’re using Procreate on an iPhone, you can find the opacity settings in the Adjustment menu by tapping the Modify button.
A: The opacity of an image in Procreate can be lowered using two different methods. You can use the two-finger technique of tapping on the layer with two fingers to open the opacity slider at the top of the screen. Additionally, you can simply select the opacity option from the layer settings.
A: Tap two fingers on a Procreate layer to open the opacity slider. Drag the slider left or right to change the opacity levels of the layer. If you’re using Procreate Pocket on the iPhone, the opacity can be changed by finding the slider in the Adjustment menu.
A: The opacity function in Procreate allows you to create transparency on different layers. When using the opacity slider, you can make that layer see-through. The function works only with layers, so you’ll need to isolate Procreate elements into separate layers if you want to change opacity for certain parts.
A: No, it’s still possible to add opacity edits in Procreate. The function has been moved since version 5 from the Adjustments menu to the layer settings. It’s also faster to enable opacity by tapping two fingers on the layer to instantly bring up the opacity slider.

Mark McPherson has been working as a video editor and content writer for over ten years. His background started in animation and video editing before shifting into the realm of web development. He also branched out into content writing for various online publications. Mark is an expert in video editing, content writing, and 2D/3D animation.