(Last updated on January 9th, 2023)
Photoshop is capable of more than just photo manipulation. You can also use the program to remove someone from a background and place them in different settings. We’ll go over everything you need to know about cutting out images in Photoshop with a few handy methods.

Using The Cut-Out Tools of Photoshop
Photoshop’s tools for manipulating your photos have taken much of the extra work out of postproduction. Cutting out the subject of an image used to be an intricate project which required much time and patience. As the program updated, so did the tools, which made such processes more manageable.
There are now multiple ways to cut out the subject of an image. You no longer have to rely on a small assortment of selection tools as you did in the past, many of which required a steady hand for essentially rotoscoping areas. Below are a few methods for quickly cutting out portions of a photo.
Subject Selection
The Subject Selection tool is one of the fastest tools for cutting out images. It’s a smart tool designed for automatically detecting the subject of your photos. If the area you want to be isolated seems vibrantly apparent, this may be the best option for making fast and accurate cutting in your image.
Here’s how to use the Subject Selection tool:
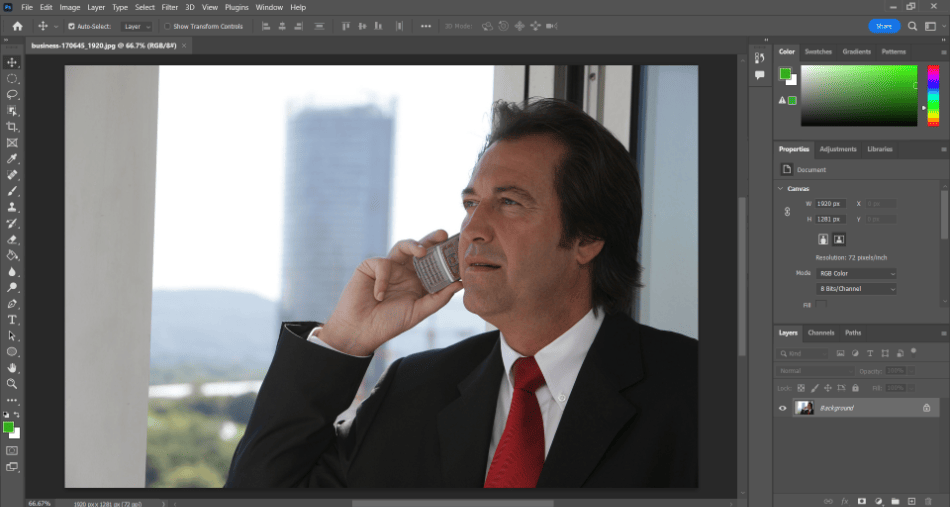
- Once you’ve opened an image in Photoshop, navigate to Select > Subject. After you click this, wait for Photoshop to finish processing the request to find the subject.
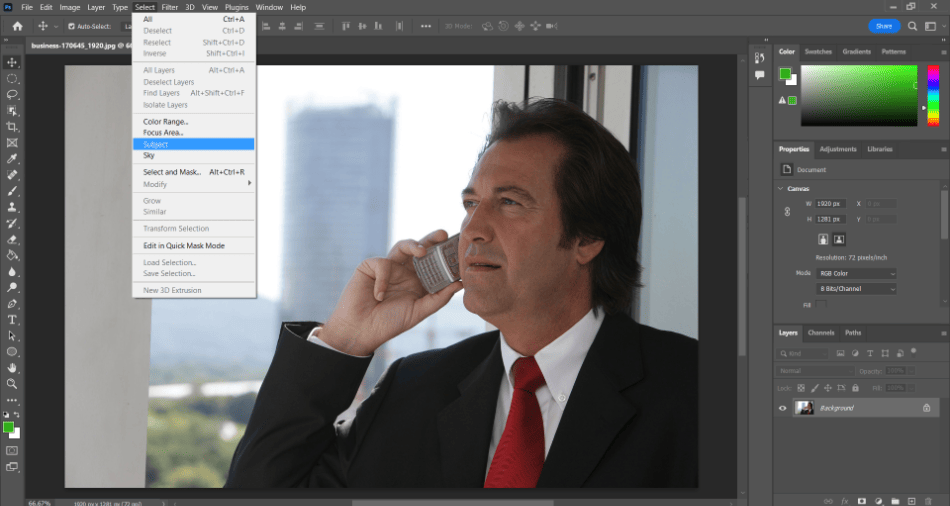
- After some time, Photoshop should be able to find the subject if it’s decently separated from the background. The tool might not have covered the entire area. If it doesn’t, use the Lasso Tool or the Quick Selection Tool to trim the unwanted areas.
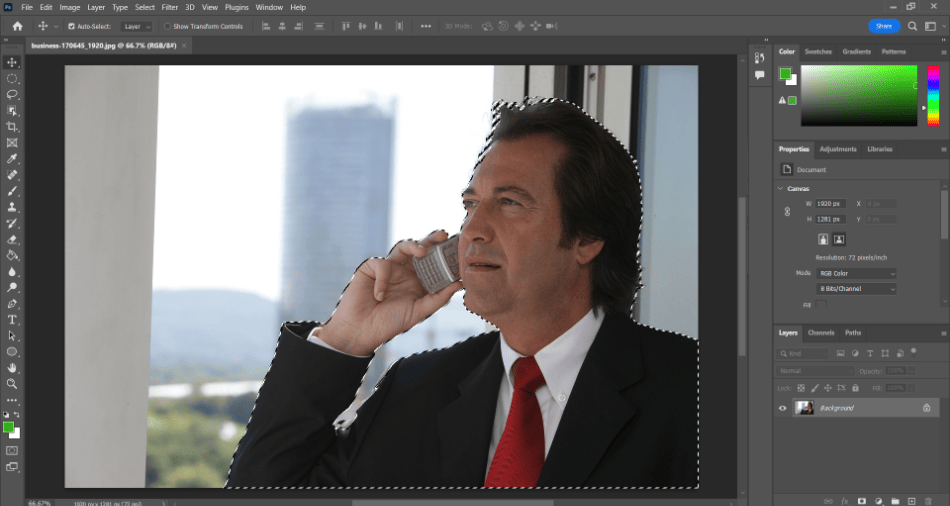
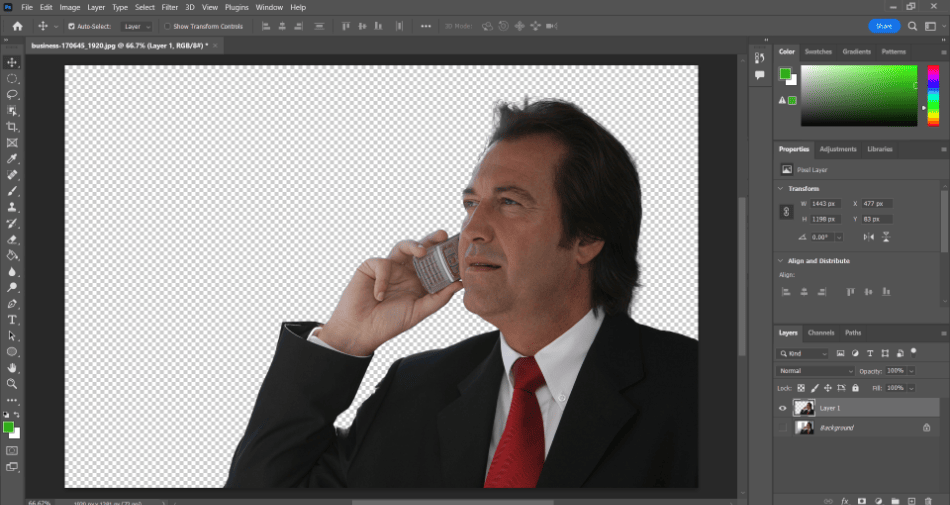
- Now that your subject is cut out, you can place it on a new layer—Press Control+C to copy the subject. Then create a new layer and paste it in there using Control+P. Delete the old layer, and you should have your subject isolated on its layer.
Rectangular/Elliptical Marquee Tool
Sometimes the best ways are the classics. If you’re aiming to cut out more of a portion than a specific subject’s shape, using a shape marquee tool can achieve this aspect with ease. This is useful for creating buttons or social media avatars.
We’ll go over how to use it to snip out your subject with this cookie-cutter method.
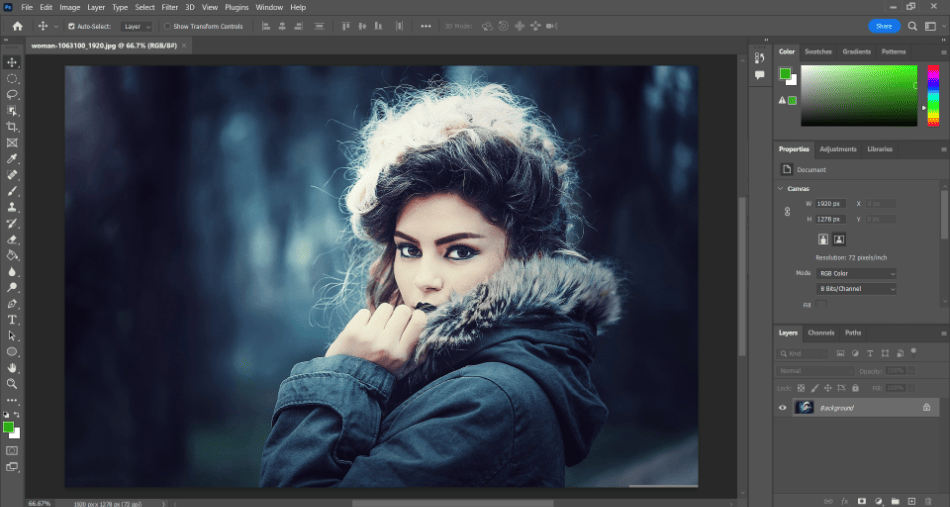
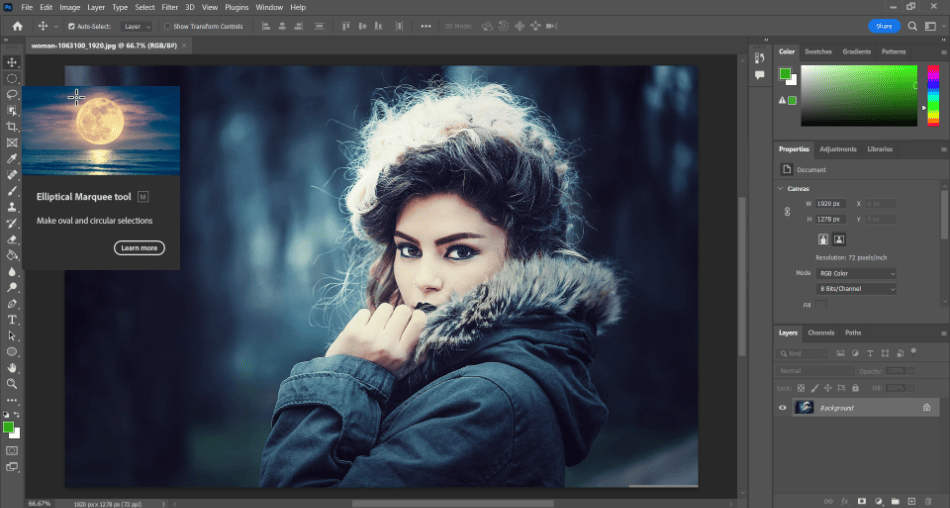
- For this tutorial, we’ll use the Elliptical marquee tool to cut out a circle of our subject. You’ll find the tool over in your toolbar, looking like a dotted line.
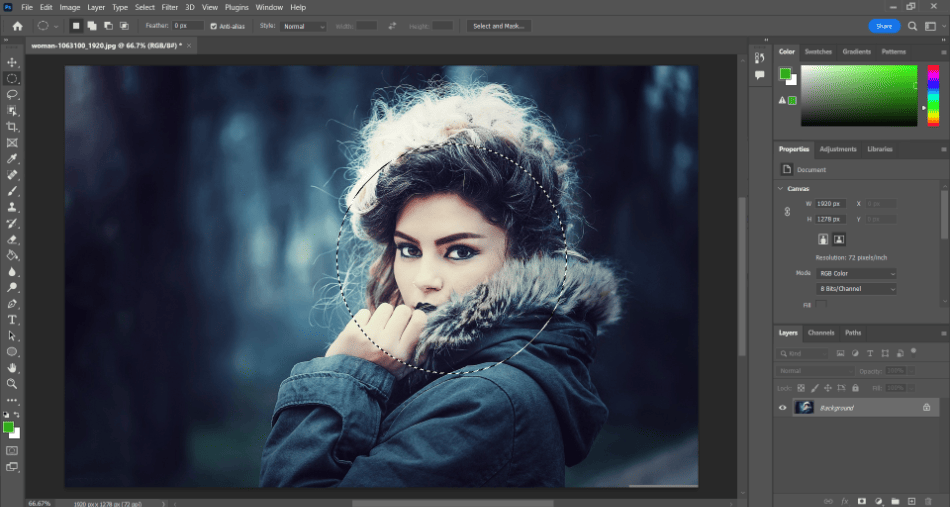
- Click and drag the tool around the subject you want to be sectioned off.
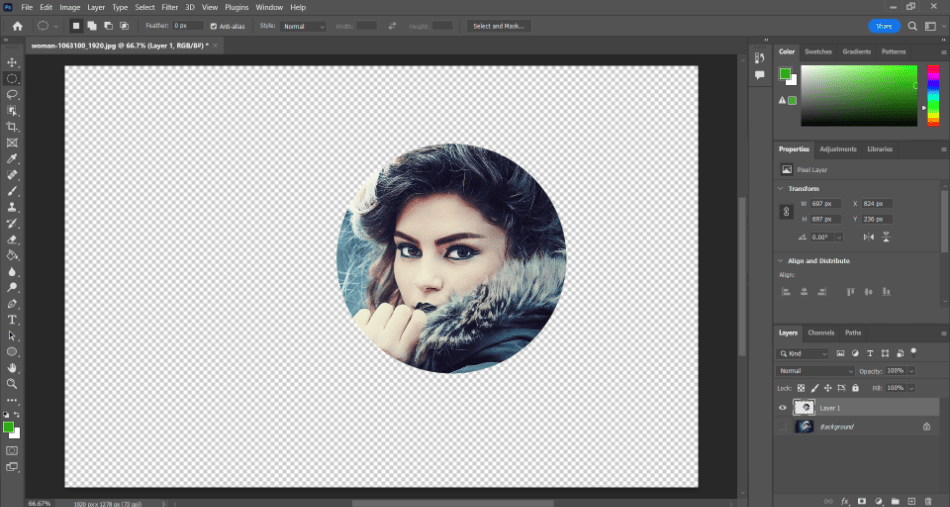
- Now you’ll create a new layer for your circled subject. Navigate to Layer > New Layer > Layer via Cut/Copy. This will create a new layer with your cut-out image.
Lasso Tool
The Lasso tool is one of the more traditional ways to select a subject’s whole area. If you want total control of your subject and don’t mind drawing around the area, this method works well for simple subjects.
Here’s how to use the Lasso tool for a cut-out job:
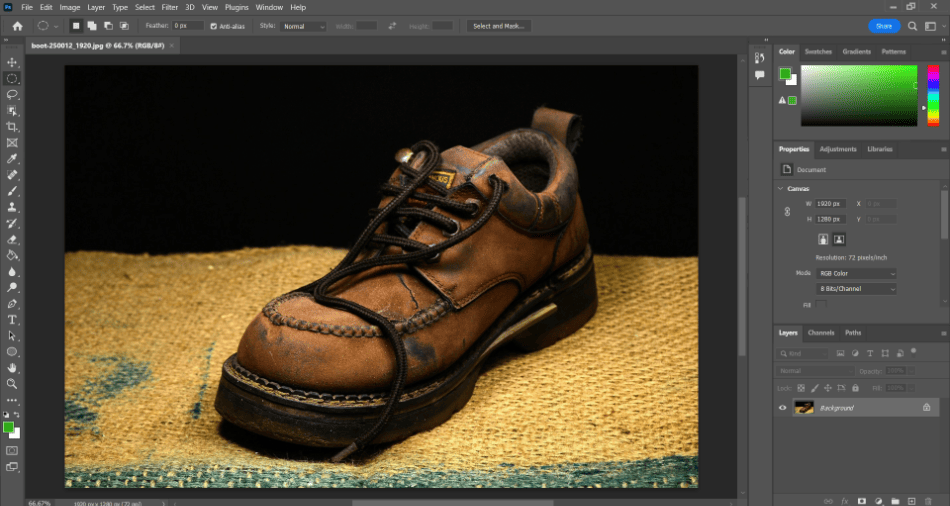
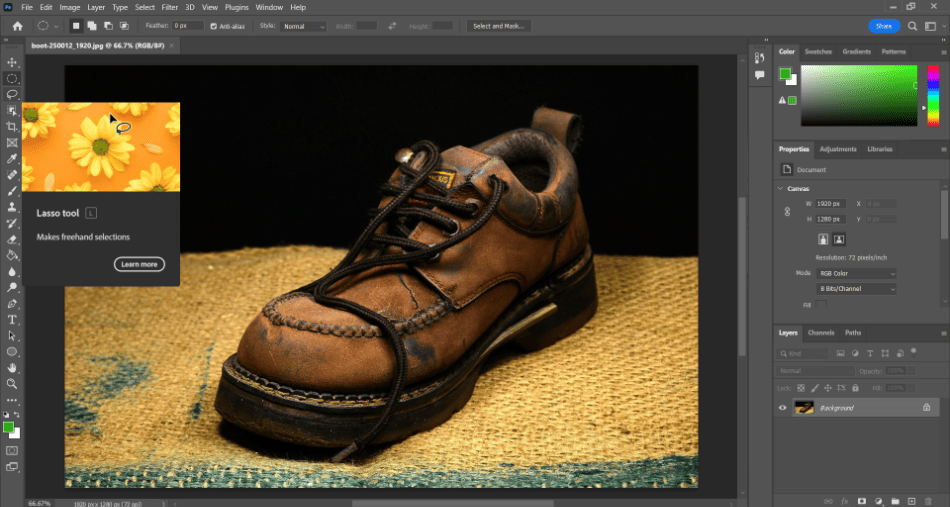
- With your image brought into Photoshop, select the Lasso tool from the toolbar. It will look like a curled circle similar to a lasso.
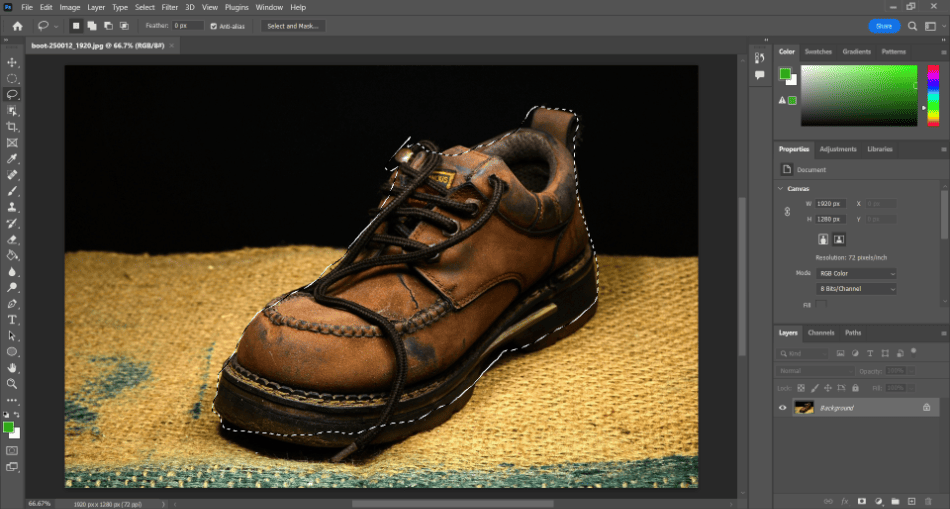
- With the tool selected, start drawing around your subject. If you make a mistake, you can hold down Shift to add in an area or Alt to remove an area.
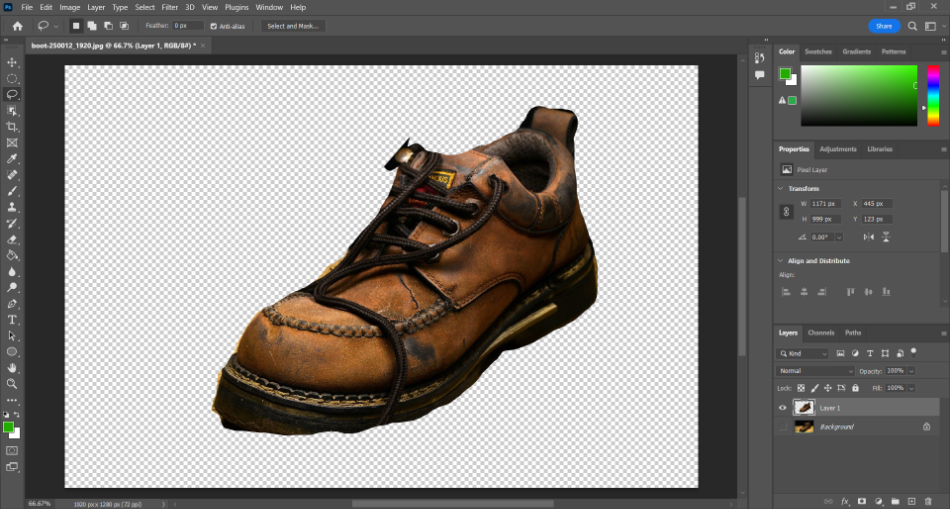
- Once your selection is finished, push Control-J. This will cut out and paste your selection onto a new layer.
Read more:
Quick Selection Tool
If the Lasso tool is too slow but you still want more control, consider using the Object Selection Tool. It’s much closer to the Subject Selection tool but has more customization options. The tool uses smart technology to detect the subject with less micromanagement better.
This method may also take extra time based on your computer. Ensure your PC or Mac has plenty of memory to handle this tool. This will improve how much time it takes for the Object Selection Tool to find your subject.
Here’s a step-by-step guide on how to use the Object Selection Tool:
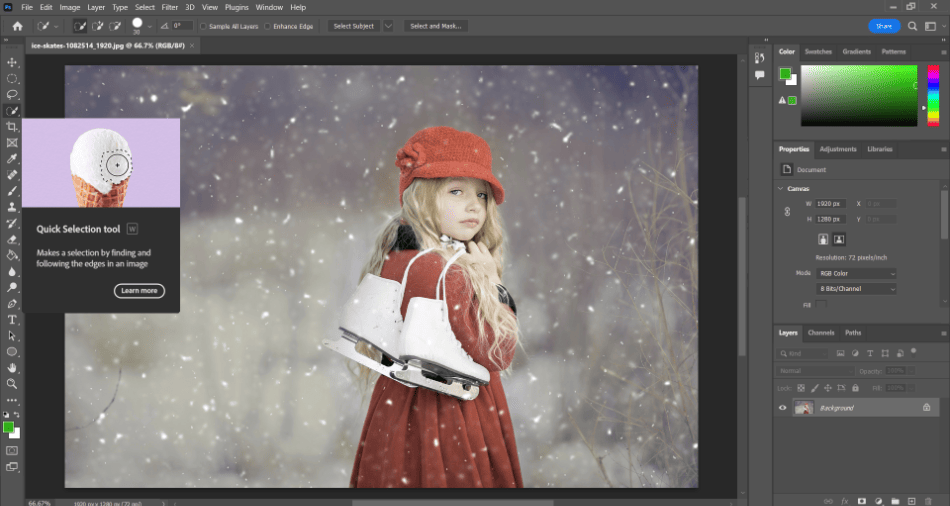
- With your image brought into Photoshop, find the Object Selection Tool in your toolbar. It should look like a box with a cursor.
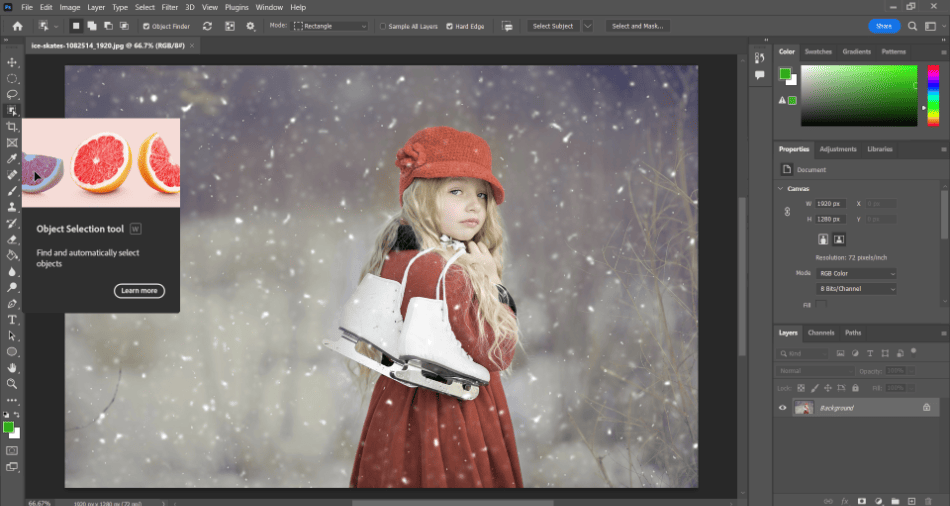
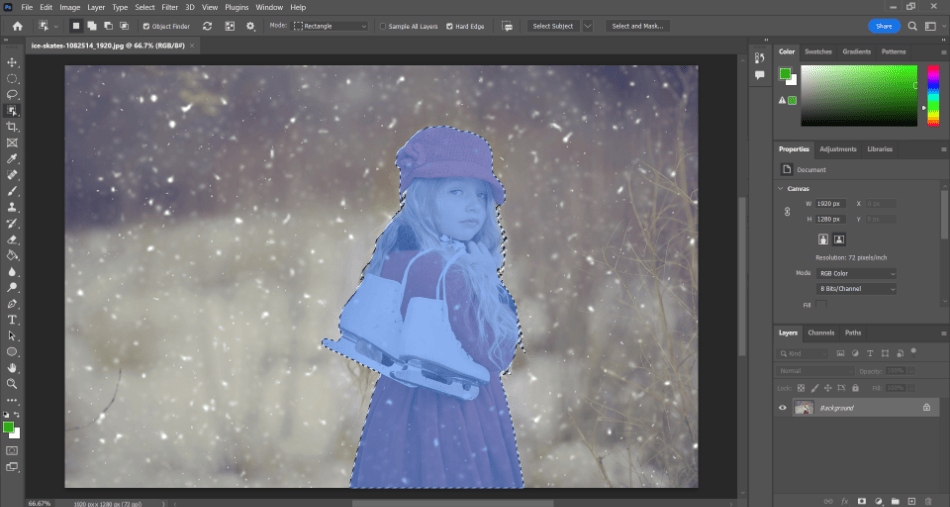
- Click and drag on the subject of your image. It may take a few moments, depending on your computer. If the subject isn’t too complicated, you should have your subject isolated. If the area you want has too much or too little of the subject, use the lasso tool to add or remove areas. You can also play with the Quick Selection settings to improve coverage.
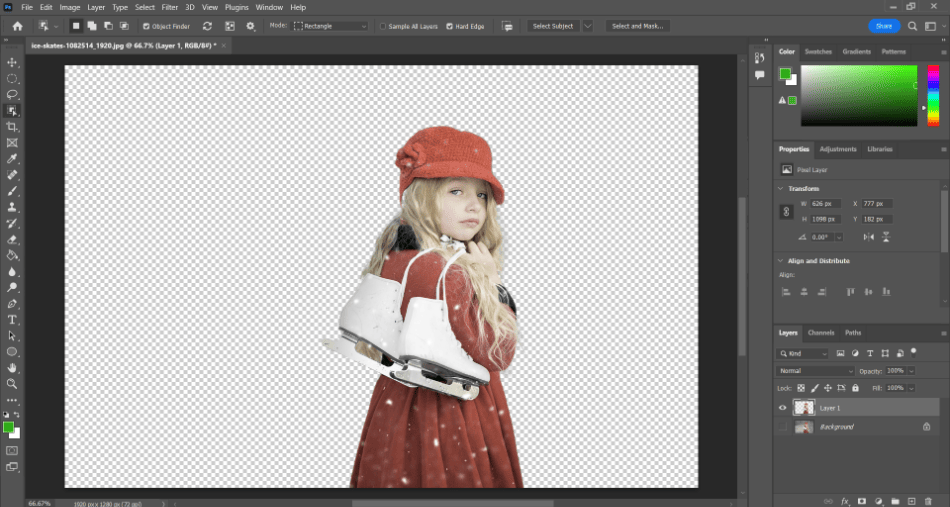
- You should now be able to cut out that area. Copy it into a new layer, and you’ll have your subject removed from the background.
Color Selection
The Color Selection method best suits images with a transparent color separation between the subject and the background. Images with white backgrounds and subjects with distinct colors are great examples. This is essentially a method used for background removal, but it works for cutting out images just as well.
Here’s how to use the Color Selection tool:
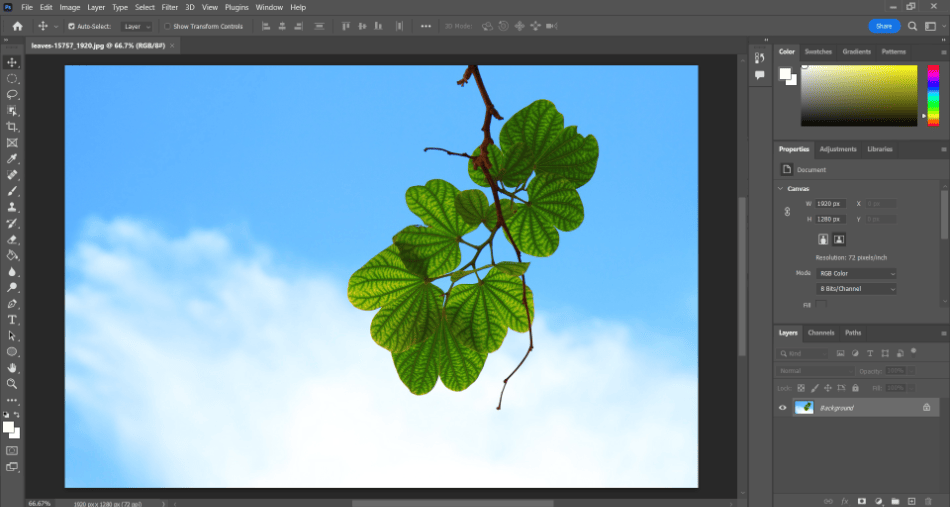
- With your image in Photoshop, start duplicating the layer so you have a backup of your original photo. After hiding the original and working on the new layer, navigate to Select > Color Range. This will open a new window.
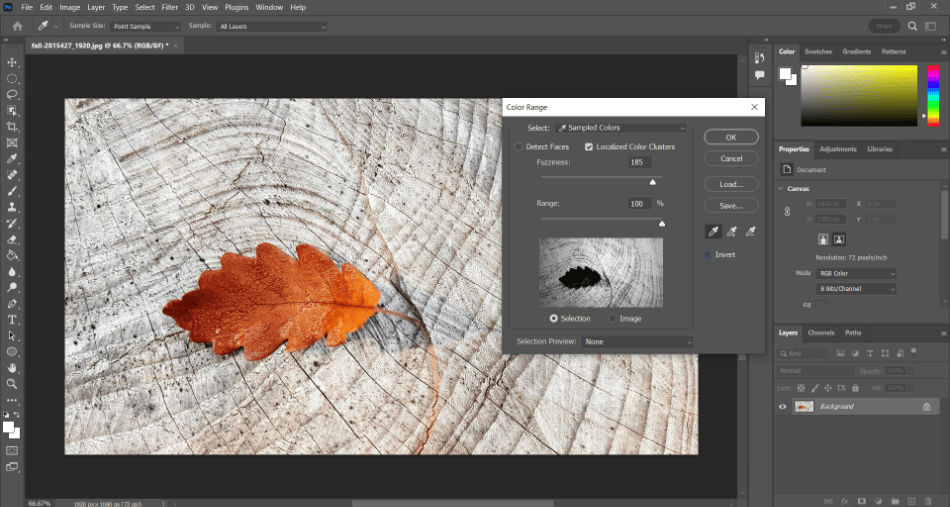
- Select the eyedropper from the Color Range window. Click on your background, and the window should now display a silhouette of your subject. Play with the fuzziness slider to adjust how much of the selection area is covered.
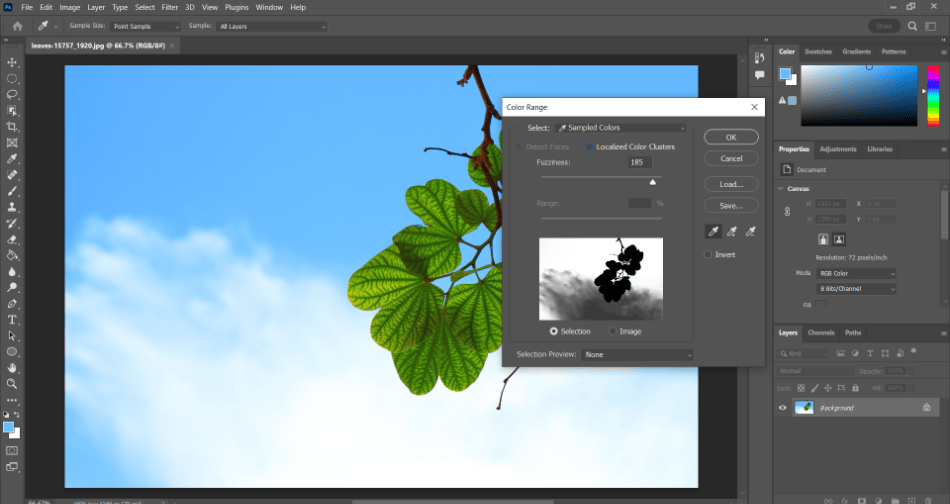
- Now that we have the subject selected, we’re going to switch up what we have selected. Navigate to Select > Inverse. This will change our selection to the subject instead of the background.
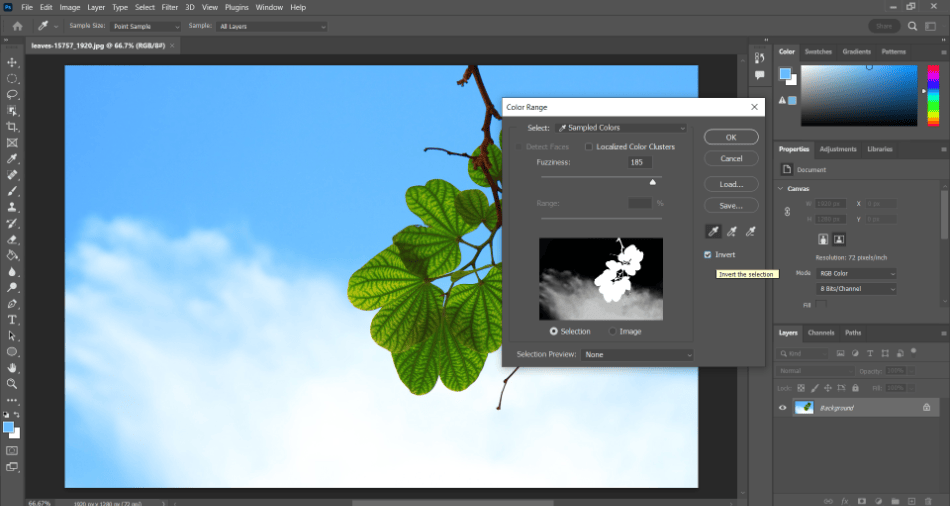
- You can now move your subject and copy it into a new layer.
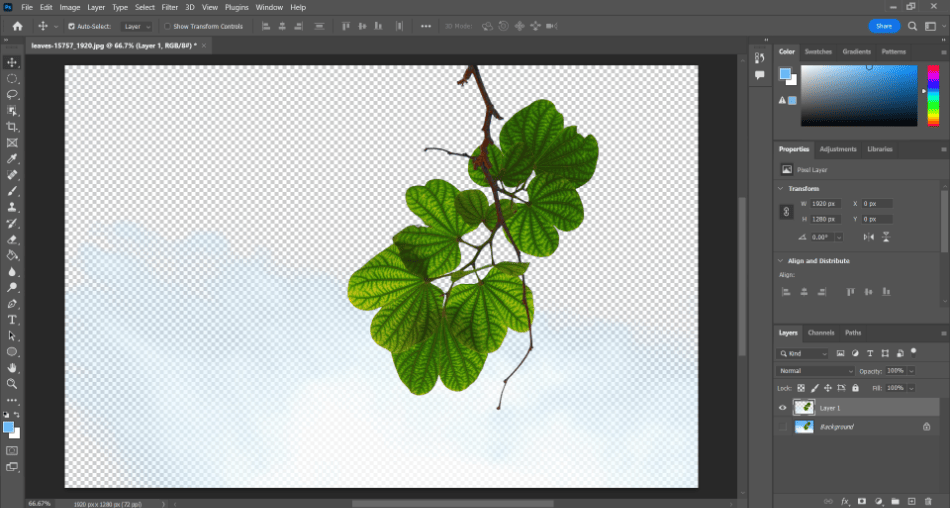
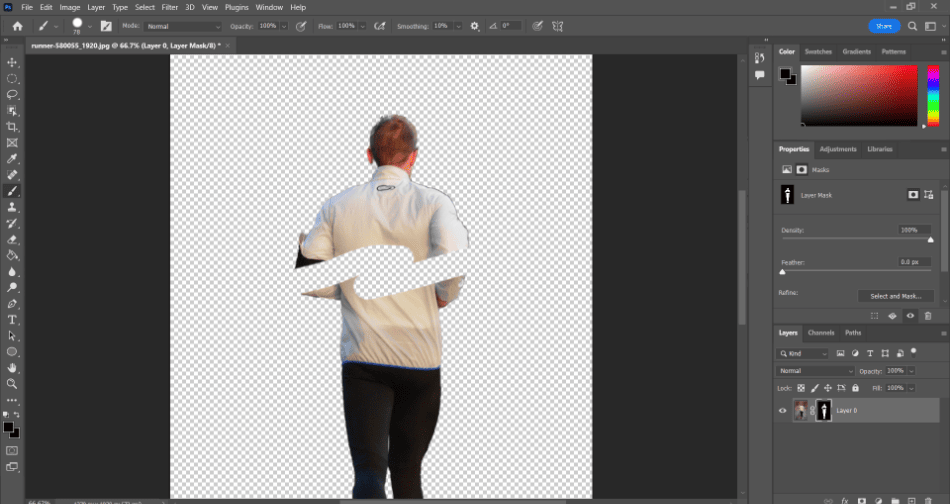
Another handy method for cutting out areas from one-color backgrounds is to use a Layer Mask. The Layer Mask technique works similarly to the Color Selection method but involves working with layers. It can be used in conjunction with the other selection methods.
How to Use a Layer Mask to Cut Out an Image
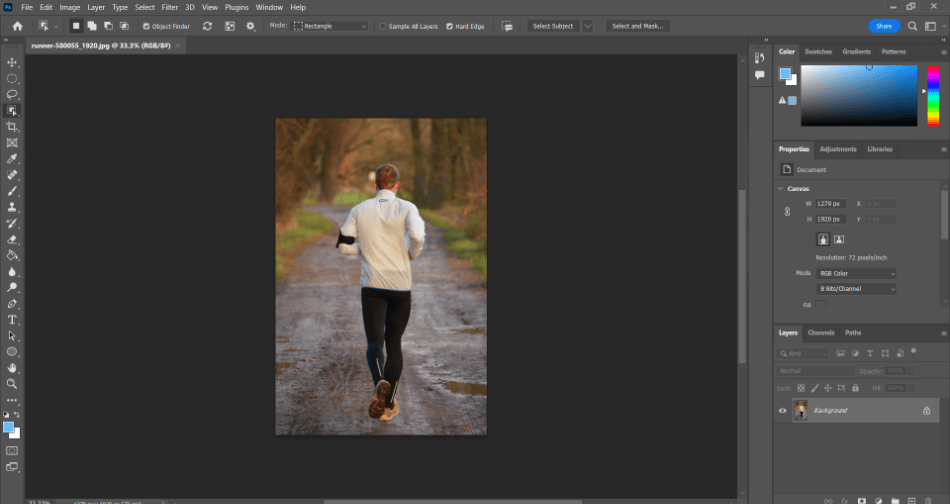
- You’ll start by selecting your subject area using previous techniques. The Object Selection or Color Selection tool is recommended for this process.
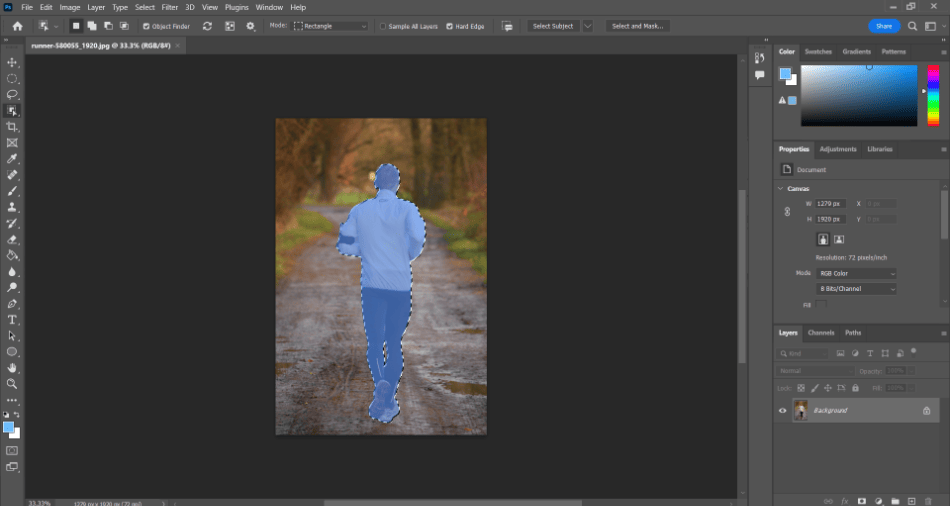
- With your selection made, click on the Add Layer Mask button in the Layers panel.
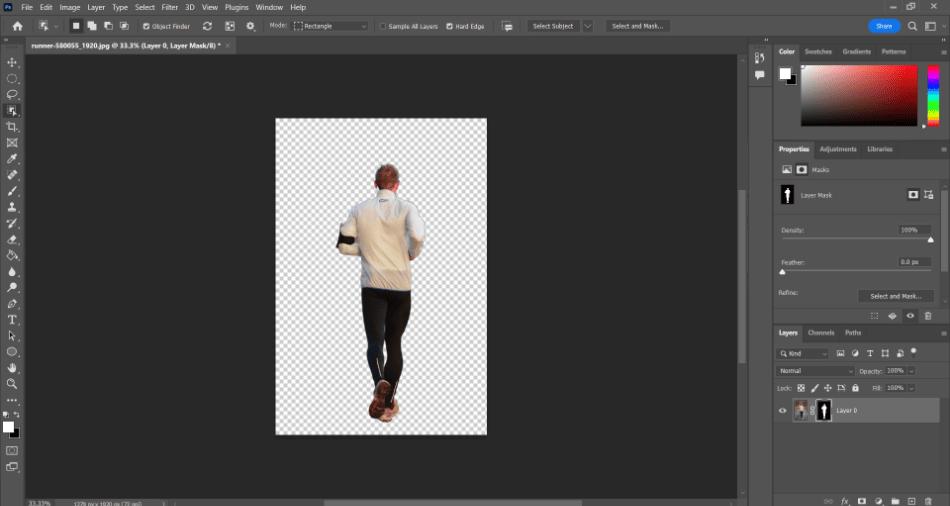
- With the layer mask created and selected, you can paint over the areas you want to be removed with a black brush or use a white brush if you want to add to it.
Cutting Tips & Tricks
- Hair: Use the mask method for cutting out hair as it will be easier to paint the smaller areas.
- Tight Angles: Rigid shapes that need cutting are easiest to cut out with the lasso tool, as well as giving you the most control.
- Complex Shapes: If your subject has an odd structure that looks like many connected shapes, the Object Selection Tool may be the best fit.
- One-Color Backgrounds: It’s worth experimenting with the background eraser tools first to see if you can easily erase the entire background without having to select it.
Frequently Asked Questions
Images can be trimmed in Photoshop by using either the cropping tools or selection tools. Cropping tools can trim out the entire frame while selection methods can portion off a particular section to separate. If you want to keep your canvas the same size, it’s recommended to go with a selection tool.
You can use several tools to cut out images in Photoshop. The classic tool for this task is the Lasso tool but you can now use the tools Select Subject, Quick Selection, and Color Selection. Any of these tools can be used to cut out a photo.
Cutting out part of an image requires that you first select it. Choose a selection tool and place it around the subject that you want to be separated. You can then copy that selection to a new layer.
You can use the lasso tool to select part of an image in Photoshop. You can also use additional tools to make the subject selection quicker. These tools include Subject Selection and Quick Selection.
The lasso or marquee tool can be used for sectioning off a portion of the image you want to be separated. That selected portion can be moved or placed on a new layer if you copy it.
The lasso tool is used to draw around a subject you’d like to separate from the image. Once you select the tool, you can start drawing on top of the image for the selected layer. You can also use the Alt and Shift buttons to add or remove portions of the selected area.

Mark McPherson has been working as a video editor and content writer for over ten years. His background started in animation and video editing before shifting into the realm of web development. He also branched out into content writing for various online publications. Mark is an expert in video editing, content writing, and 2D/3D animation.
