(Last updated on February 13th, 2023)
Procreate is one of the top drawing apps to use on the Apple iPad. It can be used to create compelling designs but only if you know all of its features. In this article, we’ll cover how to get the most out of Procreate when it comes to drawing in this mobile app.
Credit: Pixabay.
Introduction to Procreate
Procreate is a design app that works exclusively on the iPad and takes advantage of all its capabilities. You can use it to draw and paint with either your fingertips or the Apple Pencil. It’s best suited for the Pencil considering how much control you have over the pressure of the pen.
With a heavier focus on drawing than general graphic design, this app is incredibly intuitive. It’s easy enough to jump right in and start drawing. Being a mobile app, it’s also a great tool to use for artistic projects and practice while on the go.
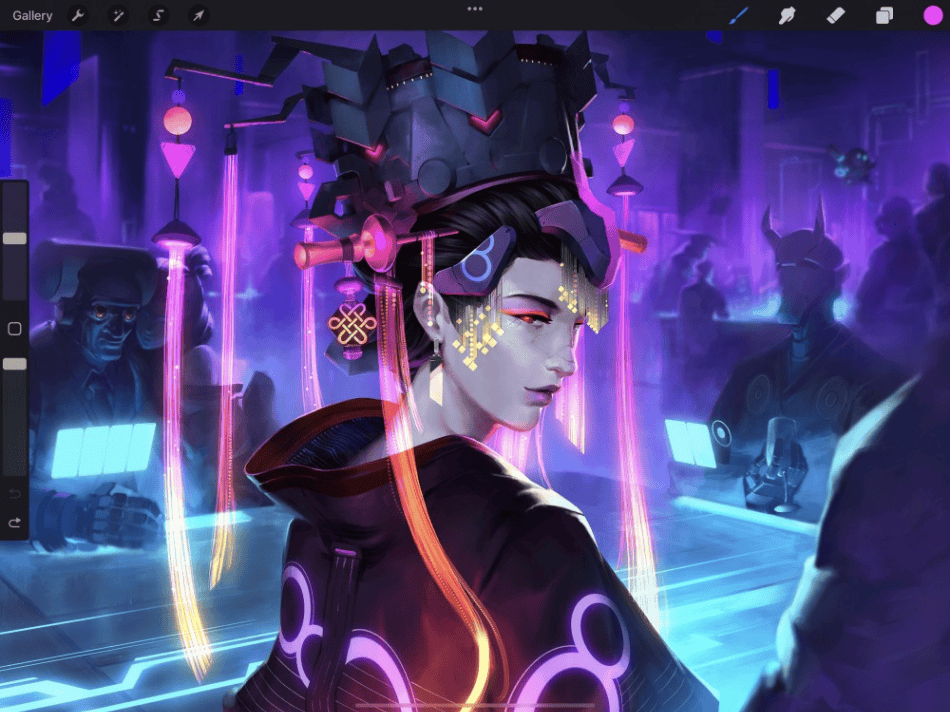
Credit: Procreate.
The Right iPad for Procreate
Even though Procreate is relegated to the iPad, there’s still a matter of trying to determine the right iPad. For the best way to draw, a large screen is recommended. Try to find a model that is either 9.7 inches if you’re on a budget or 12.9 inches if you want the most significant space.
The Apple Pencil should work with all iPad models made during and after 2018. It’s still possible to draw well with your fingers, but you’ll get the most out of the software if you have a pencil. It’s also just a lot easier drawing with a pencil than using your fingertips.
Lastly, a matte screen protector is recommended for extra comfort when using Procreate on the iPad. Aside from protecting your screen, the smooth feel can make the surface easier to work with. This means you’re less likely to make a mistake on the glass surface that can quickly become sticky or slippery, depending on how you use it.
It’s important to consider all these factors if you’re still weighing the options of buying an iPad to use Procreate. This info is also handy if you’re already using an iPad and considering upgrading. With the proper hardware, using this software will be all the easier.
Starting Up Procreate
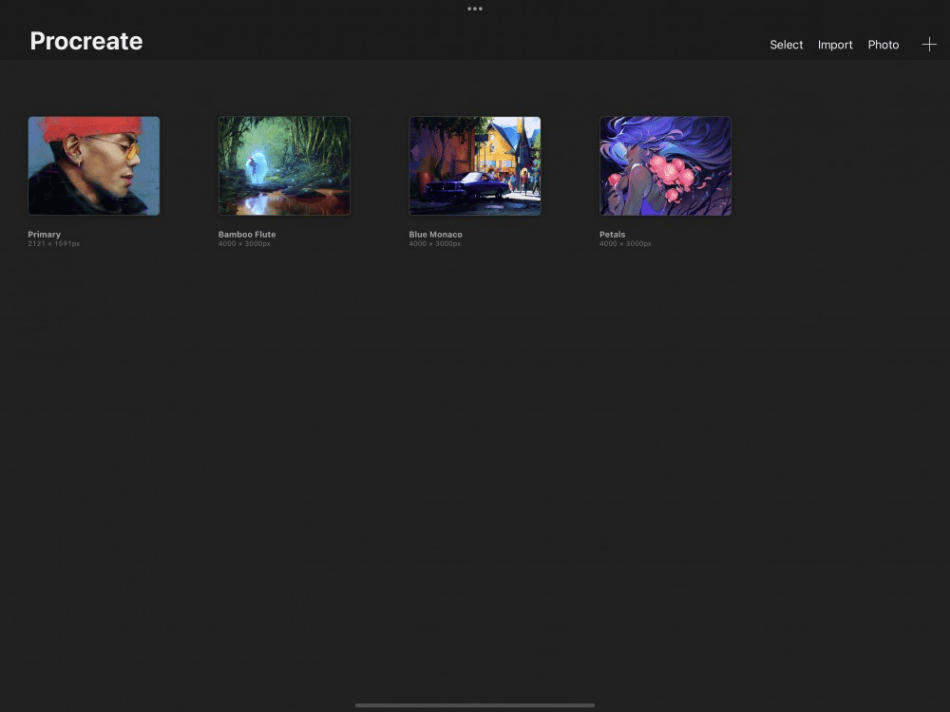
Once you’ve downloaded Procreate from the Apple App Store for $9.99, you’ll open the app and be greeted by the Gallery View. You’ll use this interface to browse, open, and create new Procreate files. To create a new file, tap on the plus sign.
After tapping the plus sign, you’ll be given the option to choose from various canvas-size templates. Choose the one that suits your project best. For example, working on a high-resolution canvas is ideal for creating artwork you intend to print later.
Here’s a rundown of the different types of canvas you can select from in Procreate:
- Screen Size: If you’re looking to use every inch of your iPad for drawing, the Screen Size canvas will give you a lot of real estate. This is a great starter template if you’re just starting to use the program and looking to practice drawing in the program.
- Square: This canvas creates a uniform square that is a good choice for small prints or creating artwork for stamps and stickers.
- High-resolution 4K: This is the highest resolution that can be selected in the app. This canvas is ideal for creating matte paintings, texture maps, or large prints. There are also different shapes you can choose for this, which include horizontal, vertical, and square.
- A4 paper: For high-quality prints, A4 paper canvases are the best option for printing your artwork on the finest A4 printer paper.
- 4 x 6 Photo: This portrait style is a good choice if you’re drawing people or want to replicate the look of framed artwork.
- US Paper: Use this standard canvas to create simple prints or mailable artwork.
In addition to these many templates, you can create your own that suits your specific creative needs. Try tweaking these settings for developing artwork on web projects or packaging design.
Procreate Brushes
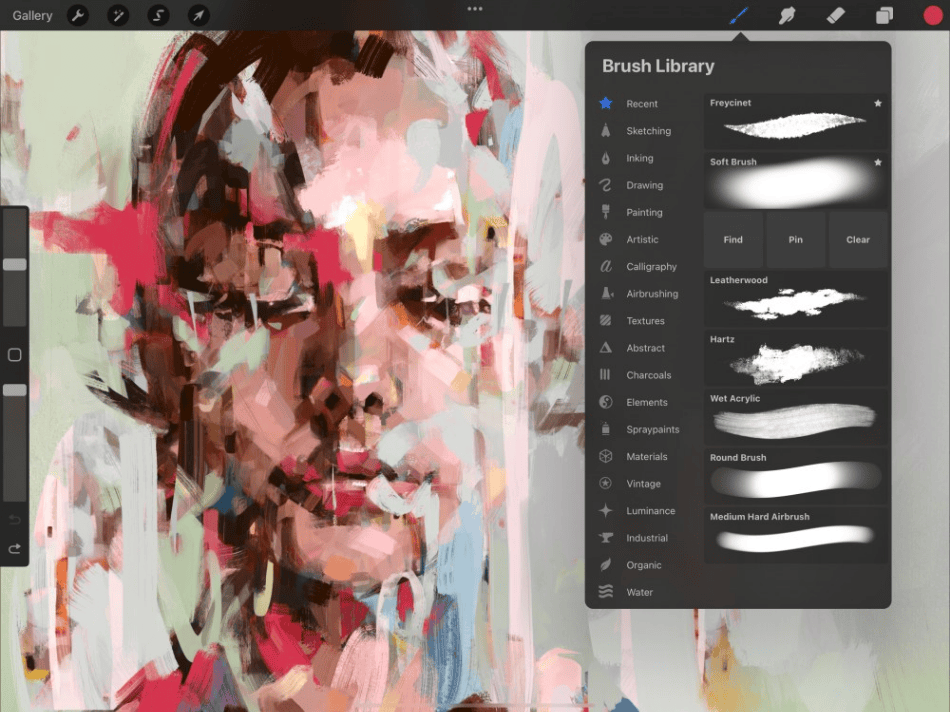
With a Procreate canvas now created, it’s time to start drawing. Look at the toolbar on the top of the screen and find the paintbrush in the right-hand corner. Tap that icon to open up the paintbrushes to select from and their settings.
Within the brushes menu, you’ll find plenty of different types of brush sets. Here’s a list of the brush sets included in Procreate.
- Sketching: For those who like to draw on the go and create some quick sketches, the sketching brush is ideal for rough designs. This brush can recreate the effects of graphite pencils, technical pencils, and artist crayons.
- Drawing: This set is much like the sketching brushes for rough designs but with the bonus of wet and dry mediums. If you start with sketching, move on to this set next to add some extra detail to your designs.
- Inking: Bring some boldness to your artwork with the inking brushes that can replicate the look and feel of markers and pens. Be sure to check out how well this pen works with the sensitivity settings to create thin and thick strokes.
- Painting: Use this brush set to craft detailed artwork that has the feel of a paintbrush with a mixture of mediums that include acrylic, stucco, and oil.
- Artistic: For added texture and effects to your drawings, the artistic brush set is capable of creating brushes that are watery and clumpy while looking like it was painted on paper or canvas.
- Calligraphy: If you’re looking to draw some text with personality, the calligraphy option is an ample choice for crafting compelling font designs.
- Airbrushing: As an essential brush style for digital artwork, airbrushing is a great wall to bring gradients and subtle details to your art.
- Textures: Use this set for creating unique surface textures and patterns to your drawing.
- Abstract: Create smoky and chaotic effects with this set.
- Charcoals: Use the charcoal style brushes for creating sketches that replicate the textures of using either a block of charcoal or a charcoal pencil.
- Elements: Create unique smoke, flames, water, clouds, and more with the elements set.
- Spraypaints: Give your artwork the look of graffiti and grunge with the spraypaint effect of this brush set.
- Materials: With styles for metallics and roughness, the material brushes work well for creating more three-dimensional artwork by bringing out details in hair and skin.
- Vintage: Find a retro style with these throwback brushes meant to replicate different techniques of different eras.
- Luminance: This light-based artwork is a great option for bringing light to a room or designing the glowing nature of a galaxy.
- Industrial: Use this set to create concrete, metal, stone, and rust effects.
- Organic: This brush set focuses on creating natural textures of grass, leaves, and bark, ideal for crafting nature artwork.
- Water: If watercolor brushes are more your medium, the water brush sets are perfect for working with wet paint to create flicks, drips, and blotches on your canvas.
Keep in mind that these are just the brush sets initially included with Procreate. There’s many more brush sets that can be installed. You can even create your own with the many customization tools and save them as presets.
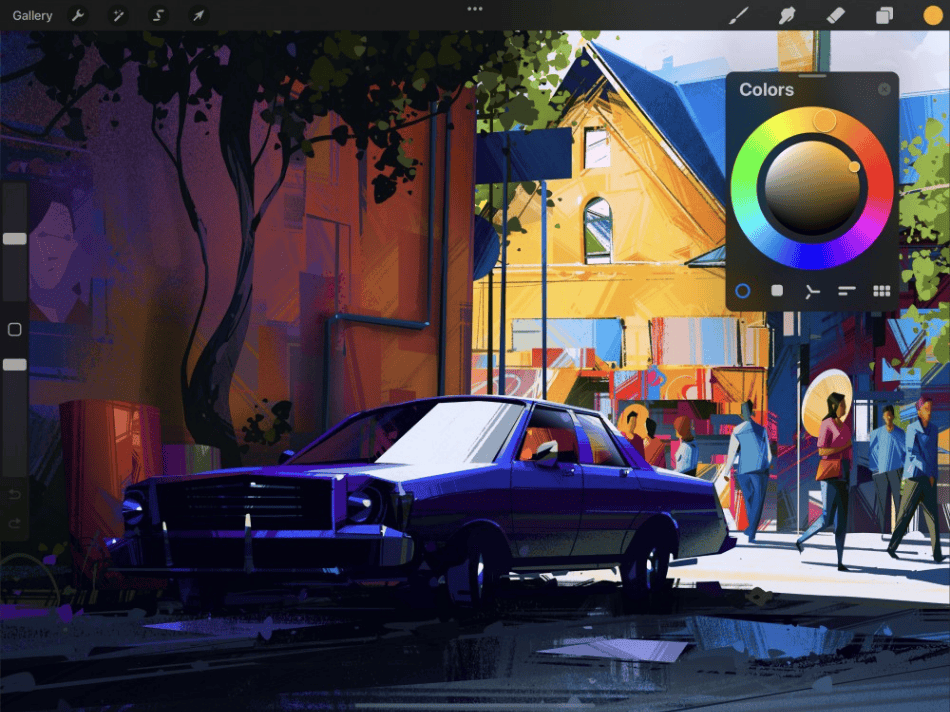
Procreate’s Colors
Once you’ve selected a brush and tried it out on the canvas, it’s time to pick a color. The brush’s color can be found in the upper-right corner of the toolbar. Find the colored circle and tap it to open the color picker.
As with many drawing applications, Procreate’s color wheel is a familiar and easy way to choose the right color. Use the wheel to select the hue, brightness, and saturation of the color you want to draw with.
While the color wheel panel does save previous colors, there’s an easier way to repeat a color when your design becomes more complex. Tap and hold on to the screen to bring up the eyedropper that can select a color currently on your canvas.
If you’d prefer to save your colors on a palette, tap the Palettes button in the color panel. Then tap the plus sign to create a new palette. You can now tap and draw colors onto your palette to start saving them for future use.
Credit: Procreate.
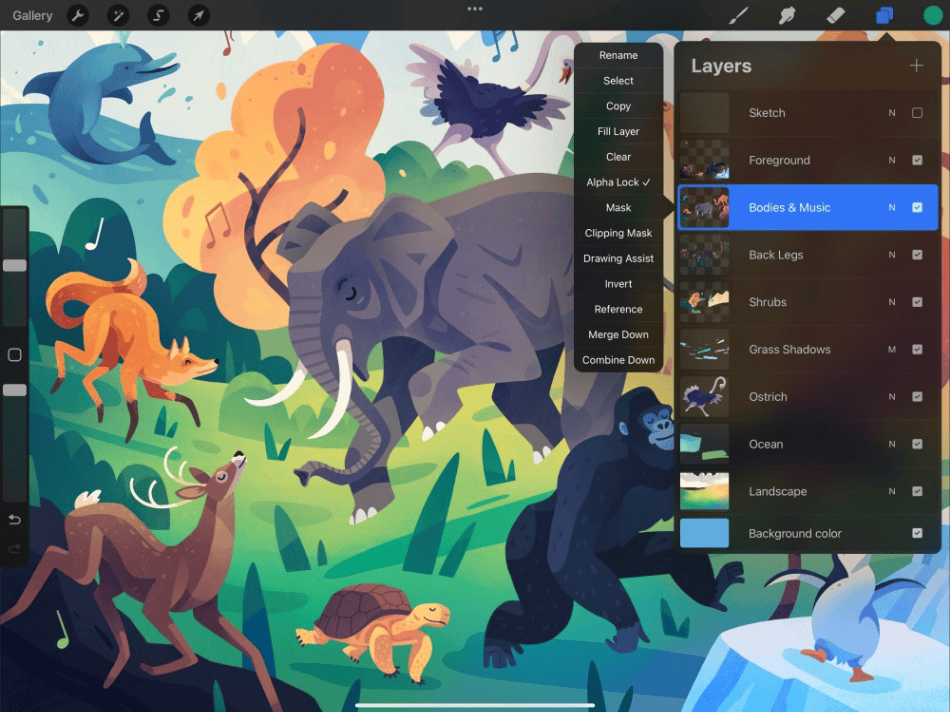
Procreate’s Layers
When creating digital artwork, working with layers is always a good idea. Layers are the best way to start with a sketch and work up to a finished piece of art. It’s not different than how you’d draw in Photoshop.
Look at the top toolbar right corner for the button with two squares. Tapping this icon will open up the layers panel. You should see the one layer with a white background.
Tap the “layers” button and the plus icon to add a new layer. With the layer now selected, you can draw on this layer. Add another layer and draw on top of that to see how easy it is to stack your artwork on top of each other.
Each layer can be customized with many options. These customizations include altering everything from the layer name to the background color. Here are a few layer customization options to consider:
- Alpha Lock: Alpha Lock can be enabled by swiping right with two fingers on the layer. This will create a checkerboard pattern. Now, this layer will act as a mask of sorts for a new color being used on this layer.
- Clipping Mask: This feature, similar to Alpha Lock, can be found in the layer settings. Enabling this will hide the layer below it based on the area you paint for your clipping mask layer.
- Opacity: Tap the N of the layer to find the opacity slider. Slide the opacity option around to change how visible this layer becomes.
- Blend: The various layer blending options are also found when tapping the N. Choose one of the many options to darken, lighten, or burn the layer into the one below it.
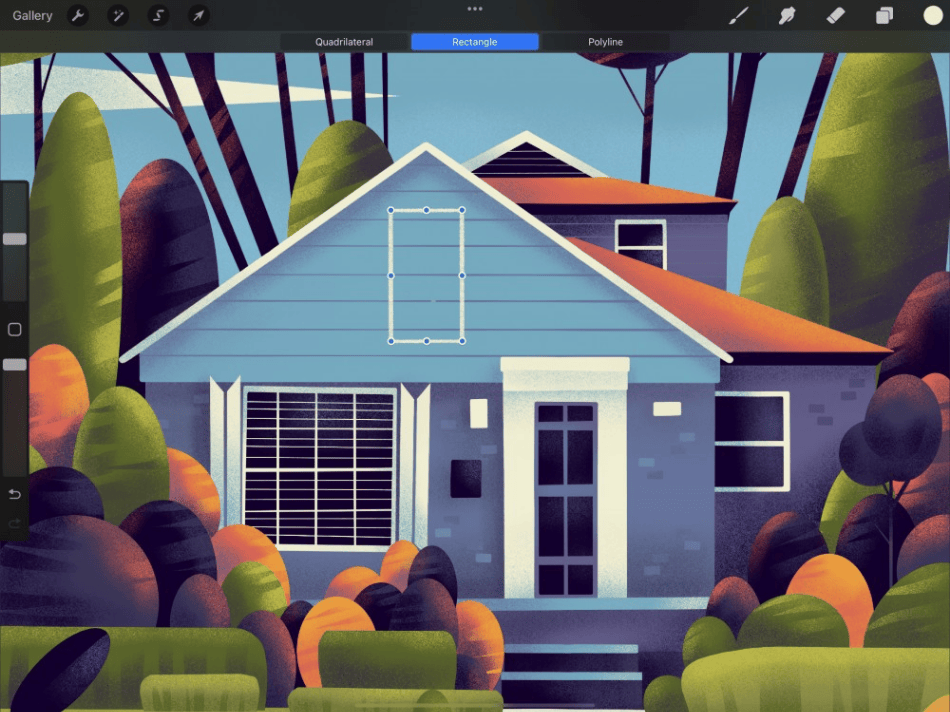
Procreate’s Quickline & Quick Shape
If you’re not used to drawing in Procreate with the brushes, there are easier ways to draw. Using the Quick Line can make a straight line with ease. Quick Shape is the same deal but is used for creating familiar shapes without much effort. Both can be accomplished by using your fingers instead of a pencil.
These quick methods are excellent for beginners and speed up the drawing process. While the shapes can be designed quickly, they are also easily editable. Tap Edit Shape in the toolbar settings to change your shape if the square needs to be a rectangle or the circle needs to be rounder.
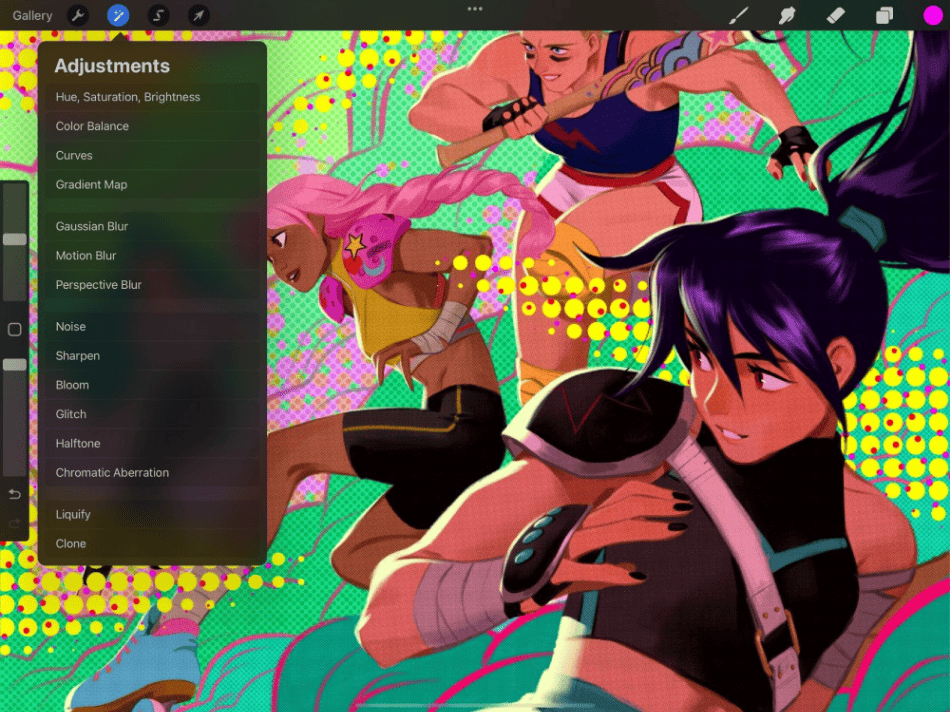
Procreate Adjustments
Once you’ve gotten used to Procreate and its drawing tools, you may want to experiment with additional features. The Adjustment features can add plenty of unique features to your canvas. The Adjustments can be found in the top-left corner of the toolbar.
Here are the Adjustments to consider for your artwork:
- Blur: Make the background blurrier to focus more on your subject with the blur tools. The types of blurs include gaussian, motion, and perspective.
- Sharpen: Make your artwork much clear with the sharpen adjustment. This sharpening can help bring out more detail in inserted photographs as well.
- Liquify: The Liquify adjustment can give you additional control over your drawing. This allows you to push, pull, pinch, and twirl your design to either subtly or entirely change how your design looks.
- Hue, Saturation, and Brightness: This reasonably standard adjustment is handy for having the most control over the color and tone. It’s easy to alter the hue, saturation, and brightness with simple sliders that give you real-time results.
Sharing and Saving
When you’ve completed a drawing in Procreate, you may be so pleased with your design that you want to share it with others or take it into another program. Procreate also makes this process of wrapping up your art process easier. Artwork created in the app can be saved as PSD or JPEG.
Go back to the introductory Gallery view when you’re all done and want your project saved. See your most recent project saved in this interface. Feel free to rename it. If you’re going to share this artwork with someone immediately, swipe left on the thumbnail to be taken through the social sharing process.
Tips and Tricks
- Sensitivity is Key: Procreate takes full advantage of the Apple Pencil hardware. This means you can draw as hard or light as possible, creating different effects. Experiment with the sensitivity settings of the pencil to find new ways of drawing.
- Experiment with Brush Settings: Procreate has many possibilities for creating brush types. Play around with the settings and try them out on the canvas to better customize your drawing experience.
- Try to Smudge: Procreate has a smudge tool that can be useful in creating smears with your colors. Try this tool if you’re working with wet-style settings on your brush.
Frequently Asked Questions
Beginners to Procreate should start with sketching to get used to the environment and the brushes. Using a sketching brush set on a Screen Size canvas is an excellent start to getting a feel for using the program on your iPad.
As with analog drawing, you can get good at drawing in Procreate with practice. What can help is finding the right brushes and getting a feel for drawing on the iPad. Start slowly using the sketching tools and move away to different brushes and tools.
Procreate isn’t too difficult to draw with, considering it can be used with your fingertips or an Apple Pencil. If you’re not comfortable drawing with a pencil, you can practice with your fingers first. Compared to a desktop computer with a digital tablet, looking at what you’re drawing makes Procreate one of the more accessible apps to use.
Sketching can be done quickly in Procreate with the right brushes. Select a sketching or charcoal-type brush to jump swiftly into sketching on your canvas.
Using the Apple Pencil with Procreate is not required. As an iPad application, it can be used with your fingertips. That being said, the app is far easier to use with the aid of the Apple Pencil.

Mark McPherson has been working as a video editor and content writer for over ten years. His background started in animation and video editing before shifting into the realm of web development. He also branched out into content writing for various online publications. Mark is an expert in video editing, content writing, and 2D/3D animation.