(Last updated on February 3rd, 2023)
I love Photoshop for the random and unique things you can create. This software allows you to transform simple photos and artwork into interesting and eye-catching pieces. One such thing you can do that is a great technique to learn as a beginner is to mirror an image.
Here, imagine you are putting a mirror against your image on one side – by doing so, you can see a flipped reflection in the mirror – it looks cool right? You can do this in Photoshop, but obviously without the need for an actual mirror! (Not sure how that would work on a monitor!)
I explain how you can easily do this in the below guide and show some strange and wonderful examples I created. This is a brilliant starting technique and it introduces you to things like using layers, changing the canvas size, and using transformations – these are all cornerstone things to understand in Photoshop.
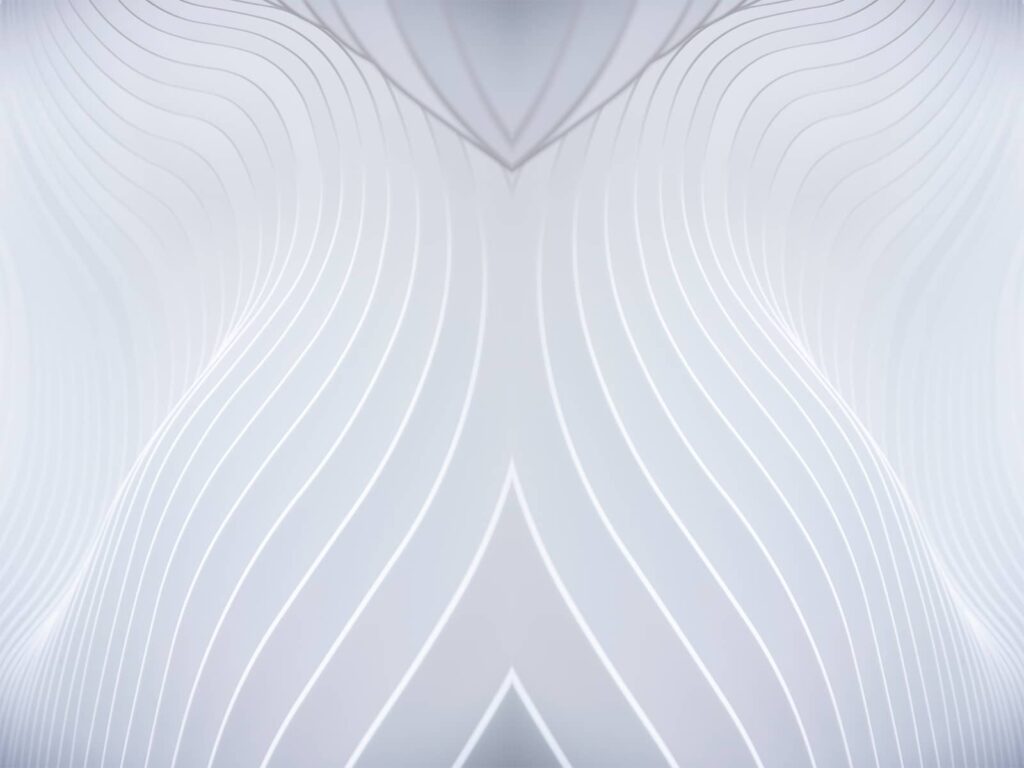
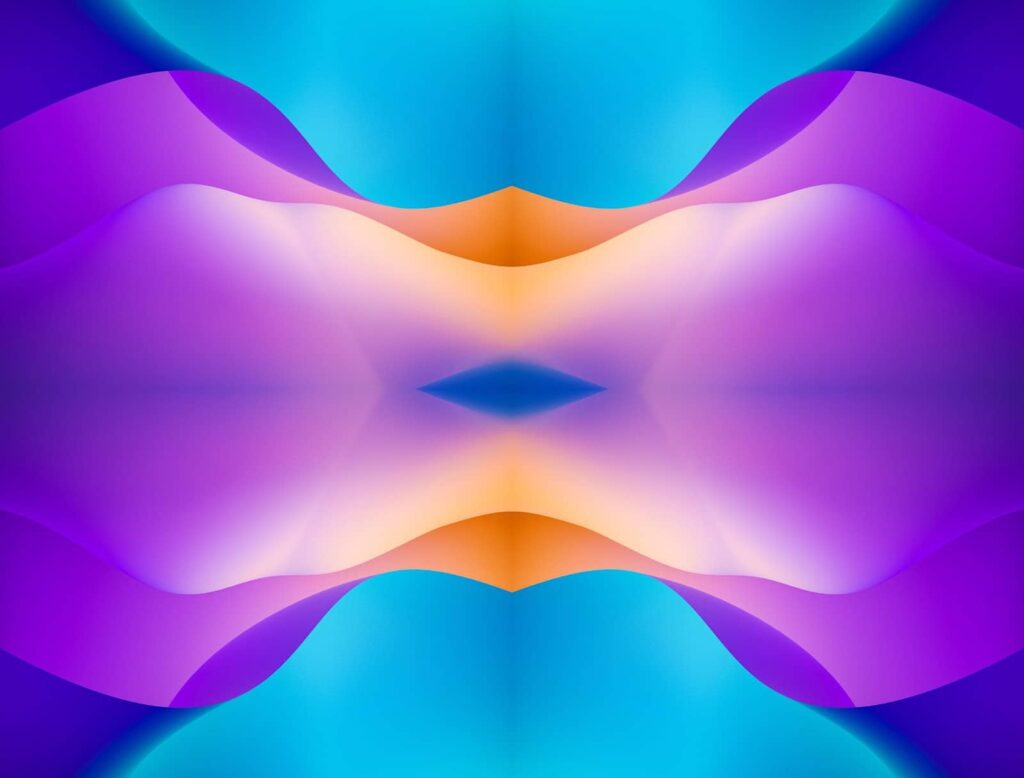
The below image is the original I used to create the tutorial – it lends itself to mirroring due to the mix of colours, and abstract style.

Why Would You Want to Mirror an Image in Photoshop?
Before we fire up Photoshop and get cracking, let’s quickly look at why you even want to do this. There are several reasons below:
- Desktop backgrounds
- Marketing artwork
- Portrait work
- Because they look awesome
This type of mirrored image is eye-catching. They stand out a mile and you might just want to create a fancy background for your computer with one!
Additionally, they have amazing utility for marketing, digital artwork, and visual media. You could incorporate abstract art like the below image into many different productions.
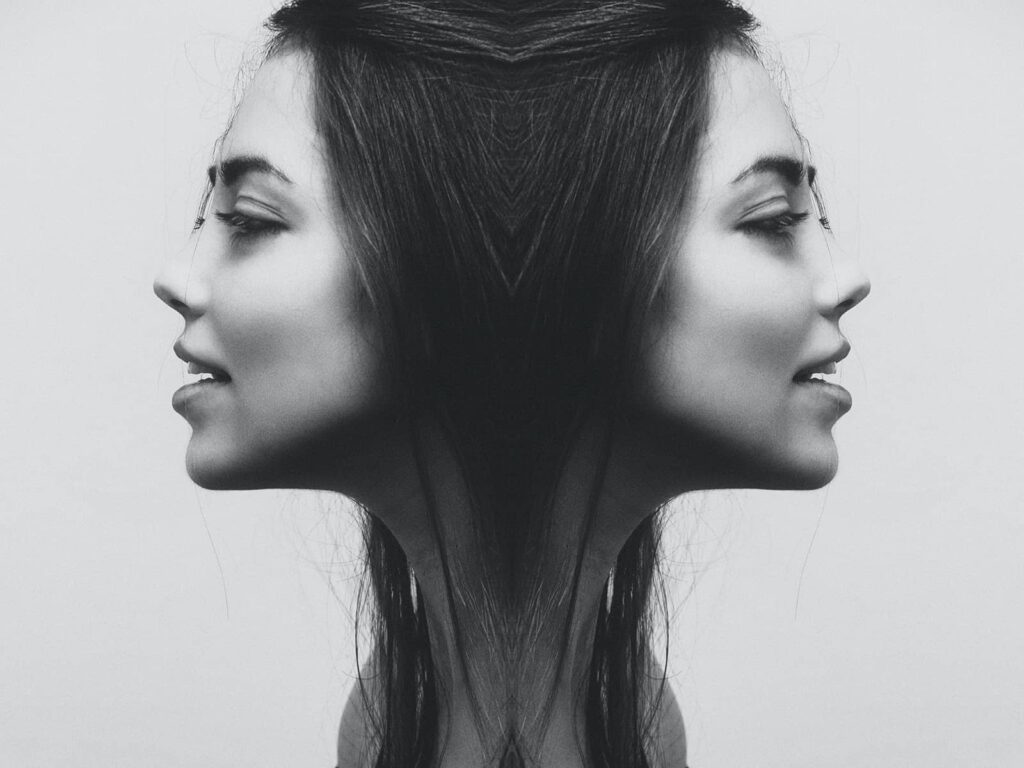
These images also work amazingly with portraits and you can create some unusual effects that would standout for marketing work like the example I created below:
There are many possibilities, but aside from them, they look great too! I just enjoy messing with things like this to have some fun on Photoshop and to improve my knowledge of the software.
Important Settings to Change Beforehand
There’s a couple of things I advise to change before we open an image too. These are my personal preferences – I find them useful, you may not, but here they are anyway:
- Enable a grid overlay on your documents
- Enable the snapping feature
- Make sure image dimensions are set to pixels
Grid Overlay
As standard I have a grid overlay visible when working in Photoshop. I find it helps moving layers and objects and framing things properly.
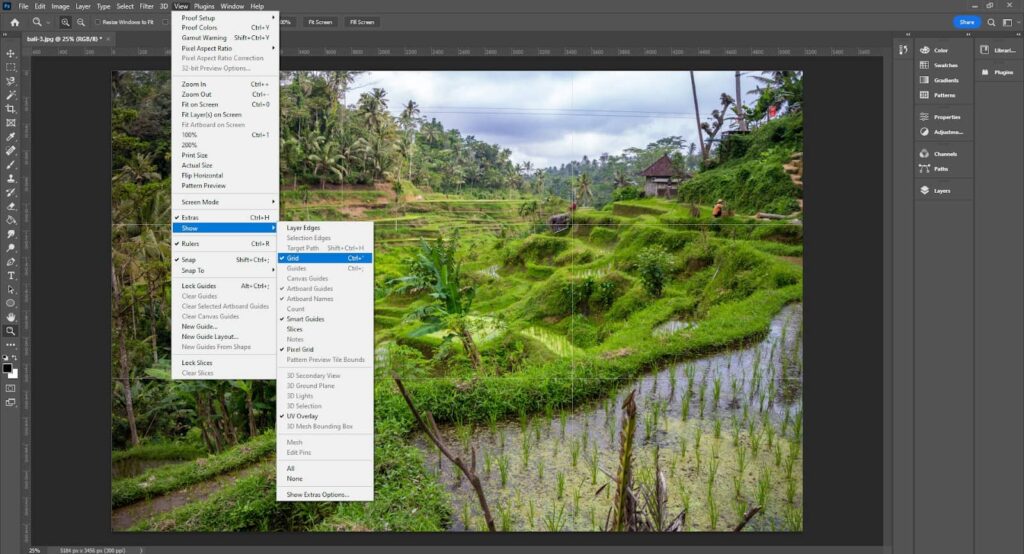
To add a grid overlay do the following:
- Click on “View” on the top menu.
- Hover over “Show” on the sub menu.
- Click “Grid” on the side menu.
This adds a faint grid as you can see in the above image. If you head to the preferences tab in the “edit” menu, you can open the “Guides, Grids & Slices” sub menu. Here you can customize the grid including line colors, and how many divides it has.
Snap To
I don’t mean something like snapping your keyboard so don’t worry! “Snap To” is an incredibly useful feature. I always have it enabled.
Think of the “Snap To” feature as like a magnet. When you move an object like a layer, it will snap to set things like guidelines and the edge of the image.
You can physically feel it when you drag something – it’s really weird but I find it essential for aligning things properly.
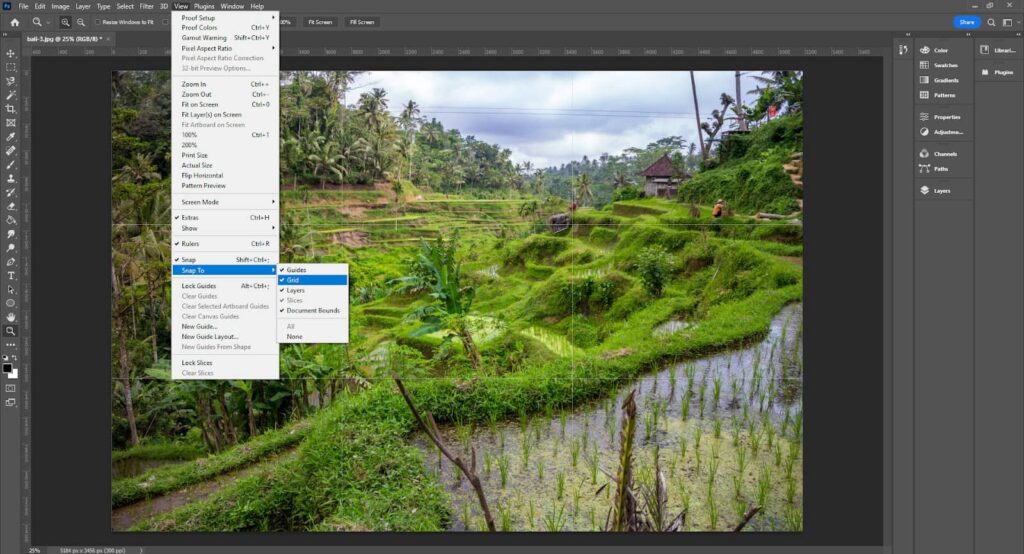
To enable the “Snap To” feature, do the following:
- Click on “View” on the top menu.
- Click on “Snap” on the sub menu.
- Go to the same menu again, and hover over “Snap To”
- Make sure all the options are ticked in the side menu.
This will make it so much easier aligning your mirrored images below and take away any guesswork.
Image Dimensions
Lastly, make sure your image dimensions are set to pixels! This just makes it easier for creating the new canvas size when we start working below. Also, unless you want to print the images, its better to work with pixels for digital artwork.
There is a “Units & Rulers” tab in the preferences menu that we used before. Here you can change the main units of measure – I advise changing them to pixels.
How to Mirror an Image in Photoshop Once
So, you’ve changed your settings and have an image ready to mirror. Let’s get started! The basic tool we are using here is the transform tool.
This amazing tool allows you to flip objects and layers either horizontally or vertically to create a mirrored effect.
First, we need to unlock the background layer and rename it. When you open an image it is locked as default – unless you unlock it, you can’t edit it! Renaming the layer also makes it easier to see what you are working with.
- Double-click on the background layer in the layers toolbar.
- Rename it to something suitable that you can work with.
- Click OK.
This will rename and unlock the layer (you know it’s unlocked because the padlock symbol should have disappeared).
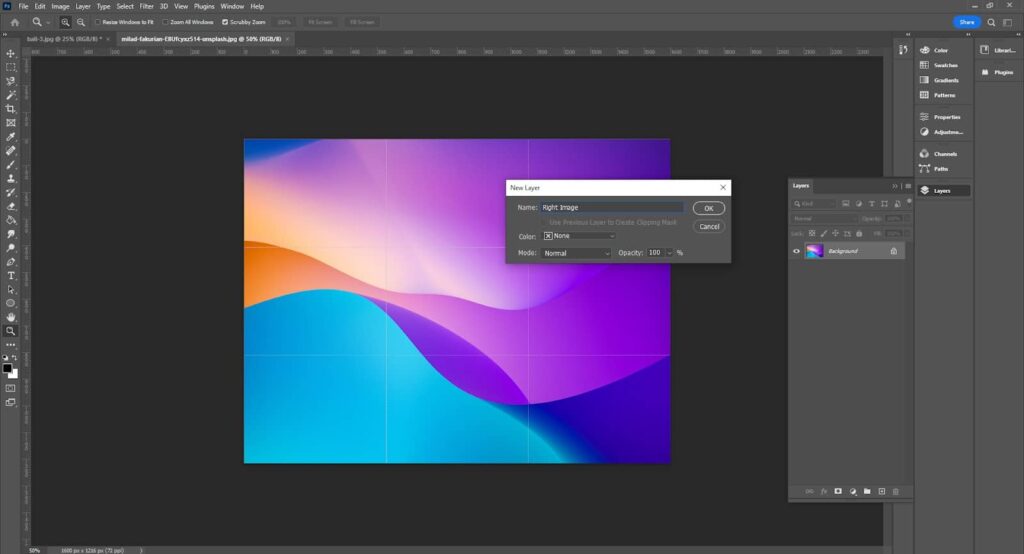
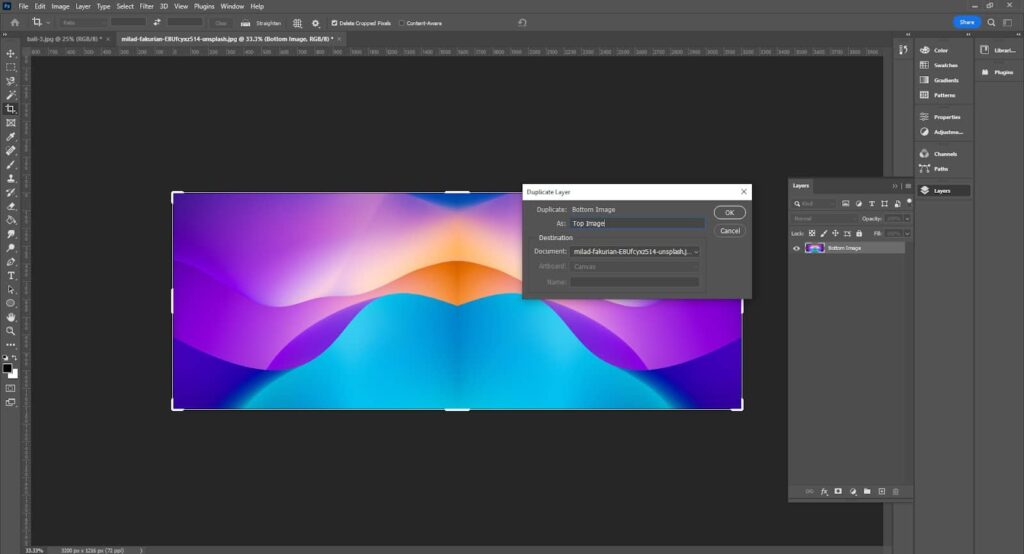
Now we need to duplicate the original image as a new layer. This is vital so we can then flip it and reposition it later.
- Rick-click on the original layer and click “Duplicate Layer”.
- Choose a suitable name for the new layer.
- Click OK.
You should then see another layer appear above the original.
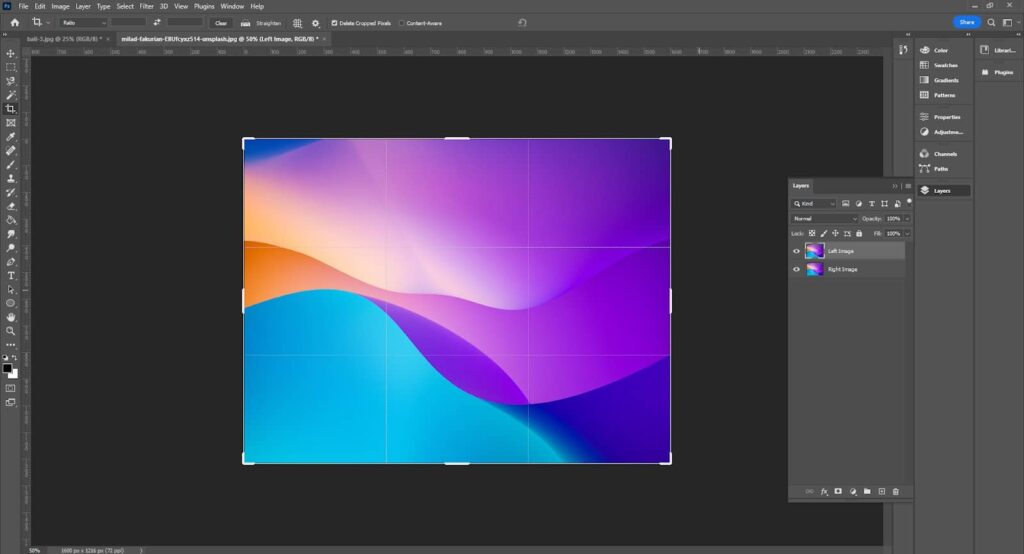
This is all great, but as you can see, we have nowhere for the new layer to fit! It’s just sat ontop of the old one obscuring it.
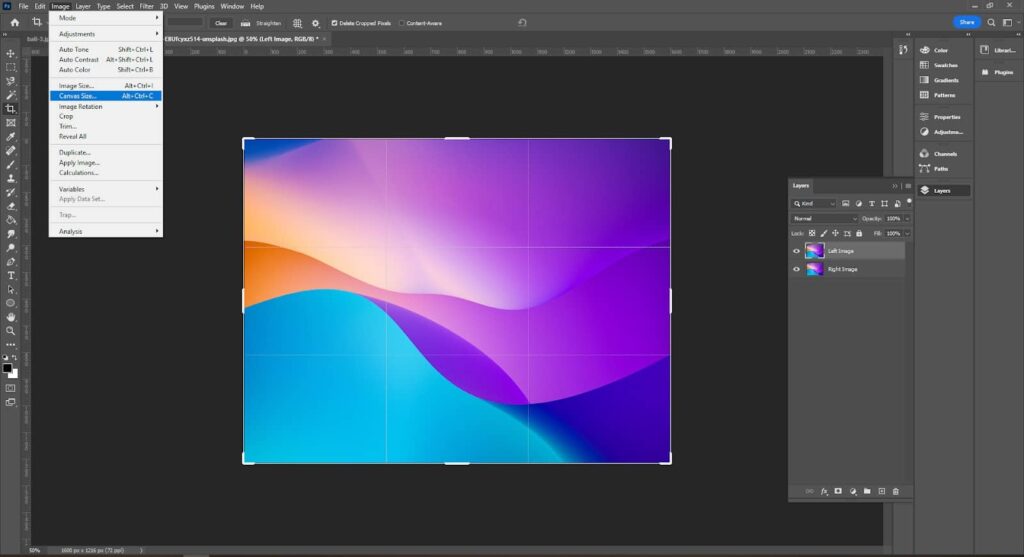
So, we have to alter the canvas size. It is important to distinguish between image size and canvas size.
- Canvas Size: Does not stretch or transform the layers in any way
- Image Size: Will stretch and enlarge/shrink the layers accordingly
By increasing the canvas size you are not changing the layers in anyway – you are simply adding more space to the document. Think of it like sticking two pieces of A4 paper together to create a larger sheet.
There are three key components to consider for the canvas size when mirroring an image – the new size, the anchor position, and which side you want to mirror.
- New Size: Here you only change either the width or length. It you are mirroring vertically, double the height. If you are mirroring horizontally, double the width.
- Anchor Position: The anchor position relates to where the original layer will sit and where the new blank canvas area is added. Choose the right arrow if you want to mirror the left side. Choose the left arrow if you want to mirror the right side. Choose the top arrow if you want to mirror the bottom side. Choose the bottom arrow if you want to mirror the top side.
- Mirror edge: Make sure you know which way you want to mirror the image – either horizontally, or vertically, and either from the top, bottom, left, or right.
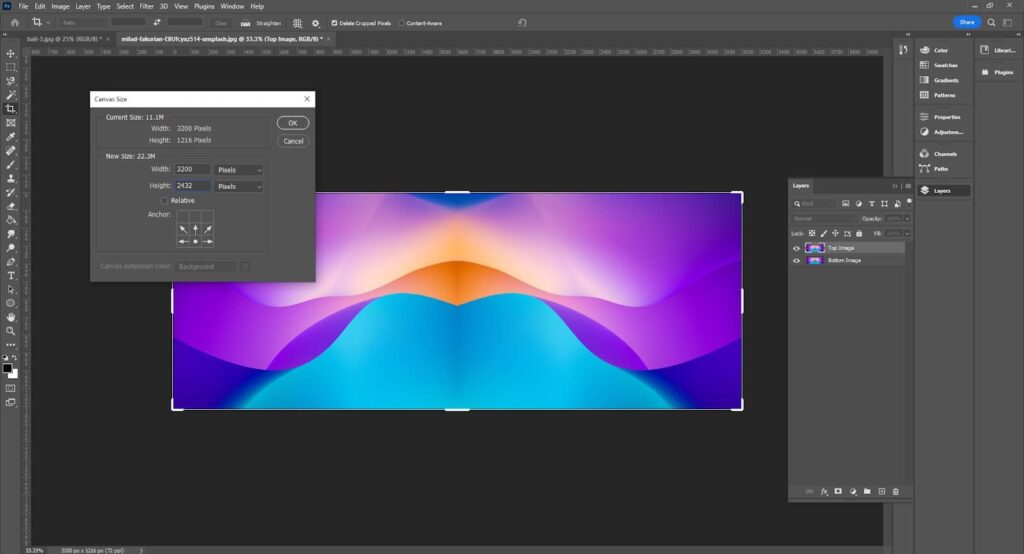
In this example, I mirrored the image HORIZONTALLY on the left-hand edge of the image. First, as shown below, click on the “image” menu, and select “canvas size”.
A pop-up box then appears with the canvas size details. You must enter the new overal canvas size, and select the anchor. In the example, I did the following:
- Canvas Size: I changed the width to 3200 as I wanted to mirror the canvas horizontally, and the original image size was 1600 pixels wide. (1600 x 2 = 3200).
- Anchor: I chose the right-middle anchor. This is because I wanted the original layer to stay on the right, so I could mirror the left-hand-side of it!
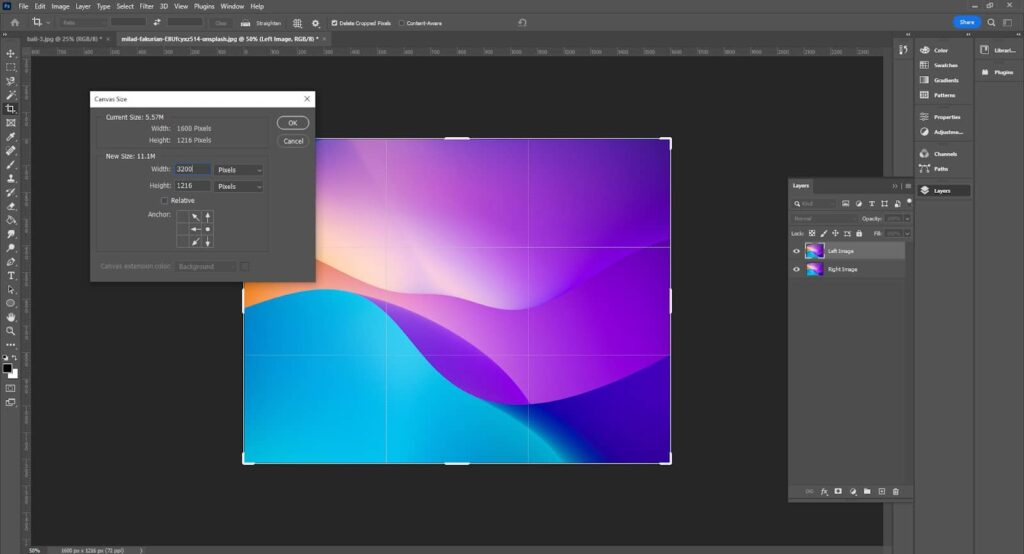
This might seem confusing but its really simple. All you have to do is double the pixels of the width to mirror it horizontally, or the height to mirror it vertically. You then select the appropriate anchor that positions the ORIGINAL layer where you want it.
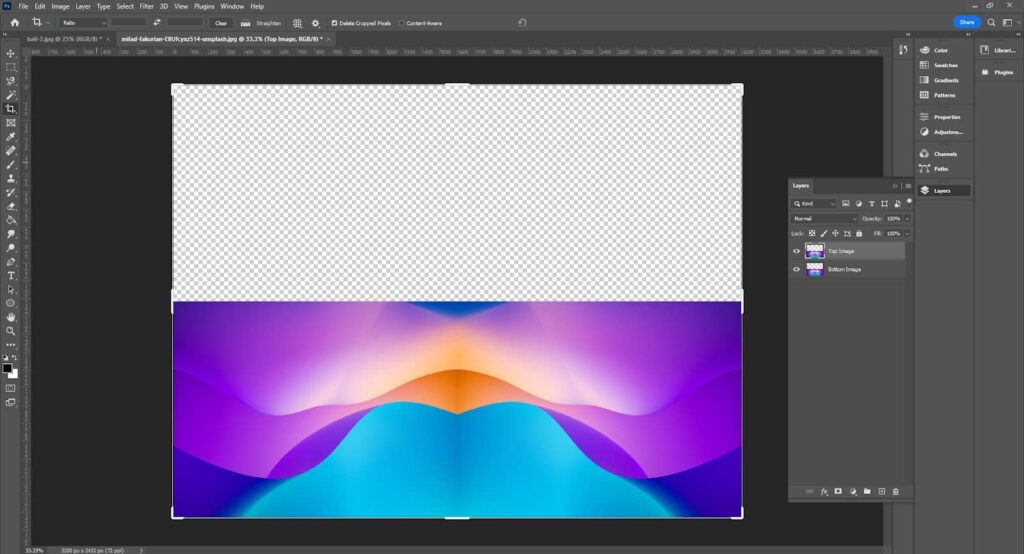
You can see below the new canvas with the original layer shifted to the right-hand-side:
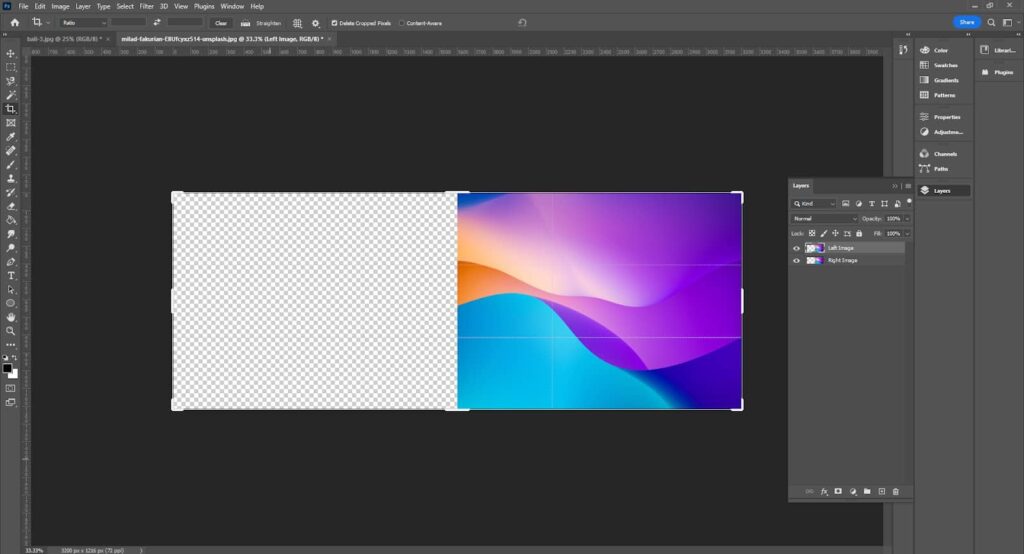
Now we have created more space, we can transform the duplicate layer.
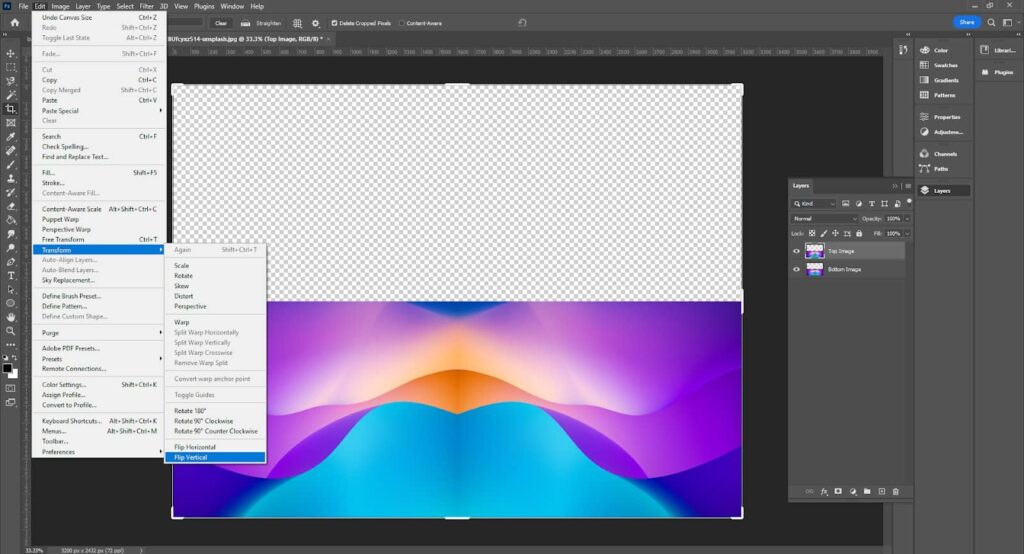
- Single-click on the duplicate layer so it is highlighted (this makes sure we only transform it).
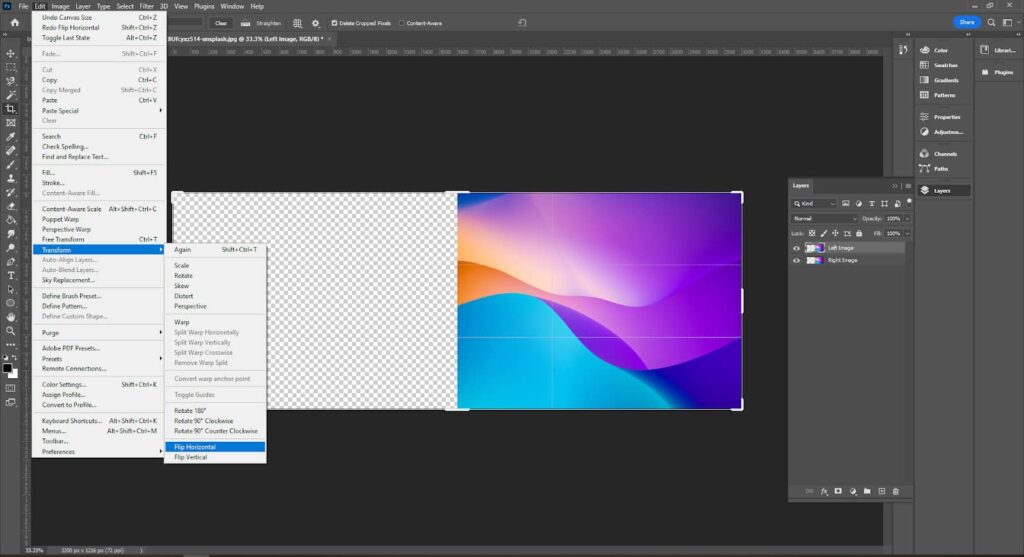
- Click on “image” in the top menu.
- Hover over the “transform” sub-menu.
- Choose the “Flip Horizontal” or “Flip Vertical” depending on what you want to do
In the example, I chose “Flip Horizontal”. This essentially creates a mirrored version of the duplicate layer. As it is the top layer, you should see it flip when you click the transform option.
We can now move the duplicate layer into the blank canvas space to create the mirrored effect! Simply use the Move tool (from the sidebar – keyboard shortcut V) and then click and hold your mouse. You should then be able to move the layer freely.
All you have to do is move it to the blank space. Because we have the “Snap To” option enabled, when you get close to the edges, it should lock automatically in place perfectly and you shouldn’t need to make fine adjustments.
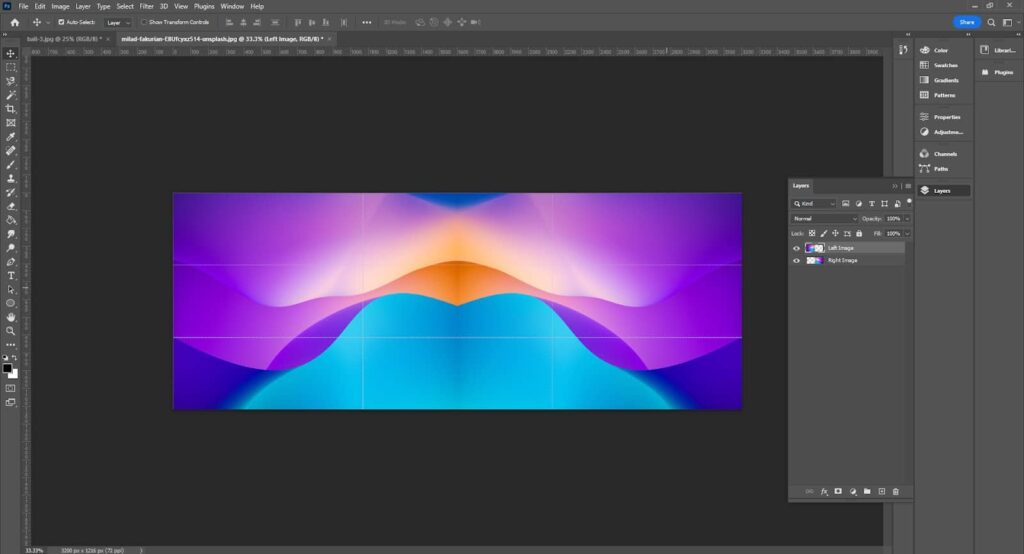
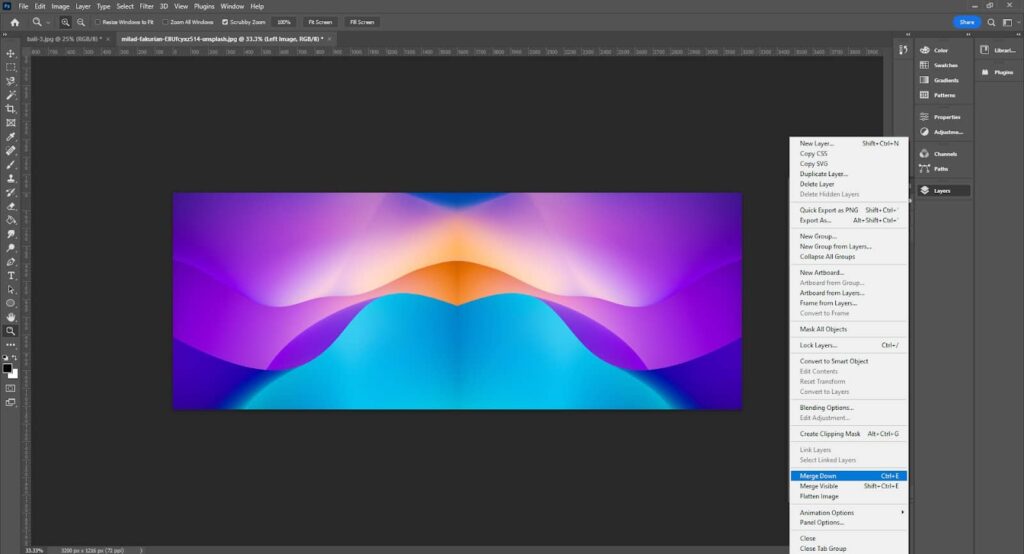
The final touch is to merge the two layers together. Simply click on the four-line button on the right-hand-side of the layers tab – this opens up all the different layer options. Click “Merge Down” and this will combine the two layers into one.
We do this to make it easier to transform the image further if you want to.
As you can see, once you get used to the canvas size and anchors, it’s really easy to do! The process can be done in a few minutes.
I advise always saving a PSD version of the file so you can make further edits. You can then export it as a JPG or PNG ready for use! This is the simplest version but there are other options to such as the one displayed in this YouTube tutorial – https://www.youtube.com/watch?v=X5jHPlwdaHY
How to Mirror an Image in Photoshop Twice
We can take this one step further and mirror the image twice – both horizontally and vertically! Here, we essentially repeat the same steps, but use the opposite transformation to what we previously did.
First, as before, duplicate the new merged layer and rename it something suitable.
We then need to extend the canvas size once again. This time, I did the following:
- Canvas Size: I changed the height to 2432 as I wanted to mirror the canvas vertically, and the image size was 1216 pixels high. (1216 x 2 = 2432).
- Anchor: I chose the bottom-middle anchor. This is because I wanted the original layer to stay on the bottom, so I could mirror the top side of it.
You can now see below that more canvas has been created but above the layer this time. Again, just think about how you want to mirror the image and you can then select the correct anchor, and new dimensions.
We can now transform the new layer. As the original transformation was horizontal, this time I used the “flip vertical” option.
Like before, we can then select the duplicate layer and move it into position to the blank canvas space above the original image.
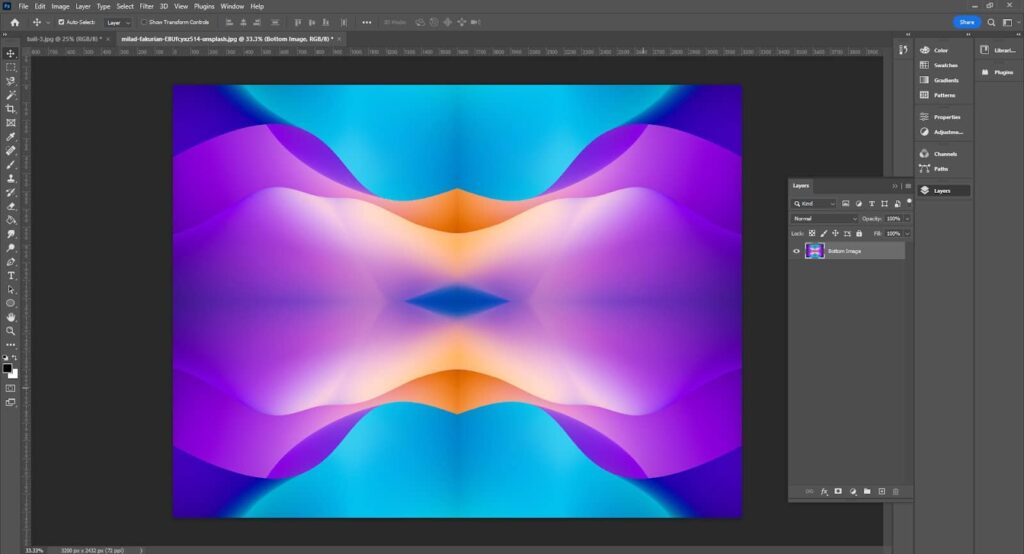
Hey presto! All done. I would advise saving a new PSD of this image now so that you don’t undo the work in the original transformation. That’s literally all it takes! As you can see from the below finished image, we’ve now mirrored an image in Photoshop twice to create a stunning piece of artwork!
Using the Canvas Size tool, and the transform tool, you can be really creative and mirror images in multiple different ways. Furthermore, you can mirror them multiple times – more than two if you want!
Create Unique Artwork and Photos Today With This Mirroring Technique
Well, I hope you found that fun! I definitely had a great time messing around in Photoshop and creating these mirrored images. What are you waiting for? Open Photoshop now and see what amazing and bizarre mirrored images you can produce.
Have a go, and just spend some time playing with layers and using the transformation effects so you get comfortable with how they work. You will be a mirroring expert in no time!
Frequently Asked Questions
Not a dedicated “mirror” tool no. The closest thing we have is the transformation tool. This allows you to flip layers and objects either horizontally or vertically to create the mirror effect.
First, duplicate the layer. Next, enlarge the canvas size to double of either the width or height depending on how you want to mirror it. Then, select the duplicate layer and use the transformation tool to flip it either horizontally or vertically. Finally, move the duplicate layer to the blank canvas area and merge.
This is essentially the same technique as mirroring a layer in Photoshop. You can simply duplicate the selection instead of the layer.
Of course! The only blockade is the size of your canvas. There is literally nothing stopping you from mirroring an image six or twenty times if you really felt the need!
Yes, you can use either the flip horizontal or flip vertical transformation tools to create mirror images in any direction.

Mark McPherson has been working as a video editor and content writer for over ten years. His background started in animation and video editing before shifting into the realm of web development. He also branched out into content writing for various online publications. Mark is an expert in video editing, content writing, and 2D/3D animation.