(Last updated on February 13th, 2023)
Lightroom is my favorite photo editing software. It’s just amazing! One of the best aspects it offers is versatility. On the one hand, I can spend hours editing a single photo to try and create a masterpiece. On the other, I can use a variety of batch editing tools to quickly blast through catalogs of photos from my travels and day trips.
In this article, I’m going to show you about the latter. Batch editing. Not every photo has to be edited to perfection. Furthermore, you may have similar images that would benefit from the same changes. In instances like this, where you want to work quickly or achieve a consistent look, batch editing is amazing.
In the below guide, I show you four different batch editing techniques and some important tips to remember, so let’s jump in!
- What’s the Deal With Batch Editing in Lightroom?
- How to Batch Edit in Lightroom – Using the Copy Settings Tool
- How to Batch Edit in Lightroom – Applying Presets
- How to Batch Edit in Lightroom – Applying Presets During Import
- How to Batch Edit in Lightroom – Copying Metadata
- Batch Editing in Lightroom Mobile
- Save Time Editing Similar Files Using These Batch Editing Techniques
- Frequently Asked Questions
What’s the Deal With Batch Editing in Lightroom?
Let’s first take a little time to discuss the benefits of batch editing. I use it in two scenarios – for improving base image quality, and to quickly edit similar photos.
Batch Editing Is Great for Improving Your Basic Image Quality
I use batch editing to improve the basic quality of my RAW images. There are things you can do to RAW photos to make them look more like processed JPEGs.
I have a “Basic Edit” preset that boosts contrast, and vibrancy, and slightly adjusts the shadows and highlights. It also has some basic distortion correction. I typically apply this preset to all photos when importing them. As a result, this greatly reduces the amount of editing required, and depending on the photo, some don’t even need further work.
It’s Also Ideal When You Have Multiple Similar Images
Batch editing is also fantastic when you have a heap of similar photos. For example, let’s say that you took 10 shots of a landscape but focused on a slightly different aspect in each one.
Here, batch editing would work perfectly as the overall colors, brightness, and contrast would be the same. If you applied a batch edit, you would get consistent results across the photos.
Just bear this in mind when using batch edits. Applying a preset, or a set of parameters to images that look wildly different may not work. The results could be too unpredictable and things like shadows, contrast, and reflections could dramatically alter how presets affect the photo. Therefore, I think it is best practice to apply batch edits only to similar images if you are making dramatic changes.
How to Batch Edit in Lightroom – Using the Copy Settings Tool
If you have a specific edit that you love and want to apply to more photos, you can use the Develop Settings tools. These are invaluable – particularly the copy and paste settings functions. I use these regularly to duplicate awesome edits across similar photos.
It’s important to note that there has to be one edited photo first, or a photo with a preset applied. This is because you will be copying the settings of that photo. To batch edit in Lightroom by copying settings, do the following:
- Make sure you have the library view open
- Select a photo that you have edited and want to copy the settings from
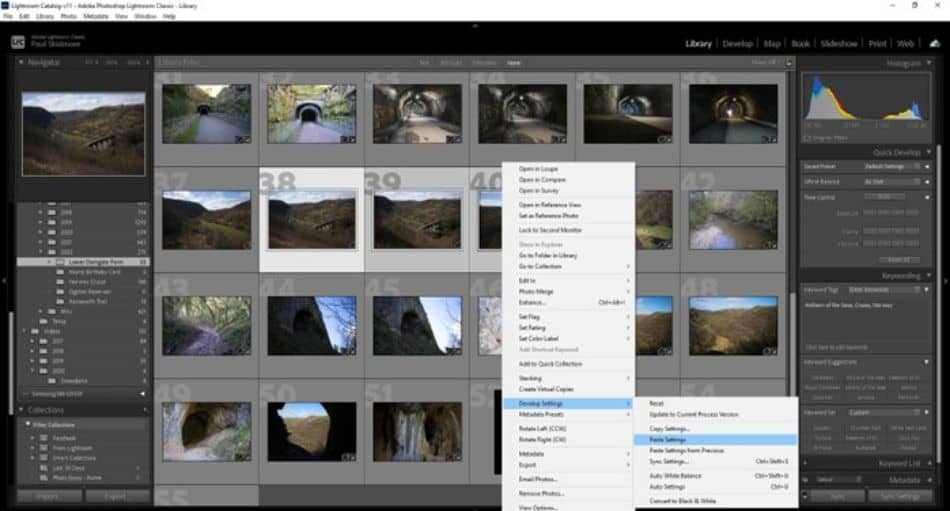
- Right-click on it.
- Hover over the Develop Settings sub-menu.
- Click on Copy Settings.
- Tick the settings you want to copy in the pop-up box.
- Click on Copy.
- Select the photo(s) you want to apply the settings to using Shift or Ctrl.
- Right-click on one of them.
- Hover over the Develop Settings sub-menu.
- Click on Paste Settings.
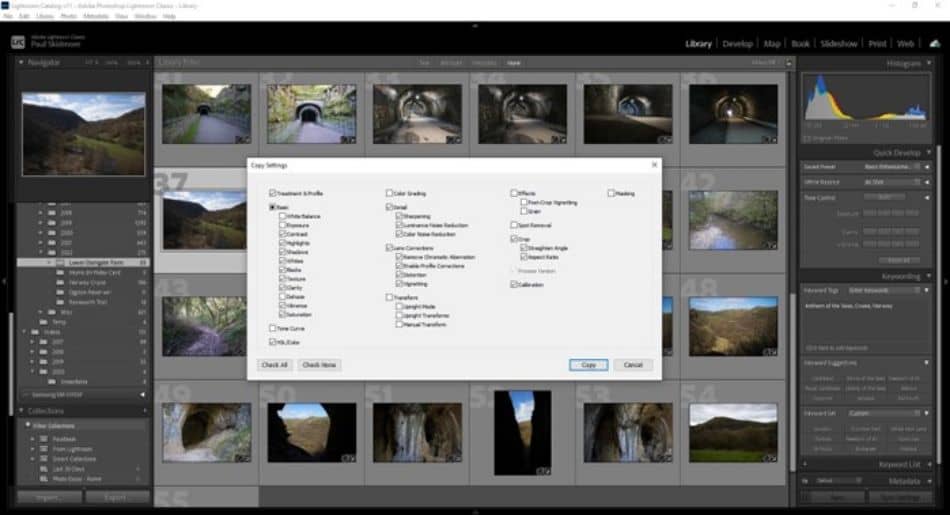
As you can see from the above screenshot, the list of settings you can copy are extensive. This includes basic parameters like contrast and saturation, but even things like local adjustments and cropping. All you have to do is tick which parameters you want to duplicate. This video here also shows some techniques using the sync feature –
Credit: Paul Skidmore.
It’s then a simple case of highlighting the photos you want to batch edit in Lightroom. You can use Shift to select consecutive photos, or Ctrl + click if they are randomly positioned. Once you click the Paste Settings option, the parameters are applied and the thumbnails will eventually update – easy!
How to Batch Edit in Lightroom – Applying Presets
Sometimes you might want to go for a specific style, or edit multiple photos in a certain way. To make this quicker, you can batch edit in Lightroom by applying presets to more than one photo at once. To do this, do the following steps:
- Make sure you have the library view open
- Select the photos you want to apply the preset to using Shift or Ctrl
- Make sure the Quick Develop toolbar on the right-hand side is expanded
- Click on the drop-down menu next to the Saved Presets text
- Click on the preset you want to apply
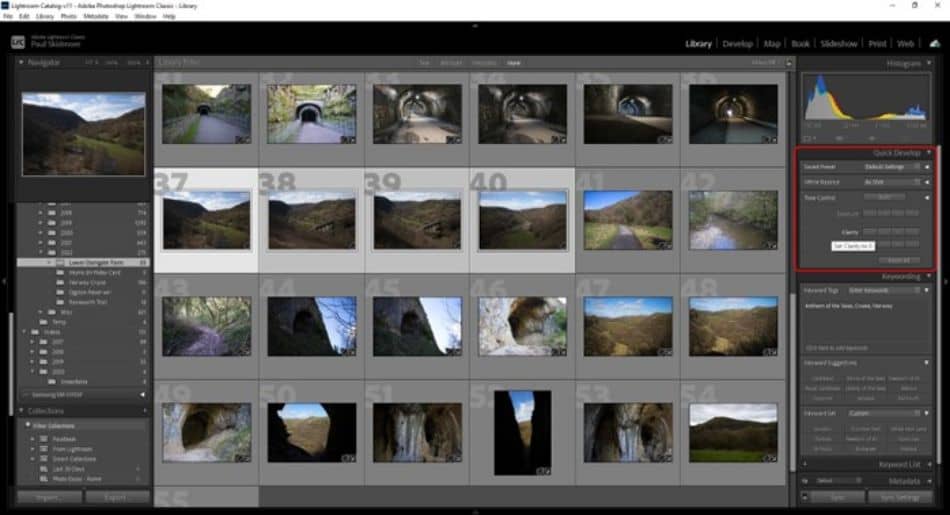
It should be noted that there can be some delay in the image thumbnail updating once you have applied the presets. Don’t worry – as soon as you have chosen one, it will be applied! You may simply have to go into develop mode to see the changes before the thumbnail refreshes.
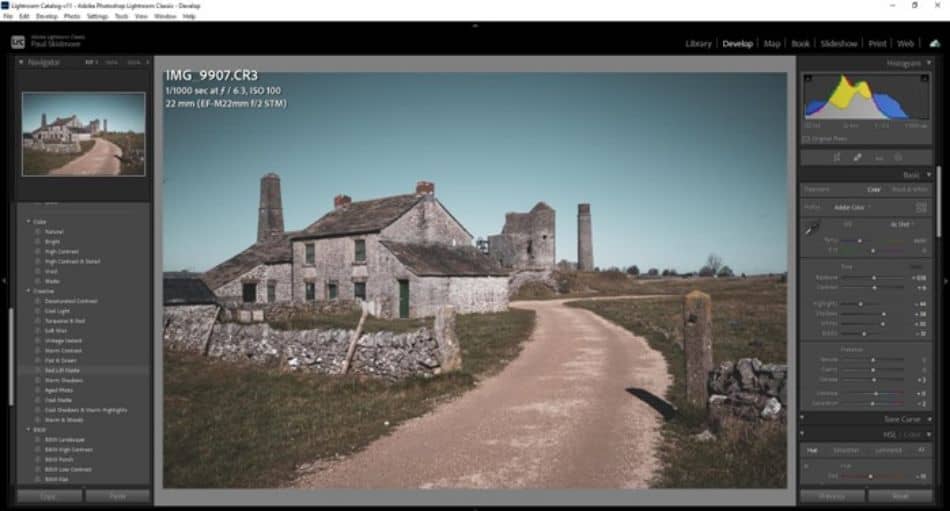
Coincidentally, using the develop mode is a great way to see the effect presets have. For example, you could use the develop mode to find a suitable preset before applying it to multiple photos. As you can see below, presets are shown in a toolbar on the left-hand side of the develop screen.
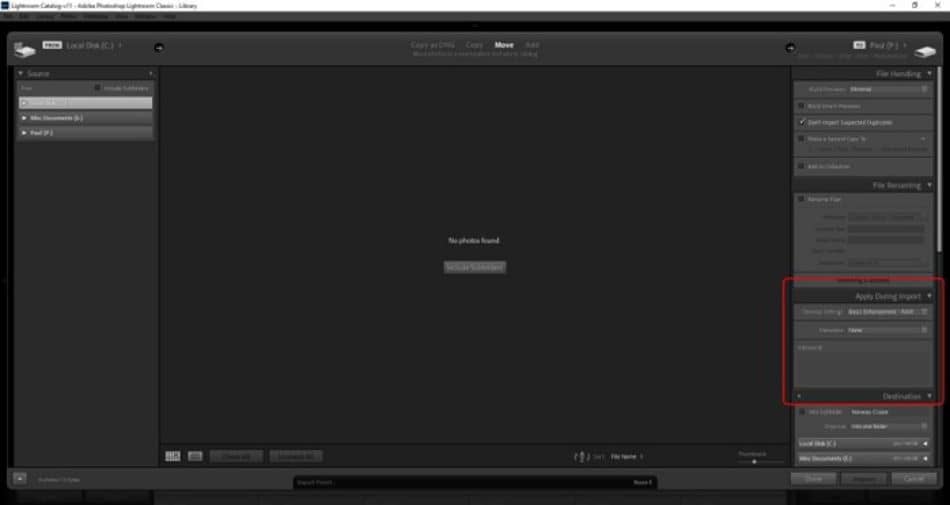
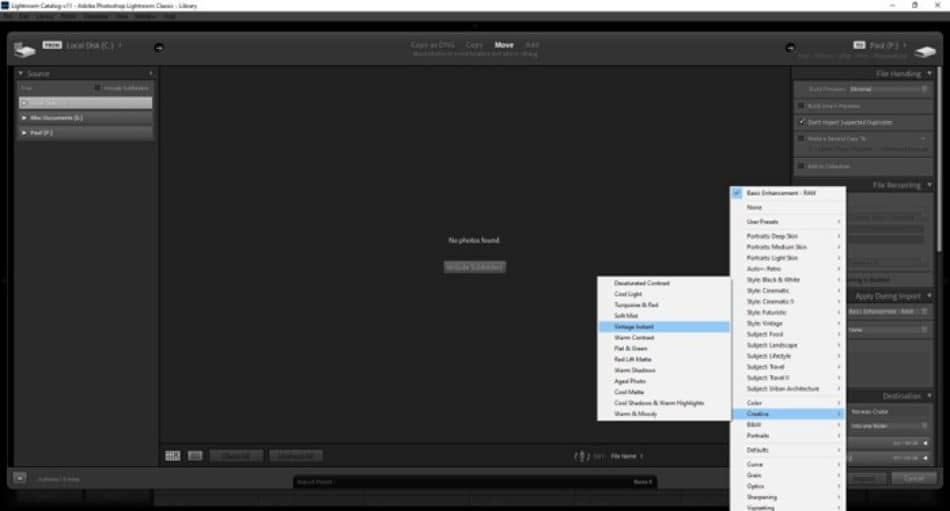
How to Batch Edit in Lightroom – Applying Presets During Import
I actually batch-edit my photos and change multiple parameters during the import process. This can greatly speed up your work and help make your photo collections that much more organized.
For example, I add keywords during the import stage and sometimes batch rename the files too. However, the most important thing I do is to apply a “Basic Edit” preset. This is a simple preset I have developed that boosts the basic quality of RAW photos – nothing too dramatic. By appling this preset during the import stage, I can reduce the effort afterwards.
You can do this easily with your own presets, or use some of the fantastic existing presets Lightroom has. There are specialist ones like Black & White, for example. To apply a preset and batch edit photos In Lightroom during the import stage, do the following:
- Make sure that you are in the library view of Lightroom.
- Click on the import button in the bottom left-hand corner.
- Make sure the Apply During Import toolbar is expanded on the right-hand side.
- Use the drop-down arrow next to the Develop Settings options.
- Select the desired preset to apply.
- Click the Done button.
Credit: Paul Skidmore.
As you can see from the above screenshot, there are numerous things you can do during importing. The thing we are using is the Apply During Import toolbar, however. You can use this toolbar to apply presets, metadata, and keywords to all the photos you import.
Credit: Paul Skidmore.
Creating presets is an entirely other guide but Lightroom has a plethora of default presets that are useful too. I suggest spending time checking out the presets on some of your photos so you can see what each one does – you may then be able to use them for batch editing.
For example, presets like Color > Natural boost the colors of your photos to create a more natural look. There are, of course, some brilliant creative effects too like two-tone, black & white, and vignetting.
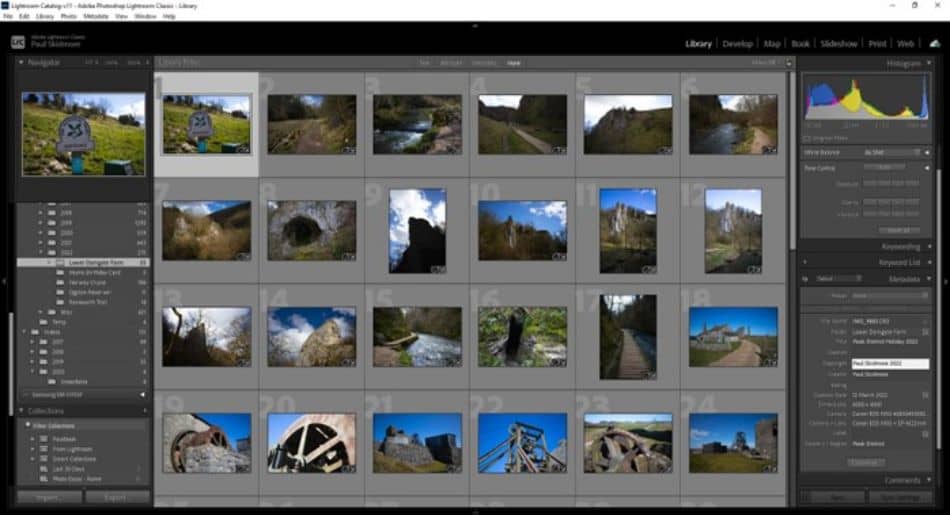
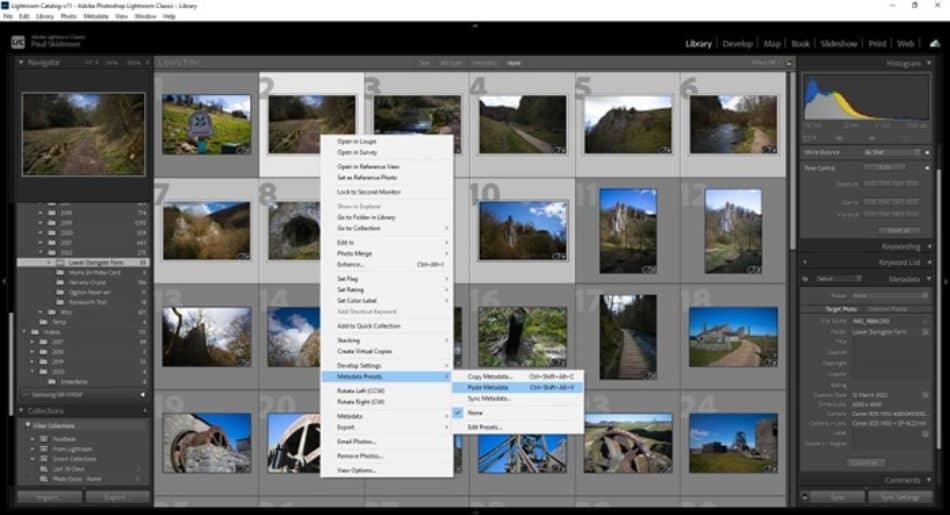
How to Batch Edit in Lightroom – Copying Metadata
Metadata is important for your photos too. This is vital information that you can use for cataloging your files or for search parameters. You can enter metadata like name, date taken, camera information, and even copyright protections.
Lightroom allows you to easily batch edit metadata and this is a great thing to learn. For example, perhaps you have a bunch of photos from a specific location and you want to add keywords or info to them so that you remember the significance. Batch editing allows you to duplicate that metadata across all the photos from the location – amazing.
To copy and paste metadata in Lightroom you do the following:
- Select the first photo in the library view by clicking on the thumbnail.
- Edit the metadata in the corresponding toolbar on the right-hand side.
- Right-click on the photo thumbnail in the library view.
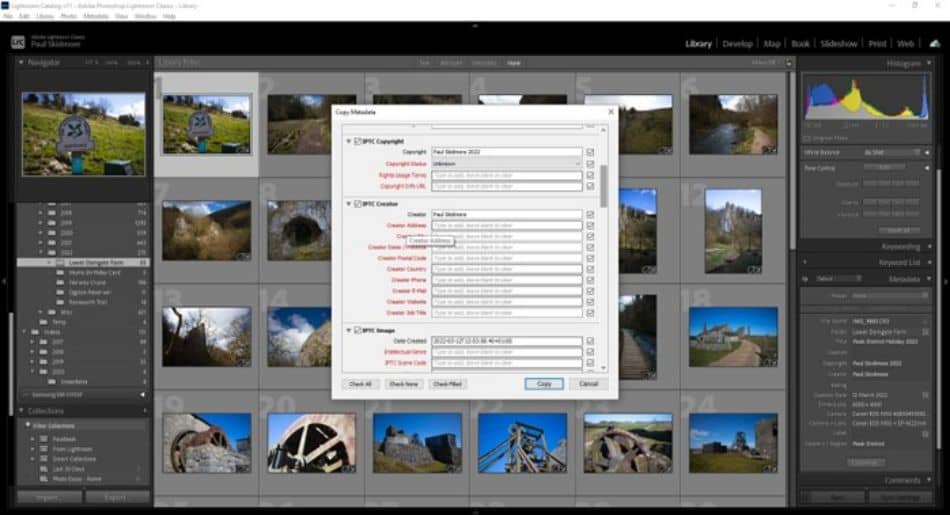
- Hover over the Metadata Presets sub-menu and click Copy Metadata.
- Select the photos you want to copy too using Shift or Ctrl.
- Right-click on one of the photos.
- Hover over the Metadata presets sub-menu and click Paste Metadata.
It’s important to note that by default not all of the metadata fields are active. You have to click the customize button at the bottom of the metadata toolbar. Here you can tick which metadata options you want to show – once ticked, they will appear in the toolbar.
Credit: Paul Skidmore.
Once you have copied the information, you have to select the photos that you want to paste the metadata to. If you have concurrent photos you can simply click the first image, hold shift, and then click the last image. This should highlight them and everything in between.
Alternatively, if you have non-concurrent photos, use Ctrl + click to select each one individually.
Credit: Paul Skidmore.
Batch Editing in Lightroom Mobile
There is also a superb Lightroom mobile app you can use for on-the-go editing. Until recently, this didn’t have any batch features but you can now edit multiple photos at once using this simple process:
- Open the folder containing the photos you want to edit.
- Hold-down press (press with your find and hold for a few seconds) on the photo you want to copy the edit settings from.
- Press “Copy” in the bottom menu.
- Select the photos you want to copy the settings to by pressing the empty white circle in the top-left-hand corner of each photo.
- Press “Paste” in the bottom menu.
This basically works the same way as the copy/paste method described above in Lightroom Classic. The main difference is that in Lightroom Mobile, you don’t have any control over which settings are copied. It’s just a blanket copy and paste of all the settings.
Save Time Editing Similar Files Using These Batch Editing Techniques
As you can see, you don’t have to edit each photo individually and spend hours trying to process large folders of images. Instead, these batch editing techniques can greatly reduce the effort involved and the time needed.
I advise considering the individual images still, however, as batch editing everything doesn’t always work. For minor quality improvements, there should be no problem. But for dramatic changes, a blanket edit might not produce the same results for each photo. It depends on things like lighting conditions and existing contrast.
Frequently Asked Questions
You can use the Develop Settings sub-menu to copy and paste settings from a master image to others. Alternatively, you can apply presets to multiple photos during the import stage. Lastly, you can apply presets to multiple photos at once.
Yes by using the Metadata Presets option when right-clicking on a photo. You first have to edit the metadata of one image and then either copy the metadata and paste it to the other images, or use the sync function to synchronize the metadata.
Yes! Simply highlight all of the photos you want to apply a preset to using Shift or Ctrl in the library view. Next, in the Quick Develop menu, click on the saved presets option and click on the preset you want to apply.
First, right-click on the photo you want to copy settings from in the library view. Next, hover over the Develop Settings sub-menu and click on Copy Settings. A pop-up appears with the settings you can copy – tick the ones you want to duplicate and press Copy. Then, right-click on the photo you want to copy the settings to, hover over the Develop Settings sub-menu and click on Paste Settings.
Yes! In the library view, simply select the thumbnails of the photos you want to rename using Shift or Ctrl. In the Metadata toolbar on the right-hand side, you can then click the menu button next to the file name field and click Batch Rename.

Mark McPherson has been working as a video editor and content writer for over ten years. His background started in animation and video editing before shifting into the realm of web development. He also branched out into content writing for various online publications. Mark is an expert in video editing, content writing, and 2D/3D animation.