(Last updated on November 1st, 2022)
Is your Premiere video project ready to be turned into a video? Do you know how to push it through the export process to get the best results? In this article we’ll take you through the process of exporting your videos from Premiere Pro.
Adobe Premiere Pro has become an industry-standard application. It can be used for more than just video editing but for making adjustments to audio and colors too. The post-production tools are ideal for delivering everything from commercials to feature-length films.
So let’s say you have completed that big video project in Premiere. You’ve made all the edits, the transitions, the color corrections, and the audio adjustments. It’s all finished and ready to become a video that you can place online.
But rendering your video out is not as simple as one click. Exporting your video requires just as much insight as making a well-timed cut or tweaking the color settings. It’s a skill that deserves just as much attention, considering it’s the final step in producing a stellar video.
This is especially true for videos intended for YouTube. The video platform can support several different video formats, but only a few meet the optimal standards of the platform. Rendering the wrong video can lead to long upload times and even interactivity issues with your video.
In this article, we’ll go over how to export your video from Premiere Pro correctly. You’ll learn how to send your project to the Adobe Media Encoder, as well as which settings work best, specifically for YouTube. It’s not as difficult as you may think, but there are some specific aspects you’ll want to know.
Tutorial Rundown
- Double-Check Your Project Timeline
- Sending You Video To Media Encoder
- Selecting The Right Export Settings
- Rendering Out Your Video
Step 1: Double-Check Your Project Timeline
Before we even jump into exporting, it’s essential to ensure that you’re exporting the finished product you want. If you don’t have the suitable composition selected, you could render the wrong video. You may even render out a portion you would prefer to remove from the final cut.
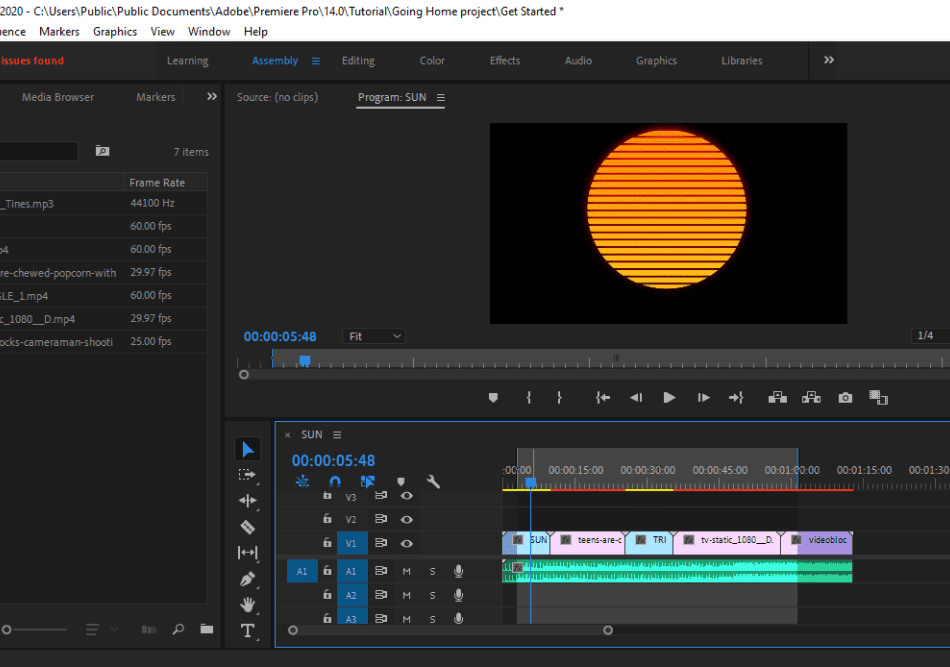
Before exportation, take the time to give your composition timeline one more look. If you prefer only to render a portion of your composition, you can set in and out points. Position the slider at an In point you want and hit “I” on the keyboard. Then find an Out point and type “O” on the keyboard.
You’ll notice now that there’s a highlighted portion of your timeline. This is what will be rendered when you send your project to the exporter. If you don’t like it, you can either remove the in and out points on your timeline or choose the export settings.
Another critical aspect to keep in mind is the composition settings. YouTube typically reads videos at either 720p or 1080p. You can go higher and even experiment with different aspect ratios. YouTube can accommodate quite a few different styles of videos when it comes to size and quality.
It’s essential to be aware that there are some limitations to video that don’t fit familiar specs. For example, if you push out a video at an odd aspect ratio that isn’t something like 4:3 or 16:9, you won’t be able to add end-video buttons. This is due to YouTube not being able to calculate the appropriate screen size for the placement.
It’s generally good practice to stick with 1080p videos with a 16:9 aspect ratio. This will give your video enough quality while still looking good. Remember, you’re making this video for YouTube, so not everybody will be watching this on a 1080p monitor or 4K television.
When you’re ready to send your video to the exporter, make sure your composition is selected. Look in your project library and click on the composition you created to make sure it’s selected. If you don’t have a composition selected, you won’t be able to move on to the next step.
Step 2: Sending Your Video To Media Encoder
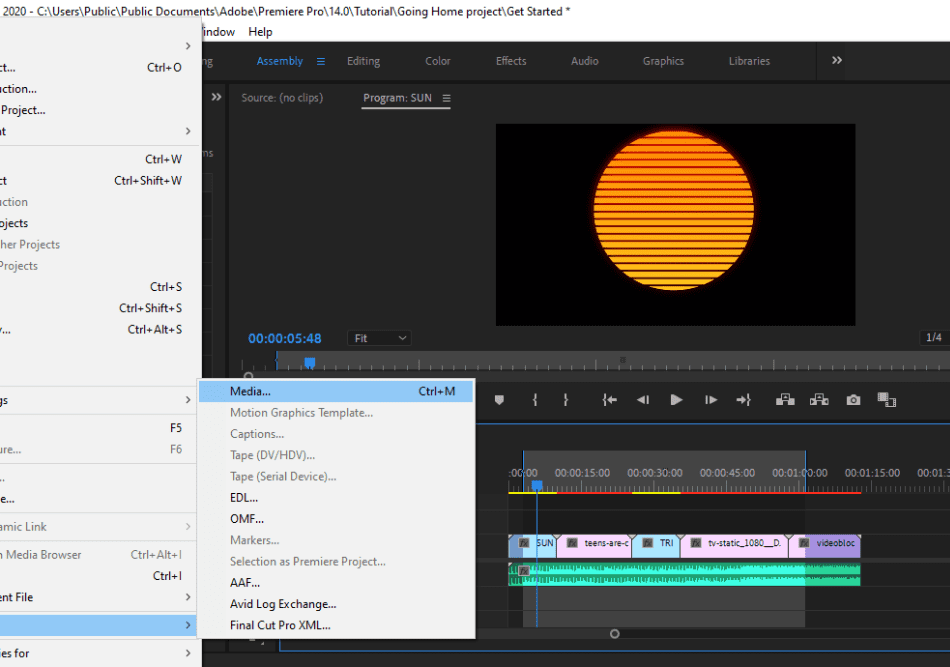
With your composition selected, navigate up to File on the top of your Premiere interface. You’ll then navigate to File > Export > Media. Clicking Media will open up the prep window for sending your video into Adobe Media Encoder.
Before sending the video off to the Encoder, take a brief moment to look over the settings. These are not settings you have to decide on right now, as everything in this window can be changed later. Still, it’s worth taking a glance at what you’ll be prepared to render to save some time.
You can see a preview window of the composition you intend to render on the left side of this window. Take a look at the slider, and you’ll see options for clicking and dragging in and out points. If you already added in and out points, you’ll see them reflected here.
You’ll notice on the right-hand side that you have options for selecting the type of video and audio you’ll be exporting. You can even choose if you only want to export video and exclude audio. We’ll cover all of these settings in the next step, so it’s best to just glance at these options for now.
When you’re ready for the next step, click the Queue button at the bottom of the window. Once you click, the Adobe Media Encoder will start opening as a separate application. You can keep Adobe Premiere open while this program is running simultaneously, so don’t feel the need to close the video editing software.
Step 3: Selecting The Right Export Settings
Once Adobe Media Encoder opens up, you’ll be presented with about four windows. For our purposes, we’re going to focus exclusively on the top right corner. This is where we will be editing the settings for our composition.
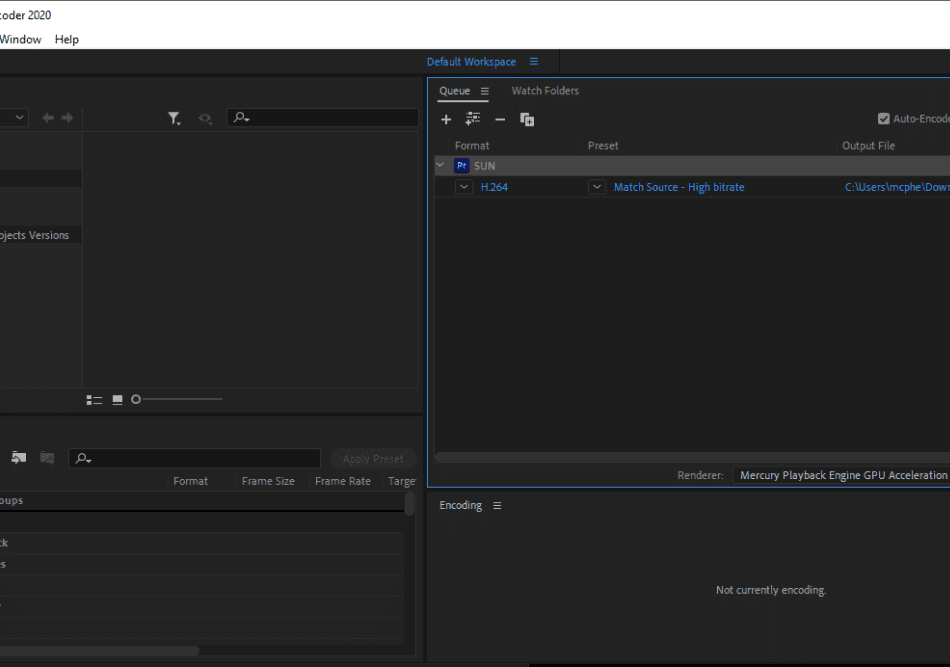
The top right section should be the Queue and you should see your composition listed in this area. Listed under the composition title, you should see three options: Format, Preset, and Output File. Let’s address Presets first since this is one of the quickest methods.
When you click on Presets, you’ll get a dropdown menu of different video types. You’ll notice that these presets are tailored specifically for where your video will be shown. This includes formats suitable for everything from Twitter to VR.
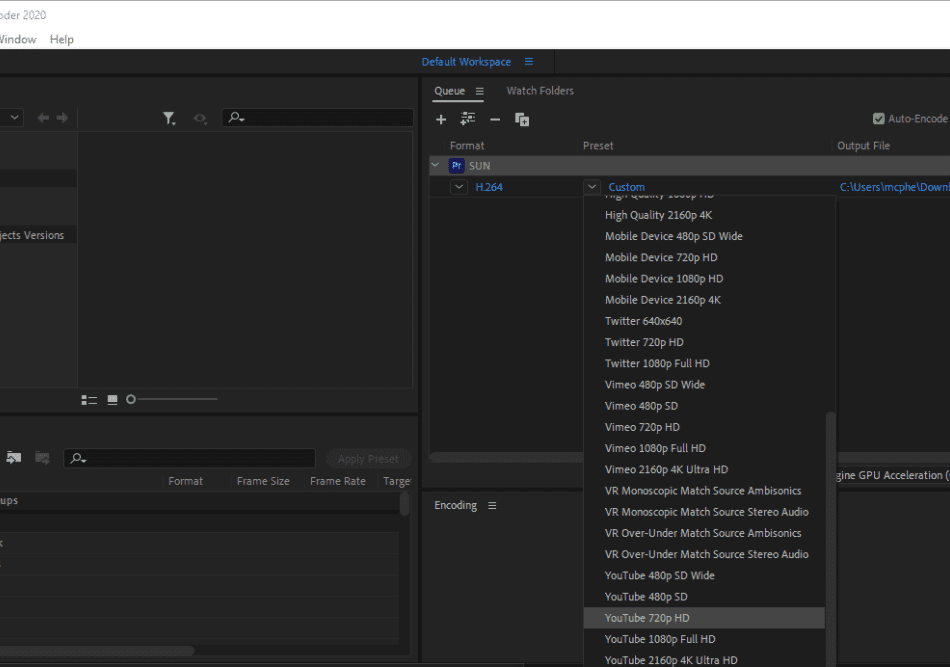
Scroll down on the list and you’ll find YouTube settings. You can select specific sizes for the type of video you’re producing. If you have a 1080p video, for example, you’ll want to select YouTube 1080p Full HD.
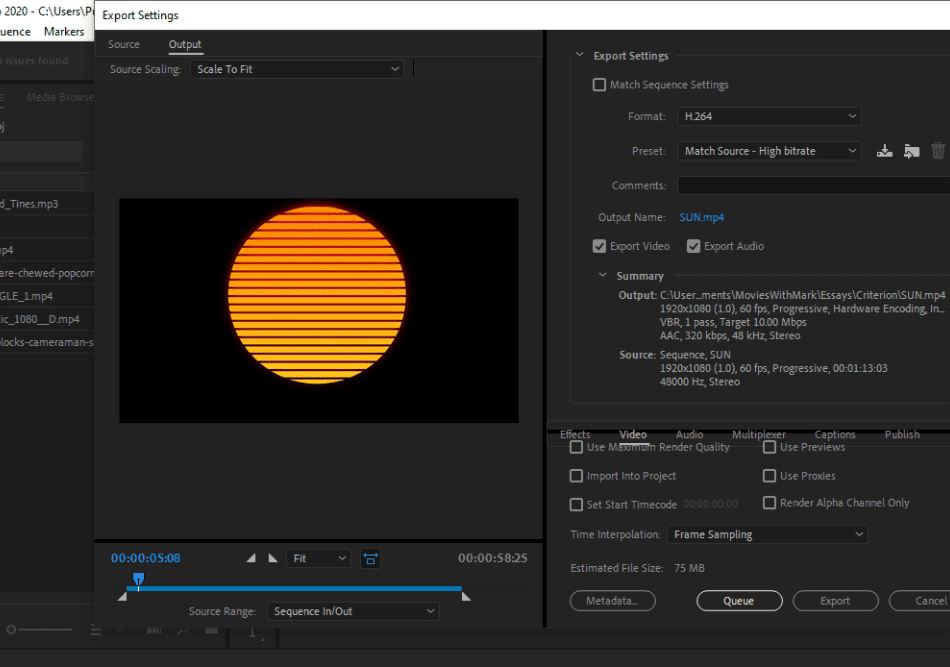
While the presets may be enough, you may want to have some more control over the output. For editing more specific details, you’ll want to click on the format to open Export Settings. Click on the blue text under Format that displays the current video format (in this case, we have H.264).
You’ll notice the Export Settings window is the same as the window we saw in Premiere before exporting to Media Encoder. Here is where things get pretty specific. We’re going to go over the details of constructing the correct settings for a YouTube video.
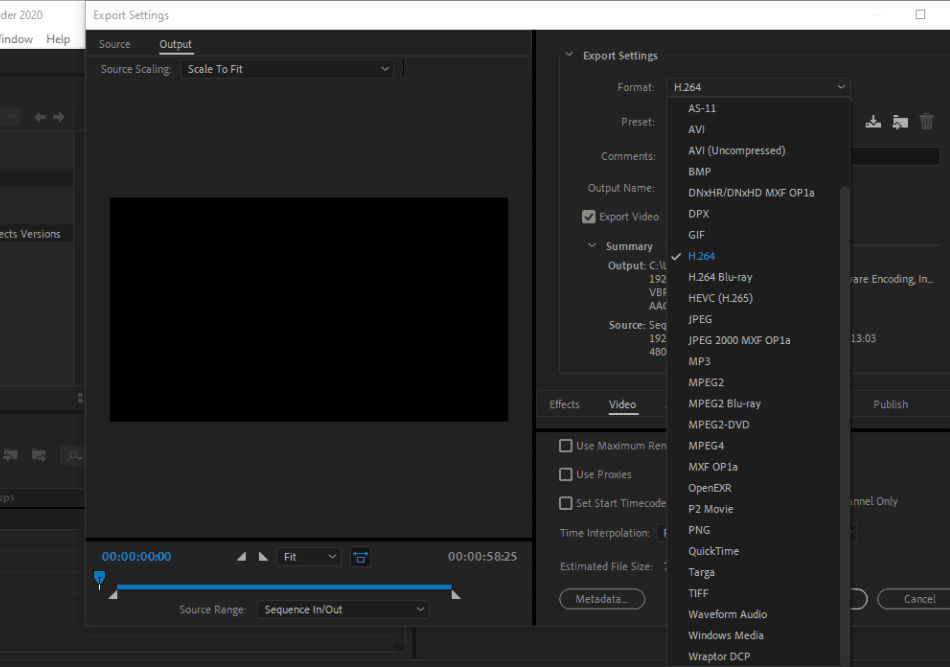
The format is an easy one to choose. MP4 is the best format for maintaining quality while still having a relatively low file size. Other formats in the Media Encoder will either produce lower quality with lower file size or higher quality at higher file sizes.
It’s important to keep the file size low as the higher it goes, the longer it will take to post on YouTube. Videos posted to YouTube have to be uploaded first and then encoded. If the file size is well over 1GB, that time can take much longer.
You’ll notice below the format are the presets. Just like in the queue, you can select the YouTube preset from here as well. You can stop there if you like but if you want to optimize your video more, you’ll want to take notice of the bitrate.
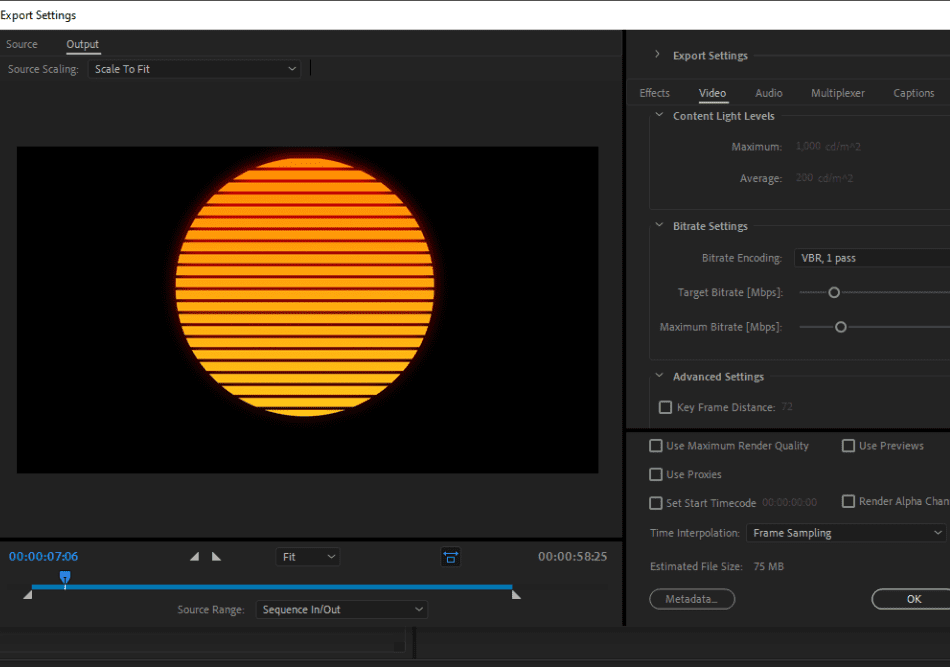
Scroll down in the Export Settings and select the Basic Video Settings tab. If your video is 1080p, here are the settings you’ll want to use:
- Frame Rate: 23.976
- Width: 1,920
- Height: 1080
- Bitrate Encoding: VBR, 2 Pass
- Target Bitrate: 15
- Maximum Bitrate: 40
- Use Maximum Render Quality: Checked
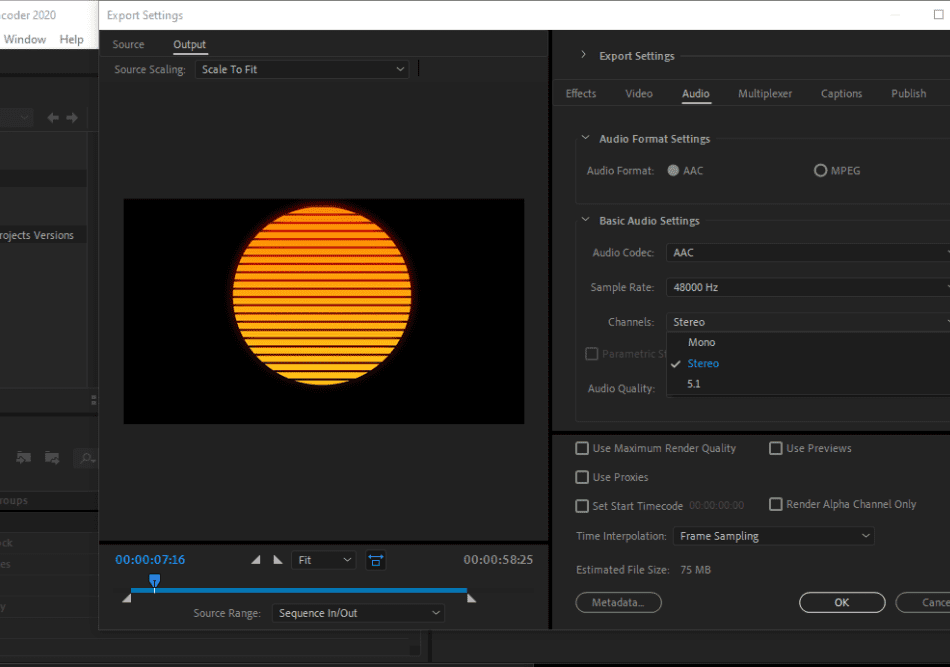
Now let’s talk audio. Navigate to the Audio tab of your export settings and scroll down to make the following edits:
- Audio Format: AAC
- Audio Codec: AAC
- Sample Rate: 48000 Hz
- Channels: Stereo
- Audio Quality: High
- Bitrate: 320
- Advanced Settings > Precedence: to Bitrate.
Keep in mind that these are settings best suited for typical YouTube videos with 1080p video and audio. You may have a video that is only 720p or you may not even want to include audio in your video. If that’s the case, be mindful of some of the settings.
In most cases, though, these are the ideal settings for your average YouTube video. With all of these settings in place, you should be ready to finish your video. The only thing left to do now is picking a destination.
Step 4: Rendering Out Your Video
Before rendering your video, you need to choose where the finished project is going to be sent. There are two options to consider if you’re creating a video for YouTube. You can either render the video directly to YouTube or save the video locally on your own hard drive.
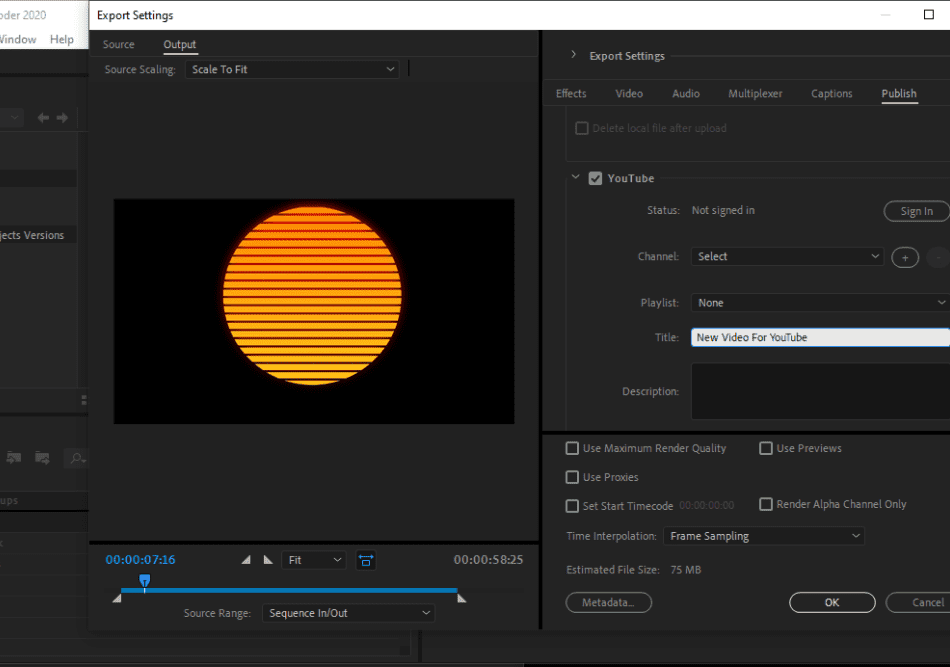
If you’d like to send your video directly to YouTube, you can find that option in the Export settings. Find the Publish tab and scroll down to the section marked YouTube. You can then select the checkbox for YouTube and then connect your YouTube account.
When your account is connected, you can then select the YouTube channel and playlist you want to point it towards. You can also write in the title and description as well. This method can save you a lot of time if you intend to post a lot of videos in a timely manner.
If you’re working with a longer video, however, it’s best just to render locally. This will allow you to preview the video before posting it to make sure you’re posting the final product you want. That way you’ll avoid unforeseen issues or errors in the rendering process.
You can select to publish locally from the Export Settings and do so after you close this window. For the simple method, click Ok to close the Export Settings. Then find the column for Output File and find the link that is currently showing the default folder for where your video will be placed.
If you click on that link, a file explorer will open that allows you to choose the destination of your video. Choose a folder where you want the video to be placed and select a title if you don’t like the one automatically written by the composition name.
This is the best route if you want to give your video one last look. There are other options to automatically upload your video to various platforms, such as the Adobe Cloud. Rendering locally, however, will make the process much faster and allow you to delete videos that don’t turn out just right.
Give one last glance over all your settings to make sure all systems are ready for launch. When you’re ready to take the final step, click the green play button in the top right-hand corner of Adobe Media Encoder. This action will start the rendering of your video.
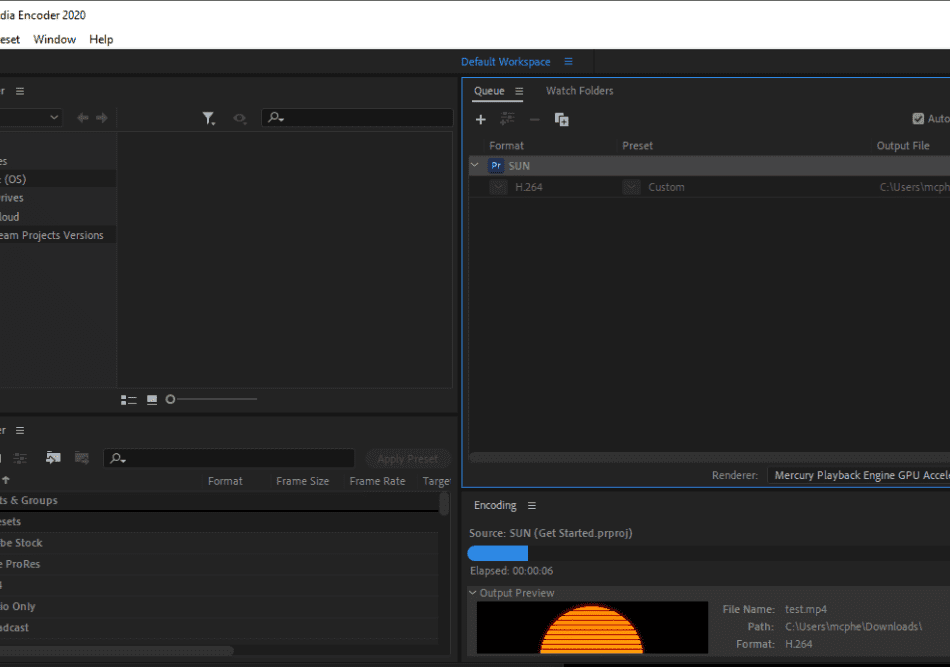
In the bottom right-hand corner of Media Encoder, you’ll notice that a preview window and progress bar are moving. Watch as your video renders out and check how long the process will take. You should receive a rough estimate of how long the video will take to finish.
If while watching the preview you notice an error or you hit the play button too soon, you can click the stop button right next to the play button at any time. This will stop the current render of your video. When you do this, however, you’ll have to go through the process again of exporting from Premiere.
The convenience of the Media Encoder, however, is that it allows you to use it at the same time as Premiere Pro. So if you’ve finished one composition and sent it to Media Encoder but want to work on another in Premiere, you can have Media Encoder running the background while you continue to edit.
When the progress bar is no longer blue, and the preview box is empty, your video has finished rendering. Find the video in the file destination you specified and give it a watch with your media player to make sure it looks good. If that’s the video you want to upload, go right ahead and post it to YouTube.
Final Thoughts
This is just one example of how you can export Premiere Pro videos. If you search around the presets and export settings, you’ll find there are options for preparing videos for DVD or virtual reality experiences. These are areas worth exploring if you plan to develop more professional videos.
Given that YouTube is one of the most popular video platforms, however, you’re likely to use this preset the most. Whether you’re a content creator or an online advertiser, the YouTube export settings are worth knowing. But there are a few more to consider as well.
If you peek in the presets, you can find settings for videos posted on Vimeo, Twitter, and Facebook. For those seeking to spread their videos across multiple platforms, these formats are worth looking into as well. With enough practice, you’ll be able to push out videos for any platform and upload great-looking videos online.
Frequently Asked Questions
Exporting video through Adobe Premiere Pro can be done with the Adobe Media Encoder. Inside your Premiere project, navigate to File > Export > Media. This will open up a window to prepare your video to be sent to the Media Encoder. Once you click the button to queue the project, Media Encoder will open. Look over the details, including the output location, and click the Play button to start the rendering process. When the progress bar finishes, your video is ready.
MP4 video can be exported out of Premiere Pro by changing the Media Encoder export settings. When you open your project in Media Encoder, change the video settings specifically to output an MP4 video file. You can also get the same results by selecting the presets for YouTube in the presets selection part of the encoder settings.
Adobe Premiere Pro costs a monthly subscription fee of $20.99 a month. This cost is under the annual plan and covers updates, so you’ll always use the latest version. If you’d prefer to only pay once instead of using a subscription service, you can use Premiere Elements instead. Premiere Elements doesn’t have as many advanced features, but you only have to pay $99.99 once for lifetime access to the current version.
Adobe Premiere Pro is intricate but is straightforward enough that most beginners can hop right into the program. It is not as easy to use as Premiere Elements, but there are plenty of tutorials, tools and tips that can easily guide the most novice of editors. It’s an excellent program to learn, considering Premiere Pro is an industry-standard video editing program. As a non-linear editor, the lessons learned in the workflow of Premiere can carry into other video editing programs as well.

Mark McPherson has been working as a video editor and content writer for over ten years. His background started in animation and video editing before shifting into the realm of web development. He also branched out into content writing for various online publications. Mark is an expert in video editing, content writing, and 2D/3D animation.