(Last updated on January 9th, 2023)
Do you want to apply some impressive-looking effects to your Premiere project? Would you like to know how to make your videos rotate around the screen? If that’s the case, you’ll want to check out this tutorial with step-by-step instructions.
If you’ve been using Adobe Premiere Pro for some time, you may already be accustomed to most of its editing functions. Let’s say, however, you have some video footage that you want to create an odd effect with. Maybe you want to change the camera’s perspective and go for more of a Dutch angle.

You don’t have to worry about reshooting your footage if that’s the case. Premiere Pro has tools for rotating your footage, which can help you change perspective or animate a shifting of the camera.
In this tutorial, we’ll go over how to apply and animate a rotation. We’ll be using footage of Los Angeles, where the camera is zooming into the city. The goal is to animate a rotation to create a slightly disorienting effect during the zoom.
Tutorial Rundown of Rotating a Video in Premiere Pro
- Selecting our Footage
- Finding The Effects Controls
- Setting Rotation Animation Frames
- Tweaking The Animation
Step 1: Selecting Our Footage
Let’s start by assembling a video project. Startup Premiere, create a new project and make sure you have the Assembly tab selected. Then either import video footage or drag your video file into the library panel.

We now need to place the video in a composition. You can create a custom one if you like by navigating to File > New > New Composition. We’ll automatically create one by just dragging our video footage onto the timeline for our purposes.

When the video is placed on the timeline, the composition will automatically be fitted to the size of the video. We now have everything we need on our timeline to rotate the video footage. Click on the video clip on your timeline to ensure it’s selected for the next step.
Step 2: Finding the Effects Controls
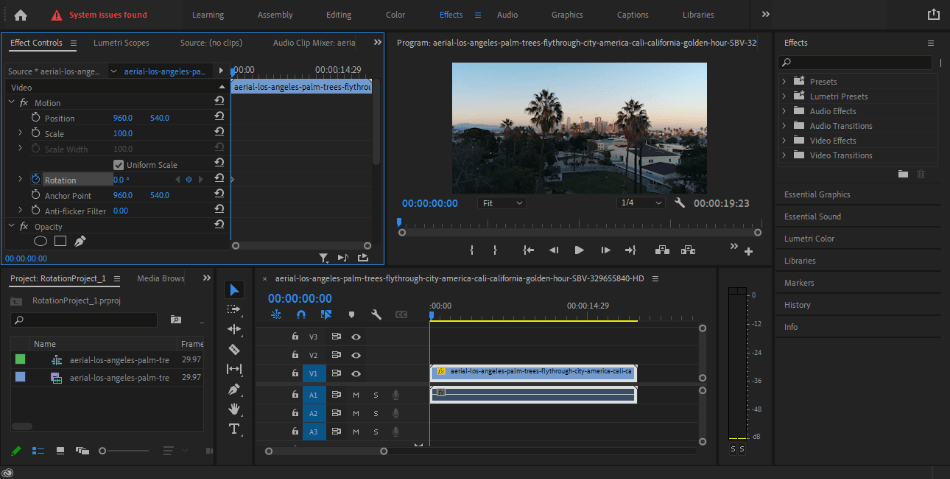
With our clip selected, we will navigate to the Editing workspace. Look at the tabs on the top of the interface and click Editing. This should open up the effects tab in the upper-left corner of your workspace.
Make sure that this window has the Effects Controls mini-tab selected. You’ll know you’re in the right place if you see options for editing your video footage. These options will include Position, Scale, and, the option we’ll use, Rotation.
In this window, you’ll also notice that there’s a timeline on the right-hand side. This small area is where we’ll be applying and tweaking our rotation of the video footage. If the timeline area seems too small, feel free to click and drag the edges of the window to resize it and give yourself more space.
Step 3: Setting the Rotation Animation Frames
Once you find the Rotation controls, you can immediately rotate your footage by clicking and dragging on the number currently at 0.0. Doing so will give you instant results in the preview window of the rotation you are making. You can also click once on the number to manually type the amount of rotation.

This method is only good if we’re not animating a rotation. The rotation won’t move as the footage progresses. To make that rotation come alive, we need to tell this footage to be animated.
To rotate your video footage, we will be applying some keyframe animation. If you’ve used After Effects, this process is quite similar. If you haven’t, don’t worry, this is a relatively straightforward process and doesn’t take much time to figure out.
We’re going to start by setting our first keyframe. Make sure that your timeline (in either the Effects Controls or your composition timeline) has the marker set to the beginning of the footage. With the beginning of our footage selected, click the stopwatch icon next to Rotation in the Effects Controls.
This is the keyframe creation button. You’ll notice that there’s now a triangle at the beginning of the Effects Control timeline. This is our first keyframe for animating a rotation.

Now let’s navigate to the end of our video clip as we navigated to the beginning. We’ll do the same thing here as well by creating another keyframe. There are two ways to develop this next keyframe.
If you look in the area for Rotation, you’ll notice there’s a circle with arrows on both ends. This small tool is used to create keyframes and navigate to each one on the timeline. If you click the circle in the middle, you’ll create a new keyframe.
Since you clicked the stopwatch, the Rotation option automatically generates keyframes on the timeline. So you could just navigate to the end of the clip and then apply the rotation changes. We’ll use the keyframe with the Add Keyframe circle button for our purposes since it’s good practice.
You’ll notice that once you apply a keyframe, the circle tool will turn blue. That’s how you know a keyframe is currently selected, and any changes you make will affect that particular keyframe. If the circle doesn’t have blue, no keyframe is selected.

Now it’s time to apply the rotation. With the last keyframe selected, look at the controls for Rotation on the left-hand side of the Effects Controls. Find the 0.0 next to the keyframe creation tools.
Click and drag your mouse to the right to make the number increase. This number is the degrees of rotation for your video clip. You’ll notice as you drag it that your video footage is now rotating in the preview window.
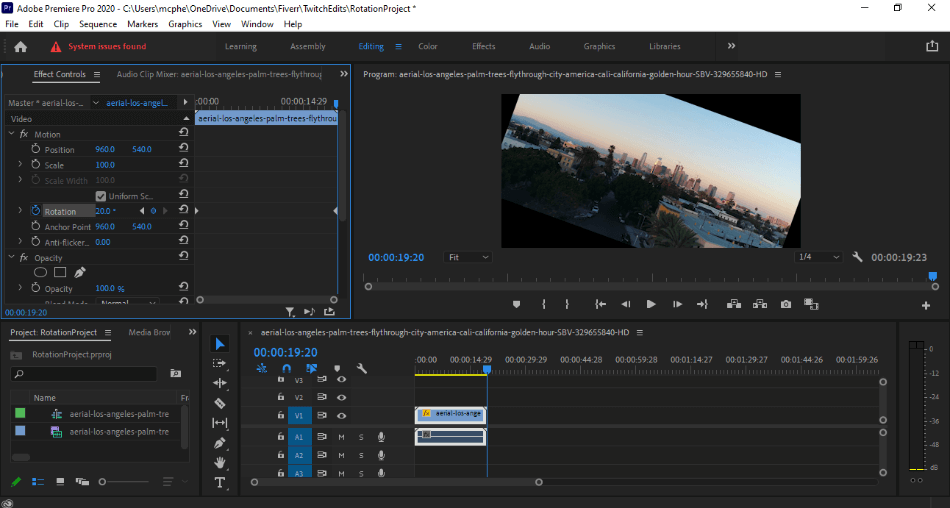
For this tutorial, we want the rotation to be relatively subtle. I’ve applied 20 degrees for the footage to shift but feel free to use what you think works best. Be aware, however, that our rotation will also determine the movement of the clip.
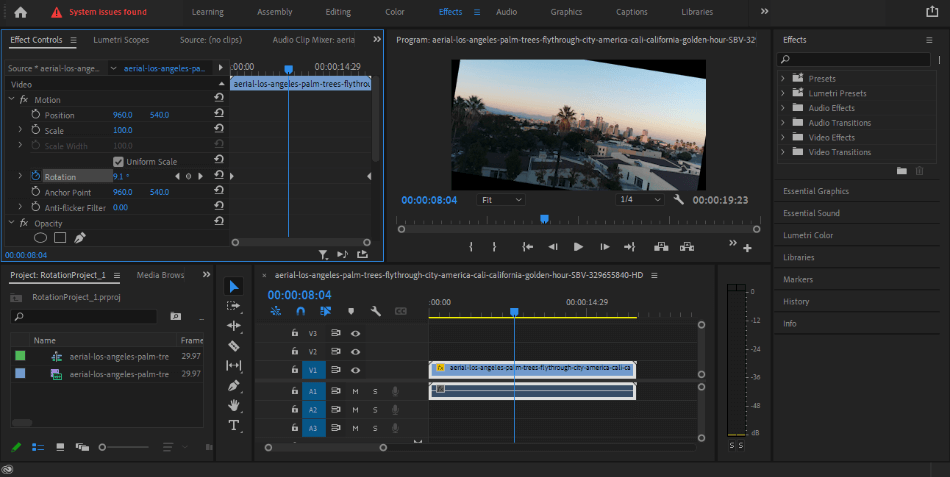
You can now check how your rotation works with animated effects. Drag around on the timeline or play your current composition timeline. You have an animated rotation of your video footage. It’s not perfect, but we’ll cover how to fix it up in the next step.
Step 4: Tweaking the Animation
Our rotation is applied, but it could use some work. Notice how when we apply our rotation, the video footage goes off the canvas and reveals the black background behind it. It doesn’t look perfect, does it?

We want to ensure our video footage constantly occupies the screen, even when rotating. To make sure the footage encompasses the screen, we will use the Scale tool in our Effects Controls. You can find it listed above Rotation.
There are a few ways we can use Scale to fix our footage. We could animate a zoom-in of the footage to get closer progressively. We could also just set the zoom without any keyframes at all.
For our purposes, we won’t be adding keyframes. The reason for this is that we need the footage zoomed in from the first few frames of the rotation. An animated zoom would not work for making sure the footage is taking up the whole preview window.
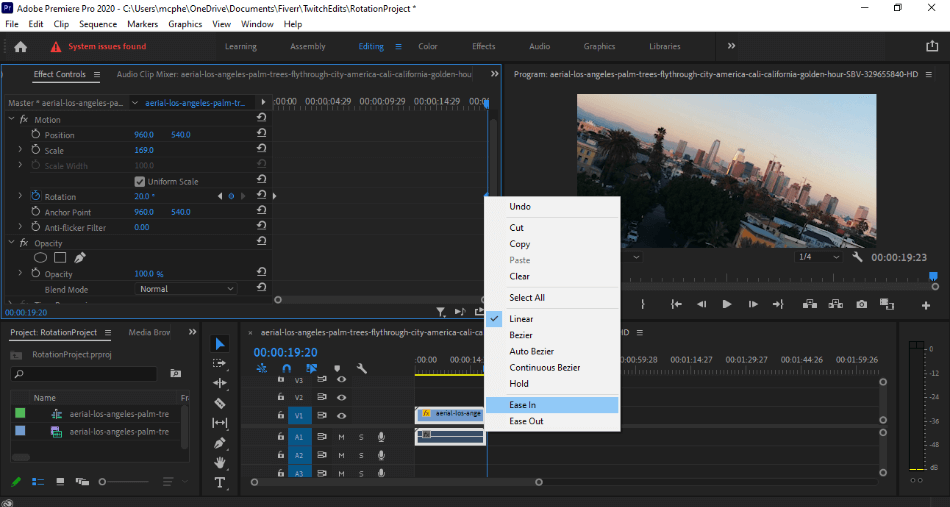
I’ve set the scale to about 169 to zoom in enough footage to cover the area. The amount of scale you’ll need will ultimately depend on the size of your footage and the extent of your rotation. Be sure to check your timeline and preview window while making these changes to find the right amount of scale to apply.
The other issue you may notice is that the rotation seems a little too subtle. It may seem too robotic. You may want to smooth the animation to feel more flowing. In the same way that you can tweak video and audio transitions, you can do the same thing for your keyframes.

Right-click on the final keyframe of your rotation animation. You’ll be given a submenu of options for what you want to perform on that keyframe. Look towards the bottom, and you’ll find Ease In and Ease Out.
Select Ease Out from the options. Playback your footage now and notice how the rotation now slows down more as it ends. You can also apply an Ease In to the first keyframe of your rotation to make the rotation animation even smoother.
This is a simple example of applying a rotation to your video footage. You can make the rotation more complex by adding multiple keyframes and moving them around. If you wanted a faster rotation to complete before the end, all you’d have to do is drag the last keyframe closer to the first.
Getting used to keyframes is an essential aspect of Premiere to learn as they’re not just used for rotating footage. You can also use keyframing to change your video clip’s position and opacity. Keyframing also works for video effects and is ideal if you want to display shifting brightness and colors.
Rotation doesn’t just work for videos, either. You can use this same technique on images, graphics, and any text that you bring onto the timeline. Keep this in mind as it can be handy for accomplishing some simple motion graphics without the aid of After Effects.
A perfect example of this may be if you’re compositing footage of the outdoors behind airplane glass. If you want to make it seem like the plane is ascending, you’d simply rotate that background footage. You can even create an animation rotation of the foreground footage to create a camera movement of the plane going vertical.
The most important thing to keep in mind with your rotation is how it appears and moves. Keep a close eye on the edges, and don’t be afraid to use the Scale and Positioning options when you need them. These controls can be invaluable for video post-production.
Frequently Asked Questions
Adobe Premiere requires a subscription fee to use the application. There is no free version of Premiere, but you can download a seven-day trial from Adobe. The trial version will give you access to all of Premiere’s professional features for editing videos. When that trial ends, however, you will have to pay to continue using the program.
Premiere Pro will cost you a monthly subscription fee of $20.99 a month. You can also get Premiere Pro bundled with the entire Adobe Creative Cloud catalog for $52.99 a month. If you’d prefer to pay a flat fee, you should look into Premiere Elements which costs $99.99. It doesn’t have as many features as Premiere Pro, but you won’t have to worry about ongoing costs.
Adobe Premiere does require some training but is relatively easy to understand. As a non-linear editor, learning this app is also beneficial for video editing in general since other editors function similarly. A more straightforward program to use would be Adobe Premiere Elements since it’s an easier interface designed for those not used to video editing.
Adobe Premiere is a non-linear video-editing program used for post-production. It can be used for editing together video and audio. There are also tools for color correction, audio edits, text, and graphic effects.

Mark McPherson has been working as a video editor and content writer for over ten years. His background started in animation and video editing before shifting into the realm of web development. He also branched out into content writing for various online publications. Mark is an expert in video editing, content writing, and 2D/3D animation.
