(Last updated on March 9th, 2023)
Everyone knows how to use the crop tool, right? It’s the editor’s right hand now.
Photoshop can crop specific parts of an image in squares or rectangles. But what about circles? I bet you didn’t even know this was possible – but it is!
In the below guide, I demonstrate how to crop a circle in Photoshop in six simple steps. This is a good learning process as it can be used to create things like profile pictures or attractive marketing graphics.
Read on to start your circle-cropping journey!
Crop Circle Uses
You may be stumped as to why you even want to crop something in a circle. Surprisingly, there are two apparent uses – profile pics and inserting the circle into another image.
To Create Profile Pictures

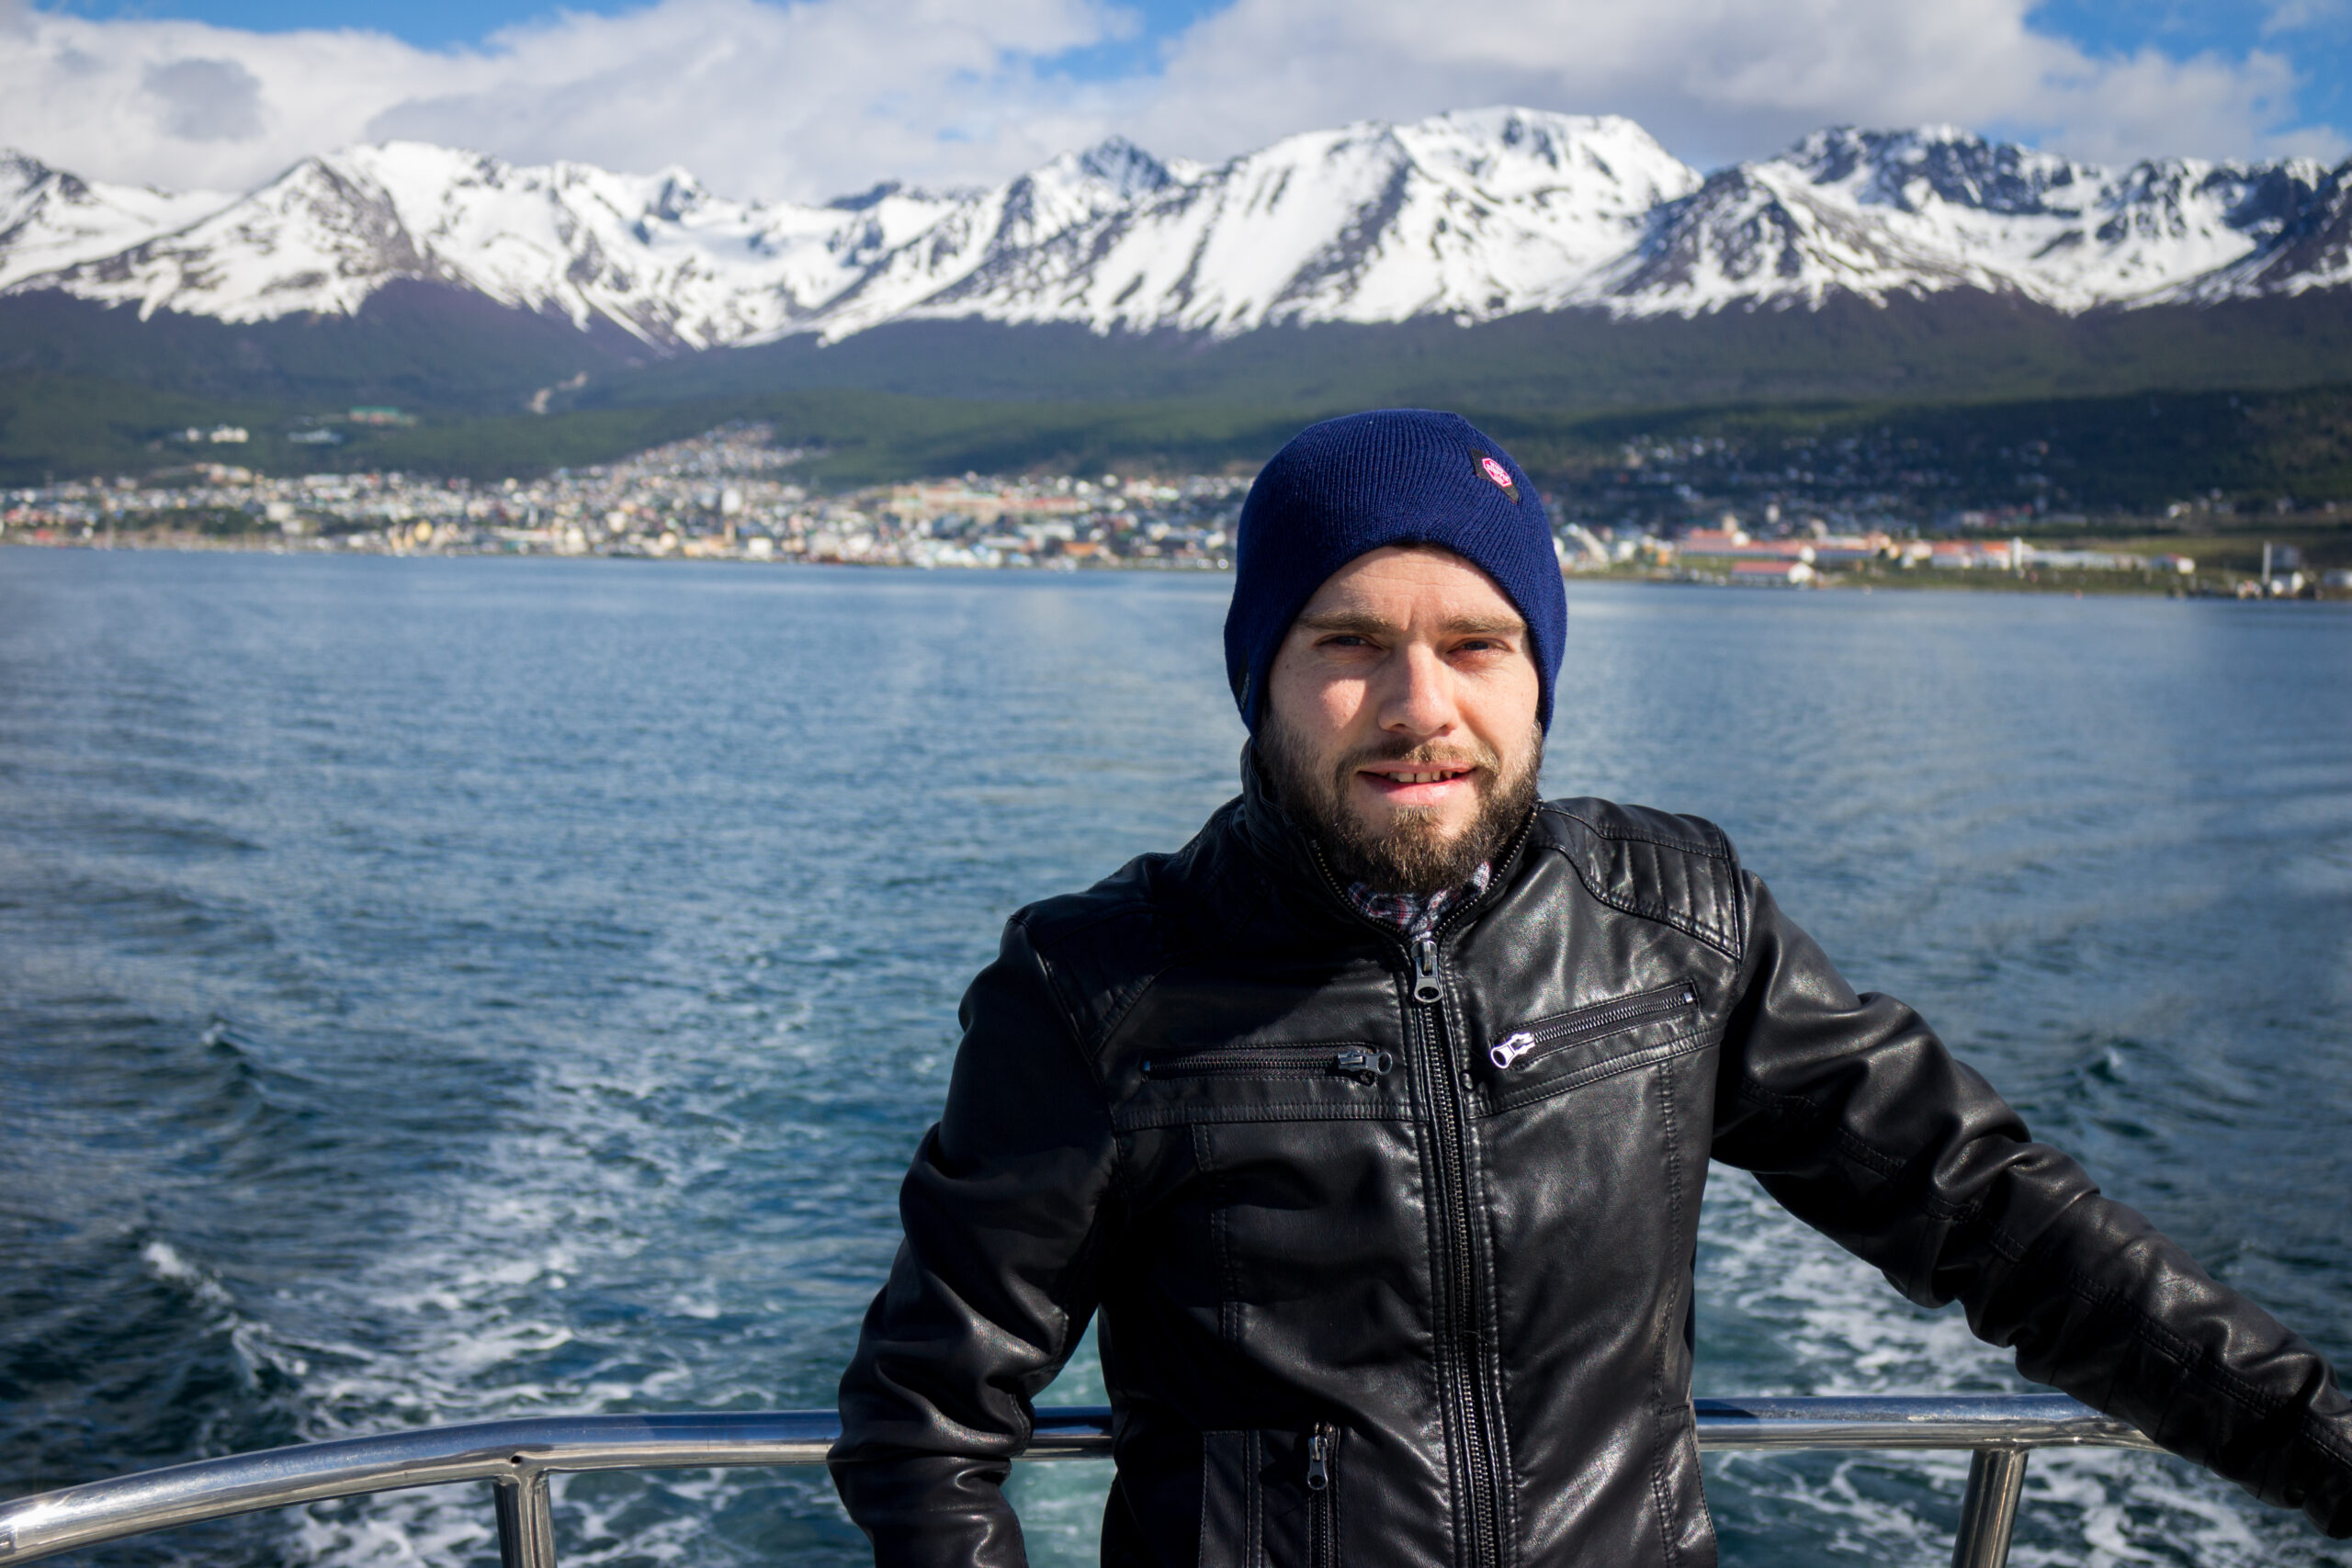
Look at that glorious mugshot and beard! The above image was created using the method I describe below. It was a photo of myself from Antarctica, and it creates a pretty cool profile pic! (Don’t you dare disagree!)
Circle cropping is perfect for making business headshots, avatars, and profile pictures. You can then also add things like curved text to the photo that matches.
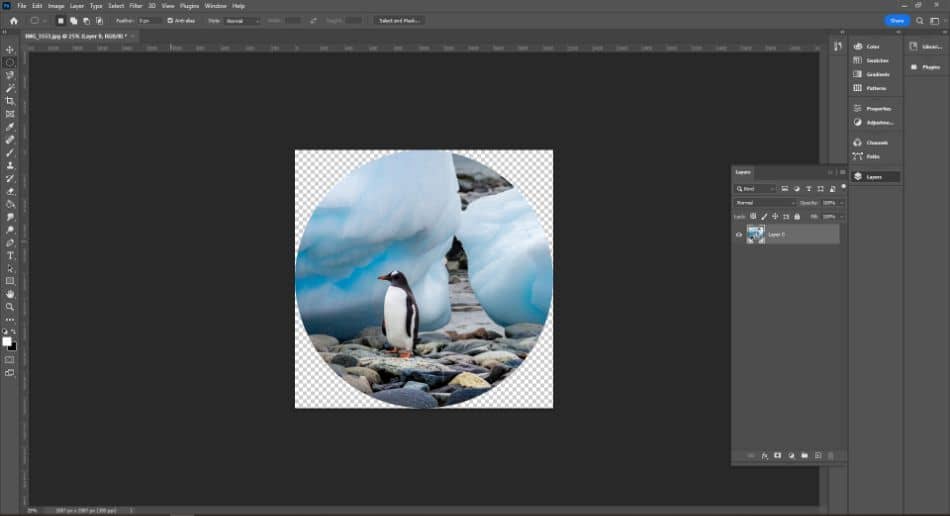
To Insert into Another Image

The other primary use is just for flexibility and to insert the circle into other graphics. The above image was originally a photo from Antarctica. All I did was create a circle crop of another similar photo and add it to this image!
When doing this, it inserts the cropped circle as a new layer so you can edit it freely and add drop shadows. As you can see, the endless possibilities open up a whole new world of creative freedom for your Photoshop exploits.
A Simple 6-Step Walkthrough
As you can see, some cool ways to use cropped circles exist, but how do you do this? The process does take a few steps, but once you get used to how the elliptical marquee tool works, you shouldn’t have any issues! This is the starter image I used in the tutorial:

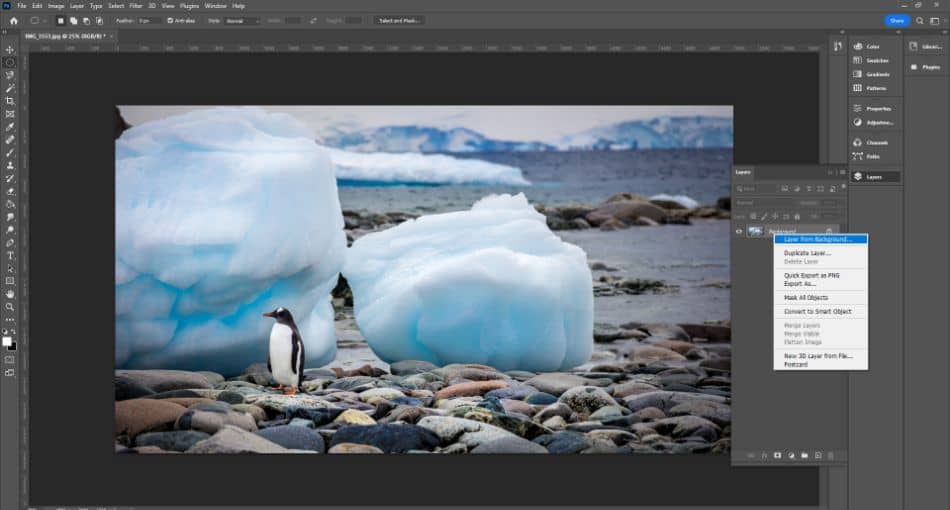
Step 1 – Unlocking the Background Layer
Before we can do anything, we have to unlock the background layer. The elliptical marquee selection tool won’t work properly if we don’t do this.
There are two ways to do this:
- Right-click on the background layer in the layers tab and click “Layer From Background.”
- Double-click on the background layer in the layers tab
Either way, a new-layer pop-up appears – just click OK, unlocking the background and turning it into an editable layer.
Step 2 – Creating the Circle Selection Using the Elliptical Marquee Tool
Next, we have to create a circular selection to be cropped. To do this, we use the Elliptical Marquee tool. This should be available in all versions of Photoshop.
This is located in the main toolbar on the left-hand side. By default, it is located directly underneath the movement tool and is usually set to the rectangular marquee tool. Simply click and hold on to it, and the other selection options should appear. Hover your mouse over the elliptical marquee tool and let go.

You can then click and drag on your image to create a circular selection. To create a perfect circle, you need to hold shifts while dragging, as this will maintain a circular aspect ratio. Just shift, click, and drag until you have a selection for the size you want.
Let go of your mouse – a dashed circular line should now appear and show the selection. You can hover your mouse inside the circle, then click and drag to reposition it over the area you want to crop.

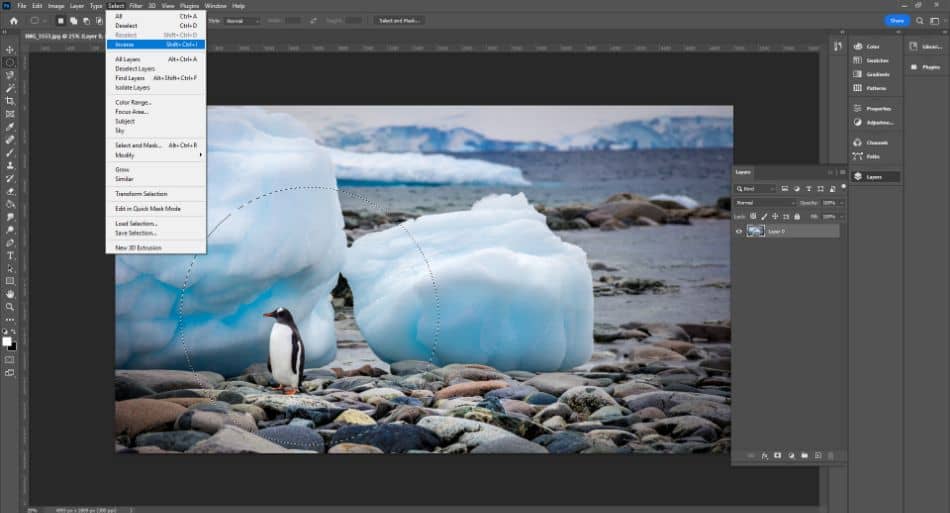
Step 3 – Inversing the Circle Selection
We have everything inside that circle selected – but this isn’t what we want! We want to delete the surrounding photo, leaving us with only the cropped circle.
To do this, we use the Inverse Selection tool. With the elliptical marquee tool still active, you can either use the Ctrl + Shift + I keyboard shortcut or go to Select > Inverse in the top menu.
This will flip the selection so that everything outside our created circle is now selected!
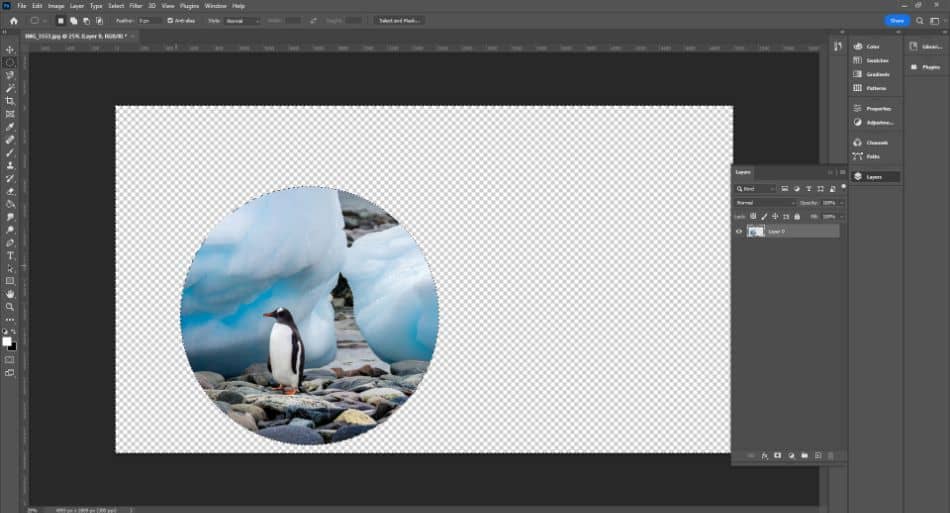
Step 4 – Deleting the Excess Image
It’s important to always have the elliptical marquee tool still active on your left-hand toolbar throughout this process. Otherwise, errors could happen.
Once you have inverted your selection, we need to delete the pixels selected. To do this, just hit Delete on your keyboard! As you can see from the image below, this deletes everything selected and leaves transparent pixels underneath.
Step 5 – Trimming the Canvas to Fit the Circle Crop
The issue is that we have this large blank canvas area we don’t want! Now, you could simply use the crop tool. However, this can be tricky, requiring multiple adjustments to position it correctly.
Luckily, there is a quick alternative – the Trim tool. With your elliptical marquee selection still active, go to Image > Trim in the top menu. A pop-up will appear – just leave the settings as default and click OK.
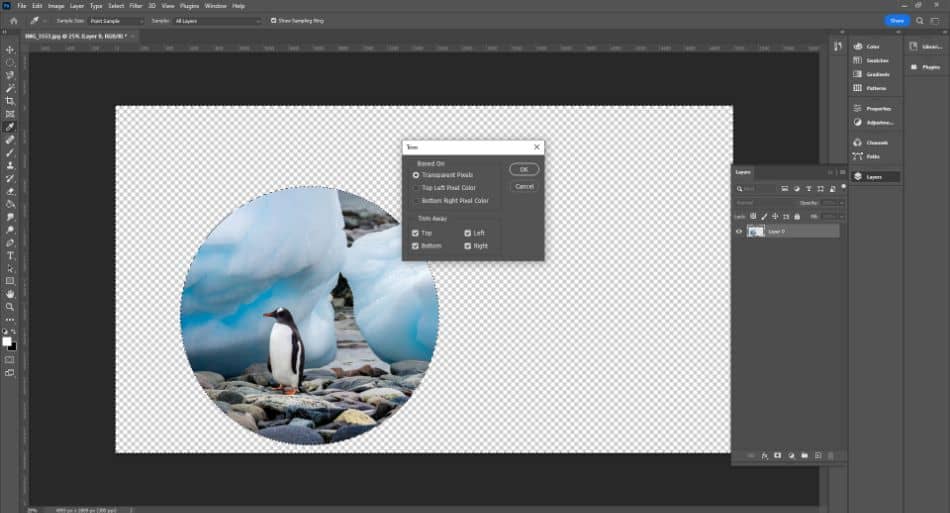
If you still have the selection active, this should crop the image to the circle’s borders, as shown below!
If you have deselected the circle at any stage, don’t worry. Just go to Select > Reselect in the top menu. This will reactivate your previous selection, which in this case, would be the circle we drew earlier. With the selection active, you can edit it now and do things like changing colors.
Step 6 – Saving the Image as a PNG
We now have a cropped circle ready to use! I suggest saving it first before you do anything else. Save a PSD file with the original layer so you can edit it if needed later.
Next, save a PNG version – PNG files support transparency. Therefore, if you then used this image on something like a website, only the circle would show, and whatever background was below it would be visible.
If you saved it as a JPEG, the surrounding pixels would be white and not transparent.
Alternatively, if you want to use the circle in another image, make sure you have both open in Photoshop. Next, click and hold somewhere in the circle. Drag it across to the tab of the second image, and then let go. This should insert as a new layer onto the second image.
The image below is the completed cropped circle I created in the tutorial – if I did it right, the background should be visible around the circle!

Verdict
Circle cropping can be incredibly useful, especially for business profile pictures and marketing graphics, and you should now have a clear idea of how to do it in Photoshop!
The best practice is to play with the elliptical marquee and other selection tools to see how they work. You will soon get used to how to use them and what the different settings like feathering do.
Frequently Asked Questions
First, unlock the background layer by double-clicking on it. Next, use the elliptical marquee tool to draw the circle selection. When it is positioned, use Ctrl + Shift + I on your keyboard to inverse the selection and hit Delete. This should get rid of the rest of the image. You can then use the trim tool to remove the excess transparent areas.
Yes! But you must save the image as a file type that supports transparency. The best choice is a PNG file, which retains much image quality. JPEG images do not support transparency, so never save your cropped circle as one.
Yes! Once you have followed the cropped circle process, you can simply click and hold on to the object and drag it across to another image you have opened. This will insert it as a new layer in the second image, and you can edit it freely.
Yes! Once you have followed the cropped circle process, you can simply click and hold on to the object and drag it across to another image you have opened. This will insert it as a new layer in the second image, and you can edit it freely.
The Elliptical Marquee tool allows you to make circular selections. You can freehand draw the selection or use the Shift key to ensure a perfect circle is selected. These selections can then be used for selective editing or cutting specific parts from images.
This handy tool lets you cut away any transparent pixels surrounding an object. This is more efficient than using the crop tool when you want to only select a cropped part of your image on a much larger canvas.
Paul is a lifelong photographic hobbyist and has been taking epic shots from around the world for the last decade. His travels have taken him to places like Antarctica, Thailand, and Greenland and this has given him the chance to photograph places few people have seen. As a self-professed nerd, Paul loves photo editing and his programs of choice are Lightroom Classic and Photoshop. In recent years Paul quit the standard office life and became a full-time freelance writer to share his passion for photography and tech with those wanting to learn.