(Last updated on November 1st, 2022)
You’ve seen animated GIFs everywhere online but have you ever considered making your own? It’s not as difficult as you may think it is. Read on in this informative tutorial that will show you just how easy it is to create an animated GIF inside Photoshop.
Animated GIFs have become such an essential aspect of the social media landscape. We see them all the time on social media. Some quirky or silly GIF that relates to whatever message is sent adds some character to a post. Wouldn’t you like to make something just like that?
With the likes of Photoshop, it’s easy to create animated GIFs. It used to be that programs like Adobe Animate and other programs better built for animation were the only suitable option for making them. The good news is that now all you need is Photoshop if you’ve got the images you need for a GIF animation.
Related: How to Get a Photoshop Free Trial: A Simple Guide (2023)
Make a Gif in Photoshop
1. Import Your Pictures
The first thing you need to do is bring in a sequence of images to form our animation. This can range from either a series of photos you want to be showcased in a gallery to a frame-by-frame animation sequence. There’s more than one way to bring them into Photoshop as well.
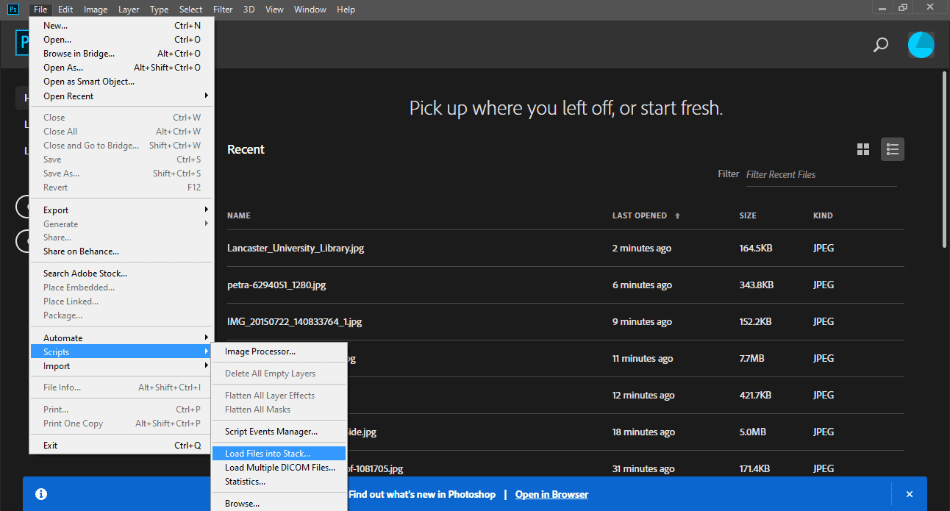
You don’t have to bring in the images one by one. If you want to load in a series in the order you want your animation to proceed, navigate to File > Scripts > Load Files into Stack. When you click this, you’ll be given the option to select a series of images to bring into the application.
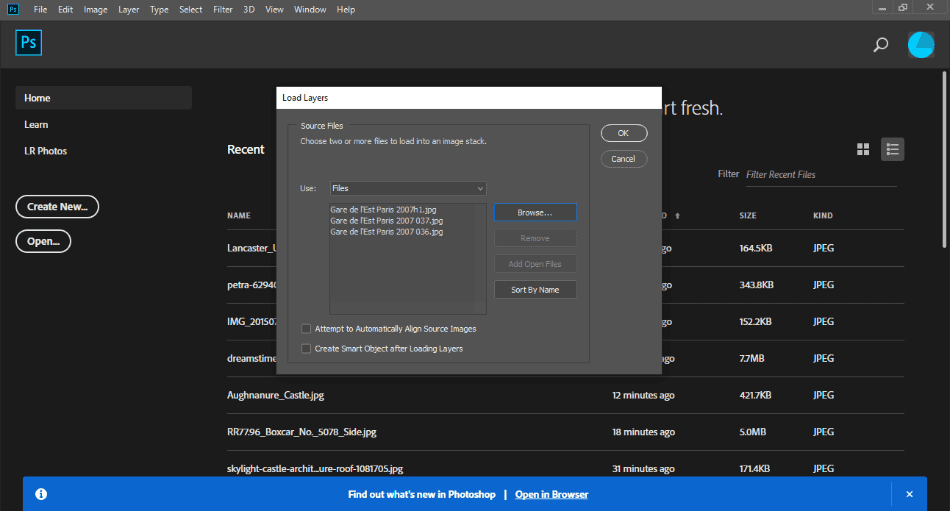
Bringing in your images for a GIF this way can help avoid confusion in the organization. You’ll notice that through this window you can better sort the images that will each becoming in as their own layer. Once you’re happy with the order, click OK.
2. Using The Timeline
You’ll notice that we now that we have our images in ordered layers inside Photoshop. For the purposes of this demonstration, we’ll be making a simple GIF meant to showcase three different images that will act as a slideshow gallery. These are quite common for websites that want to show off a series of photos in a simple GIF.
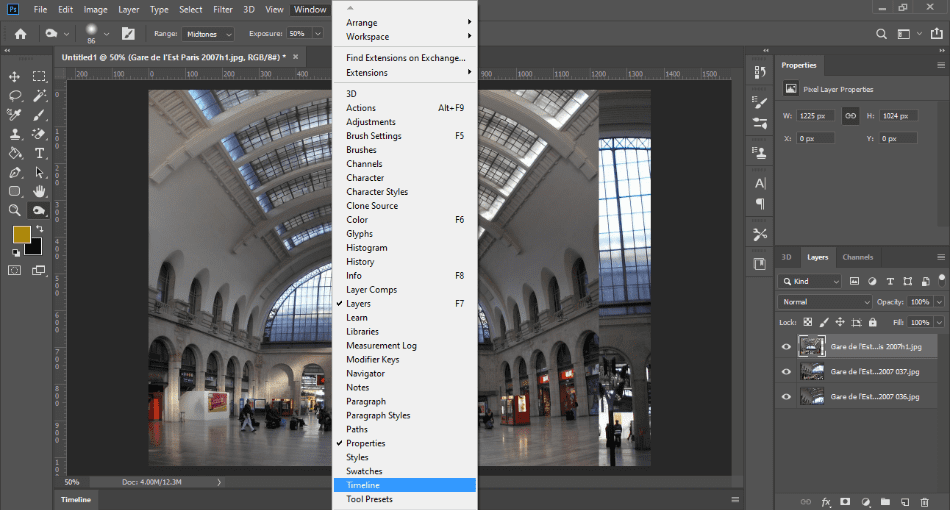
In order to animate these layers together, we’re going to have to bring up the timeline in Photoshop. To do this, navigate to Window and find Timeline. Once you click this, you’ll see the Timeline pops up at the bottom of the interface.
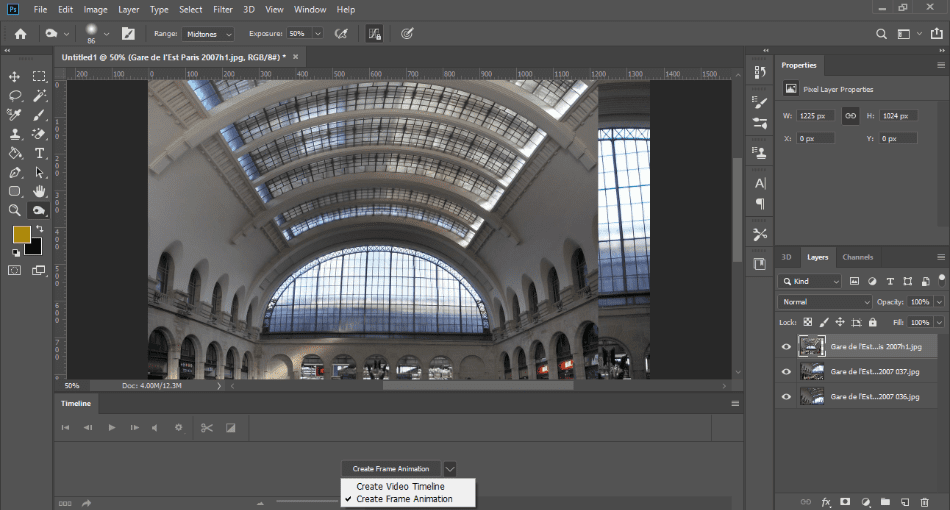
Now that we have our Timeline active, you’ll notice a few familiar tools inherent to video editors. But it’s blank as well. To start up a timeline animation, you’ll click the button for Create Timeline Animation in the Timeline section.
3. Creating The Animation
Now that we have prepped the Timeline for animation, it’s time to start creating one. After you’ve selected Create Timeline Animation, click the options button on the right side of the timeline and navigate to the option Make Frames From Layers.
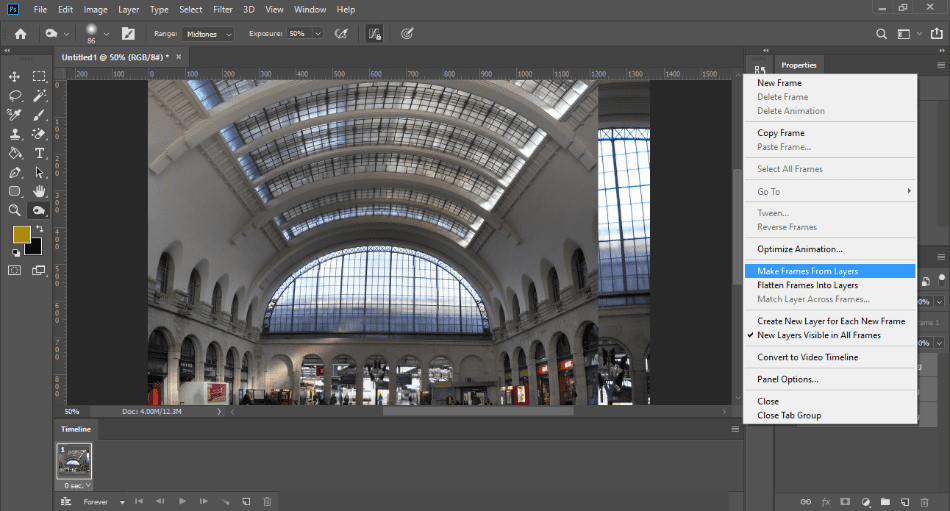
Now you’ll see all three of our pictures are on the Timeline. There are a few options we have to tweak here to deliver the animated GIF we want. These options will make the difference between a fully animated GIF and one that displays photos as a gallery.

Click on each still on the Timeline to change the length of the image. Fast animations should have the time set at under a second but in this case, we’ll be setting each still to display for two seconds.
Once the length of each layer is set, click the dropdown menu below the layers to select how many times the animation will play for. You can select once, three times, or forever. If you want the GIF to just keep looping, forever is the option you’ll want to select.
You can now test our your animation by playing around with the timeline controls. Test out your GIF a few times to see how it plays before you’re ready for the final step. You can additionally move or remove the frames if you want certain frames placed differently.
4. Exporting The GIF
Now that you’ve finished creating your animated GIF, it’s time to save it into an appropriate file format. Naturally, you’ll be exporting this final result in GIF format but there are still a few things to keep in mind when finalizing the export.
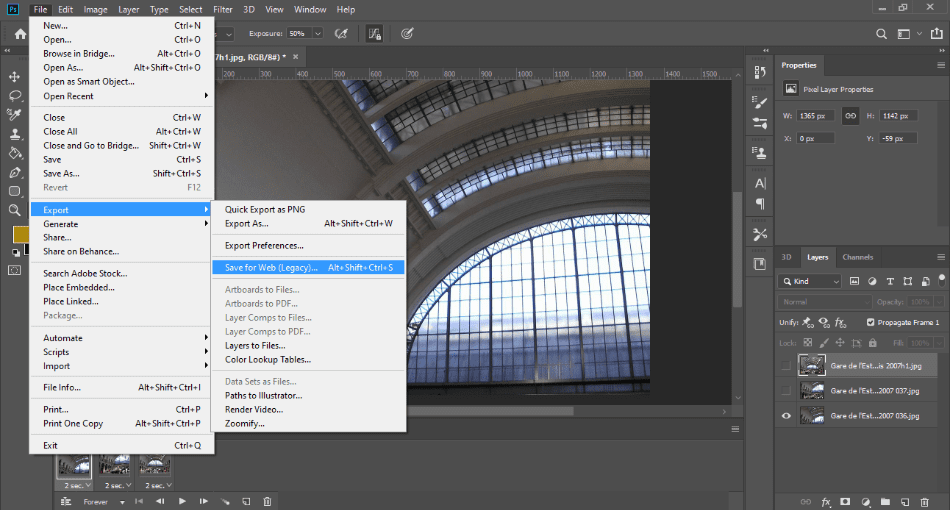
When you’re ready to export your animation, navigate to File > Export > Save For Web Legacy or simply press Alt + Shift + Control + S. Exporting this way will give you the most options to ensure you’re pushing out an animated GIF that matches what you’re aiming to produce.
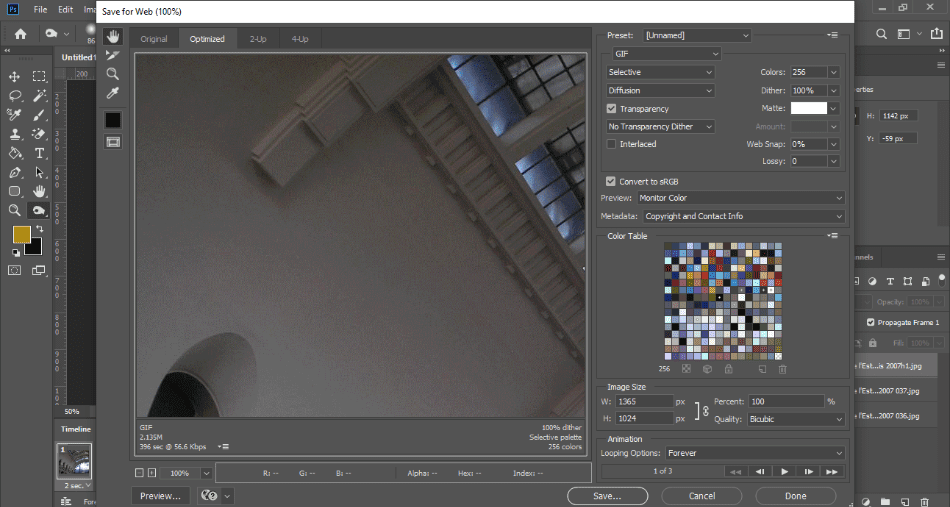
It isn’t too much you’ll have to change here in order to generate an animated GIF. Look over the various options of any details you want to include such as transparencies or different color preferences. You can also adjust a few animation options from here as well if you decide you only want one loop instead of infinite rotations.
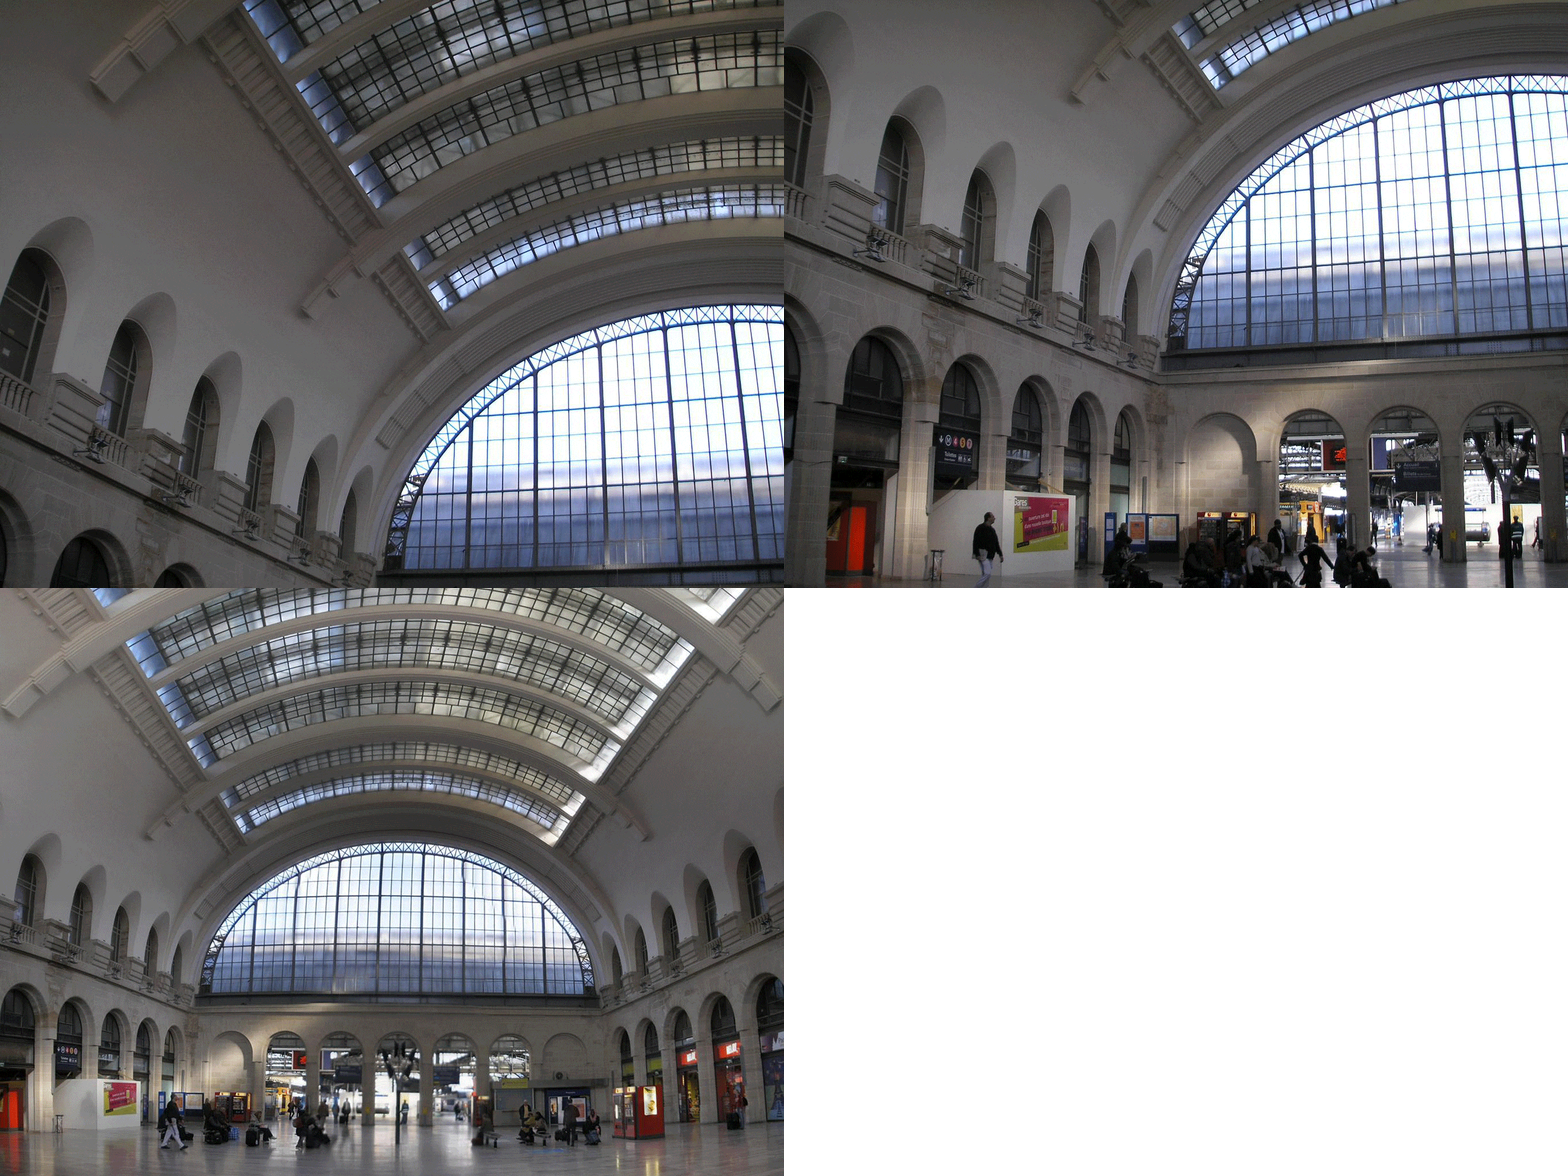
As you can see from the rendered-out GIF, it appears to show the frames we want at the speed we specified. There are a few seconds before each frame and the animation will loop forever. It’s a great way to showcase a lot of pictures in the form of a gallery.
Of course, you can use this technique for crafting for more than just slideshows. If you’re handy with video, you can bring a short clip into Photoshop to transform it into a GIF. If you can create an animation in Adobe Animate, you can render out a sequence of animation that can be brought into Photoshop as well.
There are so many ways you can use the timeline tools to create so many different GIFS, from small sizes built for sending over social media to stylish displays you can showcase on your website.
Frequently Asked Questions
Making a GIF in Photoshop first requires a video or series of images that can be arranged into a sequence. You can bring in the images one by one if you like but it’s highly advisable to bring them all in at once via Load Files Into Stack. With all the images present, you’ll then open the Timeline window. Bring your layers into the Timeline and coordinate how long you want each frame to be and how often you want the GIF to loop. Once all of that is figured out, you can render out your animated GIF via Save For Web Legacy in the import options.
There are a few options available for making a GIF out of pictures. The truth is that you can use any number of programs to create an animated GIF, including Adobe Animate, as well as some online applications. Since Photoshop is the most common, however, it’s generally easier to recommend making a GIF through this program. No matter the program, all of them require the same thing: either a video or a sequence of frames in order that makes up the GIF animation.
GIFs, at least the animated kind, are really just a collection of images assembled to create an animation. There are a number of ways you can make GIFs and multiple programs you can use to develop them. There are even a few online applications capable of creating GIFs. So long as images are arranged in a sequence, you should be able to render them out as a GIF, whether you’re using Photoshop, Animate, or any other program capable of handling animation.
Photoshop is capable of creating animation with a combination of both the layers and the Timeline controls. You would basically treat each layer in Photoshop as a frame of animation. Onion-skin layering between layers can make it possible to judge the flow of your animation. Once you have your animation frames assembled, you can bring them into Timeline, to be rendered out as either a GIF or a video depending on what you want the final result to be. Photoshop can be quite handy in this department if you’re seeking to create highly detailed animation. In terms of animation controls, however, it’s not as robust a program as the vector-based Adobe Animate. While not as intuitive or better built for longer animation, Photoshop is quite capable of handling animation projects.

Mark McPherson has been working as a video editor and content writer for over ten years. His background started in animation and video editing before shifting into the realm of web development. He also branched out into content writing for various online publications. Mark is an expert in video editing, content writing, and 2D/3D animation.
