(Last updated on March 9th, 2023)
A photo with blurriness can look awful. Nobody wants to squint when trying to figure out what was shot. I’ll review how to clear those blurry pictures in Photoshop by showcasing various techniques and let you know which method is best for which photos.
Photos and Blurriness
Photos can end up looking blurry for a variety of reasons. The lens might not have been focused, or the autofocus might not have worked correctly. It’s a common problem that is common in most photos.
If the photos turn out blurry, the blur might be fixed thanks to the tools and features in Photoshop. Here are a few different methods to consider when fixing blurs in Photoshop.
#1: The Sharpen Method
The most common method for fixing blurs in Photoshop is to use the sharpening feature.
This feature uses contrast to smooth out areas that would otherwise appear blurry. How much you’d apply depends entirely on the photo. So, avoid overusing the features to counter excessive smoothness in the pictures.
Here’s how to apply sharpening to a photo in Photoshop:
- Bring a blurred image into Photoshop.
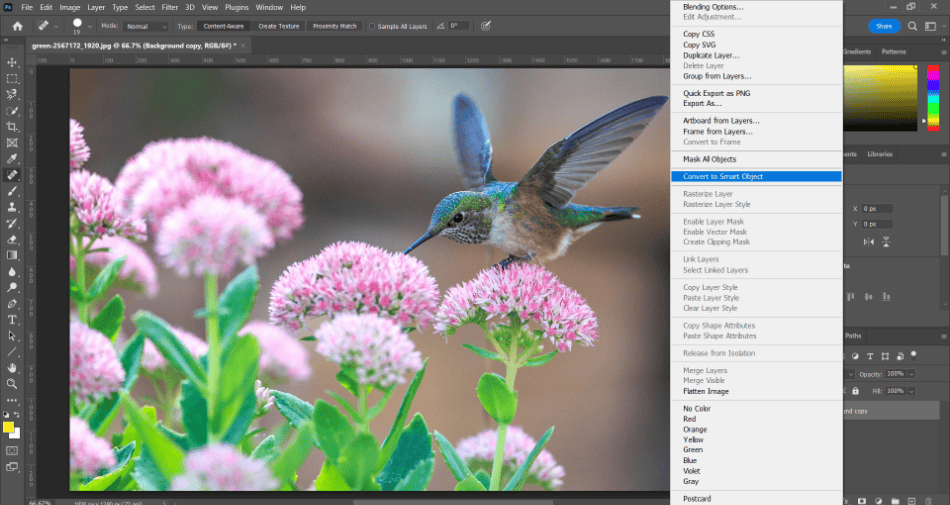
- Select the photo on its layer in the Layers panel and then find the Filters options menu. You can find this by right-clicking on the layer and select Convert for Smart Object.
I’m applying this filter to make changes without making them permanent.
Now I can apply the Unsharp Mask filter by navigating to Sharpen > Unsharp Mask.

- With the mini-window for Unsharp Mask Open, drag the amount slider to get the desired effect to smooth over the blurry areas. Here’s what each of the sliders does for this mask:
- Amount: This is the strength of the sharpening.
- Radius: This slider determines the width of smoothing and how it affects the edges of objects.
- Threshold: It limits the sharpness area of the photo. You can alter this to prevent the smoothing of photo grain or the blurriness of the background.

- Click OK when satisfied with the results.
To ensure the sharpening works, try zooming in on the blurry areas to see how the Unsharp Mask looks. You can go back and make changes anytime by double-clicking on the Unsharp Mask layer in the layers panel. However, if you want to completely be rid of the background, there are different ways you can do that as well.
#2: The Smart Sharpen Method
Smart Sharpen is a more advanced sharpening filter. The benefit of Smart Sharpen is that it reduces noise in areas of the photo with low contrast.
It can also better target specific areas in need of sharpening.
Here’s how to use Smart Sharpen.
- Open a blurred picture in Photoshop.
- In the Layers Panel, duplicate the photo by pressing Ctrl + J (Windows) or Cmd + J (Mac). For the duplicated layer, right-click on it and select Convert to Smart Object.
I can now select the Smart Filter by navigating Filter > Sharpen > Smart Sharpen.

- In the Smart Sharpen dialog box, make the following adjustments:
- Turn on Preview if the checkbox isn’t already checked.
- Set Preset to Default.
- Turn down the Reduce Noise slider to see the effects of the sharpening.
- Use the Amount slider to change the strength.
- Use the Radius slider to control the spread of the sharpening.
- Use the Fade Amount slider in the Highlights area to change how much falloff there is with the sharpening.
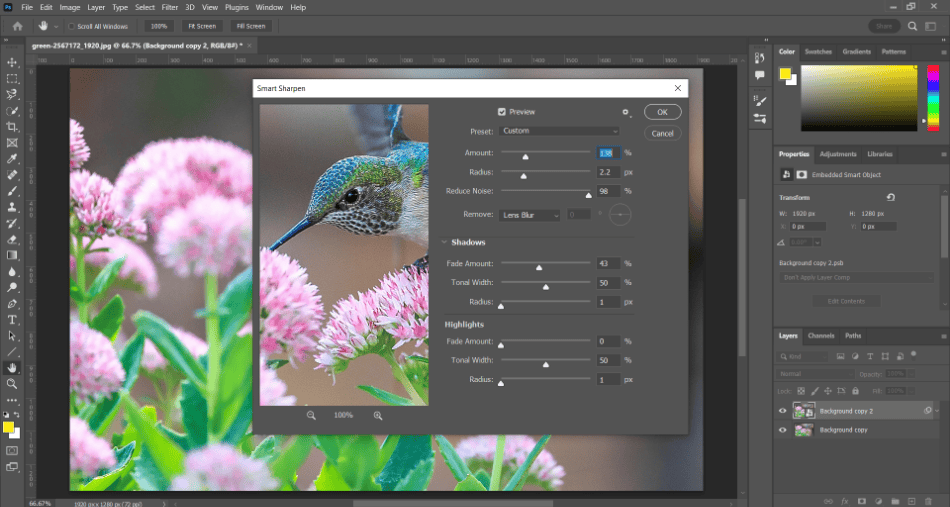
- Click OK to finalize the Smart Sharpen.
The best part of using Smart Sharpen is that the settings can be saved.
With the Presets box, you can save the Smart Sharpening settings and reuse them in the future. This can be handy for applying sharpening changes to a series with similar features.
#3: High Pass Filter
Another filter to consider when removing blurs is the High Pass Filter. This is ideal if you prefer to spend less time experimenting with sliders.
Here’s how to use the High Pass Filter:
- Add your photo to Photoshop. Duplicate it and select the duplicate layer. Be sure Convert to Smart Object is applied to the duplicate.
- Select the High Pass Filter by navigating to Filter > Other > High Pass. This should place a grayscale effect on the image.
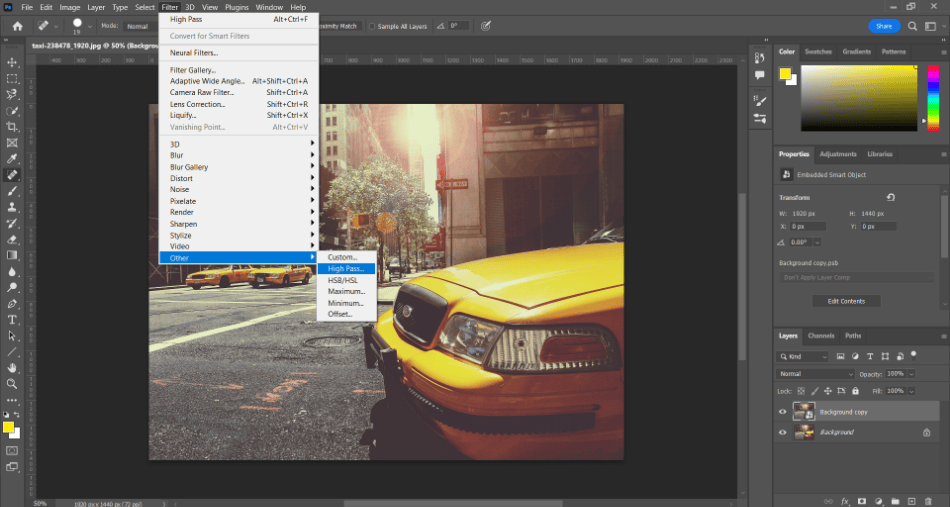
- Select a reasonably low Radius from the scale from the High Pass mini window to make it subtle.
- Choose a blending mode that works best for being placed on top of the original photo. “Overlay” is a good choice, but try the other modes first to see which will suit the image. Click OK to save the blending mode.
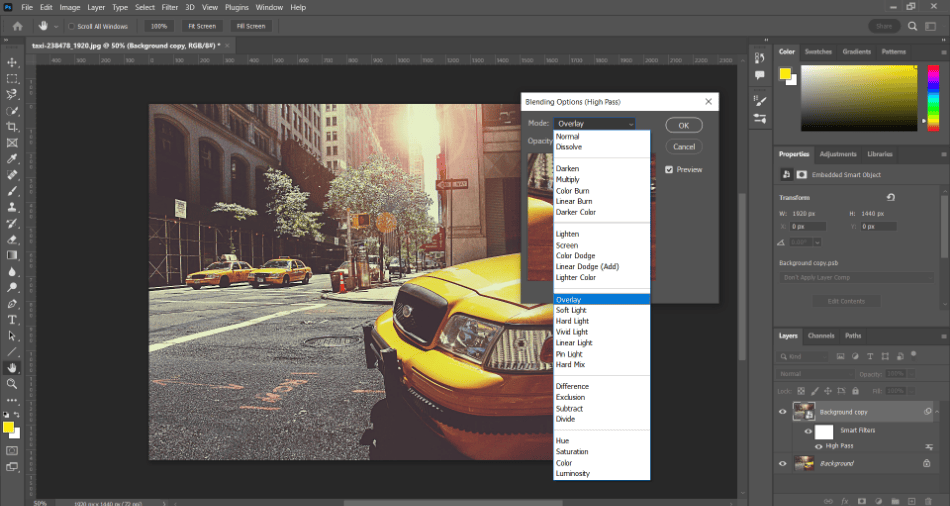
The High Pass should have fixed most of the blurry areas. If not, play around with the radius and blending modes until it looks right.
#4: Basic Sharpen
In addition to the Sharpen filter with options, Photoshop also has one-click sharpening filters. You might have seen them when selecting from the Sharpen filters present. Here’s how to those simple filters:
- Bring an image with shaky blurriness into Photoshop, make a duplicate, and convert that layer for smart filters.
- With the duplicate layer selected, choose the Shake Reduction filter by navigating to Filter > Sharpen and choose from one of the following options:
- Sharpen: The basic sharpening filter that automatically detects areas in the photo to sharpen.
- Sharpen Edges: This sharpening focuses specifically on the edges that might blur with falloff. Use this to make the foreground objects you want made less blurry to be more detailed.
- Sharpen More: If the first Sharpen option isn’t enough, try Sharpen More for a heavier effect.
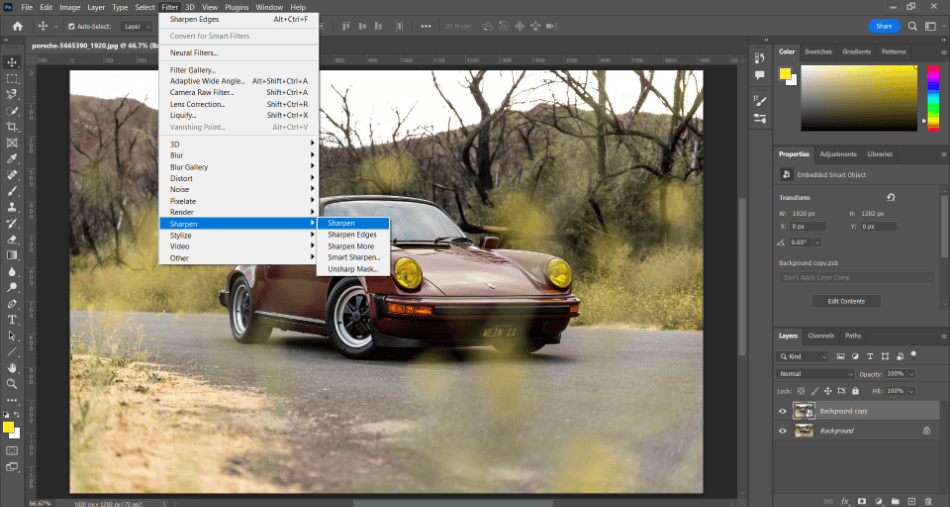
- Apply as much or as little sharpening as possible. Each filter you apply can be edited if the layer is a smart object, placing the applied filters in a sub-layer.
#5: The Sharpen Tool
If you want the most control when clearing up blurs in photos, you’ll want to use the Sharpen tool that acts as a brush. Let’s run through how to use this tool to eliminate blurs.
- Open a blurry photo in Photoshop and duplicate the layer.
- With the layer selected, choose the Sharpen tool from the toolbar. It will be located in the same group as the Blur tool.
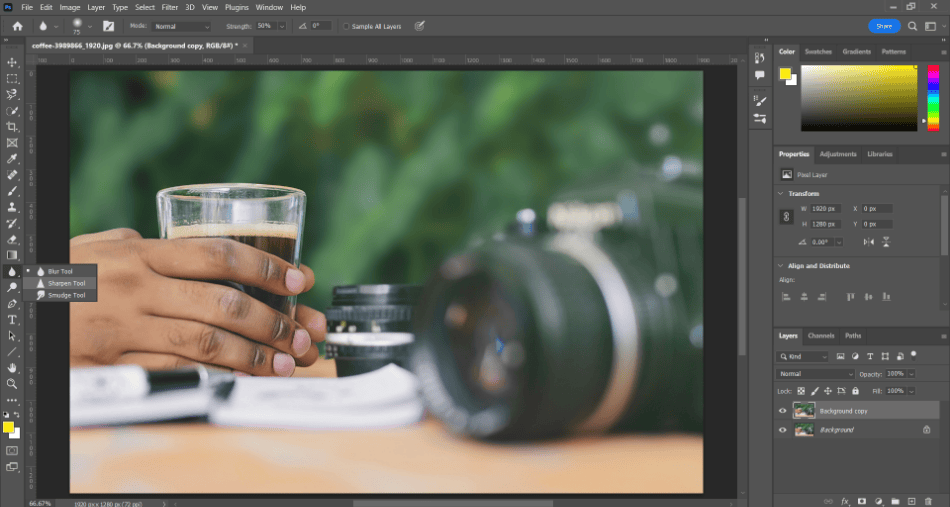
- After selecting the Sharpen tool, look over the options to change the brush type and select your preferred blending mode and strength. You may experiment with different options before finding which combination works best.
- Click the checkbox for Sample All Layers in the Sharpen properties. Also, check the box for Protect Detail to reduce the chance of pixelated artifacts.
- Click and drag over the parts of the image where you want to remove the blur.

It’s up to you to decide how much or how little sharpening you need to apply. Try out a few different styles to see which options best suit your needs for removing blurs.
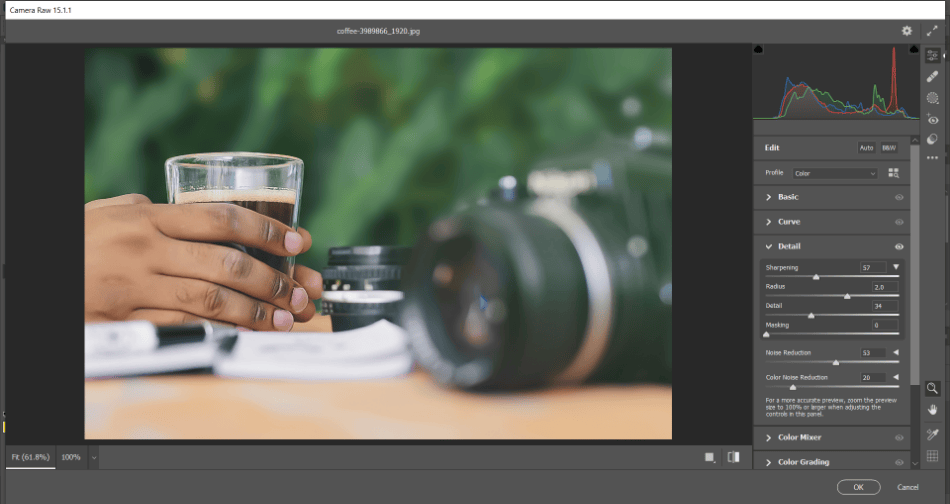
#6: Camera RAW Filter
One of the handiest filters in Photoshop is the Camera RAW filter.
This filter can be used for many purposes, including sharpening a photo. Here’s how to use this multipurpose filter:
- Bring an image into Photoshop and duplicate it to retain the original.
- Enable the Camera RAW filter by navigating to Filter > Camera RAW Filter.
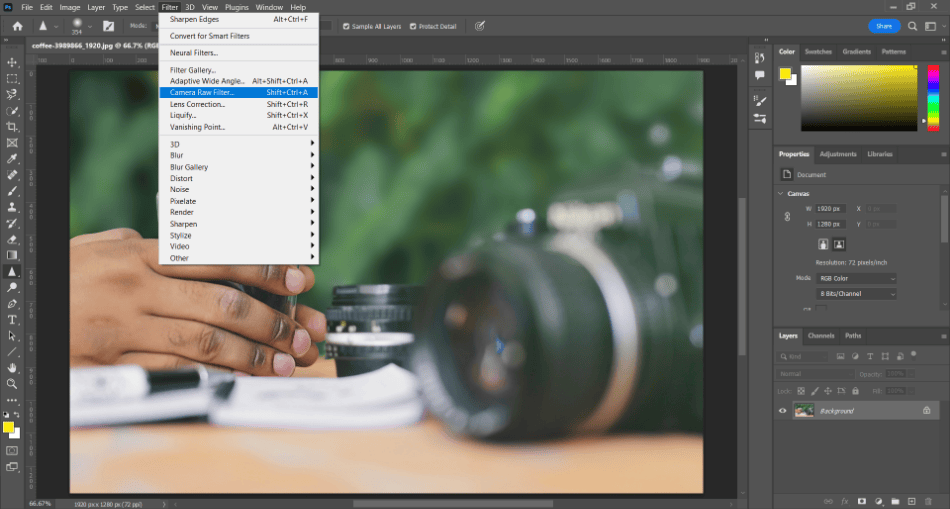
- Find the tab on the right for Detail in the Camera RAW Filter window. You should see the slider for Sharpening. Drag it up to see how much of the blurred areas are smoothed. Use the noise and color reduction sliders for fine-tuning the sharpening.
- Click OK to finalize the sharpening.
If you need to go back and make other changes, open the Camera RAW Filter again and change the settings. Use this filter for additional features to alter contrast, shadows, color, and more.
Alternative Applications
If you’d prefer to use a different application for removing blur in photos, consider a few alternatives.
- Adobe Lightroom: Lightroom is a non-destructive photo editor with a few sharpening tools for highlighting more detail.
- Adobe Photoshop Elements: For a cheaper alternative to Photoshop, Photoshop Elements can perform most of the same smart functions for removing blurs in images.
- Luminar: Luminar works similarly to Photoshop and has a Sharpening filter that works with many of the same options.
Conclusion
Removing the blur from your photos can be as simple as adding sharpening. It’s not a guaranteed method, and fixing the blur in your camera is always recommended before it starts. With these methods, you should be able to improve your photographs and better center on what needs to be focused.
Remember that these methods are for Photoshop CS and may not be present in different versions, like Photoshop for Chromebook.
Tips & Tricks
- Check Your Camera: The best way to fix blurs in your photos is to prevent them from happening when shooting the pictures. Look at your camera’s settings and previews to ensure that you’re focusing on what matters most. This way, you can avoid doing post-production work on your pictures, saving you time on your projects.
- Keep It Subtle: Someone can quickly go overboard with sharpening tools; your photos may need smoother and more believable. Try using as little sharpening as possible to make the picture look less like it was run through Photoshop filters.
- Always Back It Up: No matter which method you choose for removing blurs, it’s always good to have a backup. Duplicate your photo layers to save yourself time if you need to go back after so many altercations. It’s also handy to have duplicates on hand to compare and contrast.
Frequently Asked Questions
A: Pictures in Photoshop can be made less blurry by applying sharpening. Sharpening can be applied through a few different filters or with the Sharpening brush tool. If you only need a portion of the picture less blurry, the Sharpening brush is recommended.
A: Blurry pictures can be caused by problems with the focus, the shakiness of the camera, or motion of the subject. These problems can be fixed if you have the correct camera settings. Photoshop can aid in making these blurs less noticeable with sharpening filters and brushes.
A: Yes, most photos can have the blur removed if sharpening is applied. Select the sharpening tool from the toolbar and paint over the areas you want less blurry. Be careful when using this brush as too much sharpening can bring out unwanted artifacts.
A: Clarity can quickly be increased in Photoshop using sharpening filters. Apply either the Sharpen filter, Smart Sharpen, or use Camera RAW filter to use the sharpening sliders. These methods work the fastest.
A: You can either use the Sharpen brush tool or several filters to apply sharpening to a blurry picture. The right choice depends on how much sharpening you need and what type of photo you’re working with. For example, a picture where there’s a small amount of blur in one area can be easily removed with the Sharpen brush tool.

Mark McPherson has been working as a video editor and content writer for over ten years. His background started in animation and video editing before shifting into the realm of web development. He also branched out into content writing for various online publications. Mark is an expert in video editing, content writing, and 2D/3D animation.