(Last updated on November 2nd, 2022)
Wondering how to create a zoom-In effect in Adobe Premiere Pro? You have come to the right place!
Problem: You have fantastic footage, but you need to zoom-in to focus on a subject. How do you create a realistic zoom-in effect? Here, I will show you how to make a zoom and fine-tune the animation for your project.
Now, when we talk about zooming, what we are actually doing is scaling the image up. You make the image bigger, and it crops within the frame to give you the appearance of a zoomed-in effect.
Related: Final Cut Pro vs Premiere Pro | The Ultimate Battle (2023)
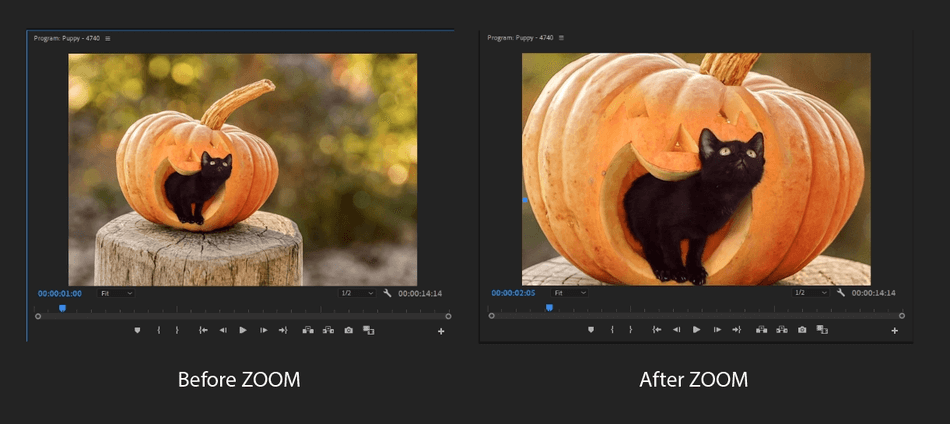
Zoom in with Key Frames on a Clip
I will show you how to do zoom manually using keyframes. For this clip, I want to zoom in on the kitten, the zoom beginning at 00:00:01:00, ending at 00:00:02:00. I will show you two ways of doing this, first with manipulating the Clip Anchor Point and Scale. Second, by changing Position and Scale.
#1 Method: Zoom in Premiere Pro with Anchor Point and Scale
- Select your clip by clicking on it. When selected, it will be highlighted in a white border. When selected, the Effect Controls Panel should pop up. If it isn’t showing, go to Window > and check Effect Controls.
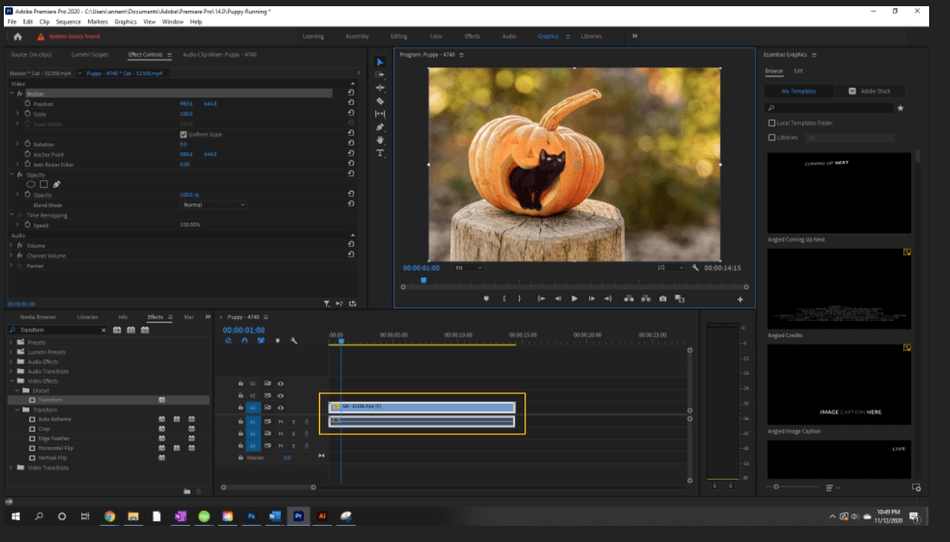
- Select the Anchor Point in the clip. The Anchor Point will be a circle with crosshairs at the center of your clip. Select and drag it to your point of focus. Here, I’m focusing on the cat.
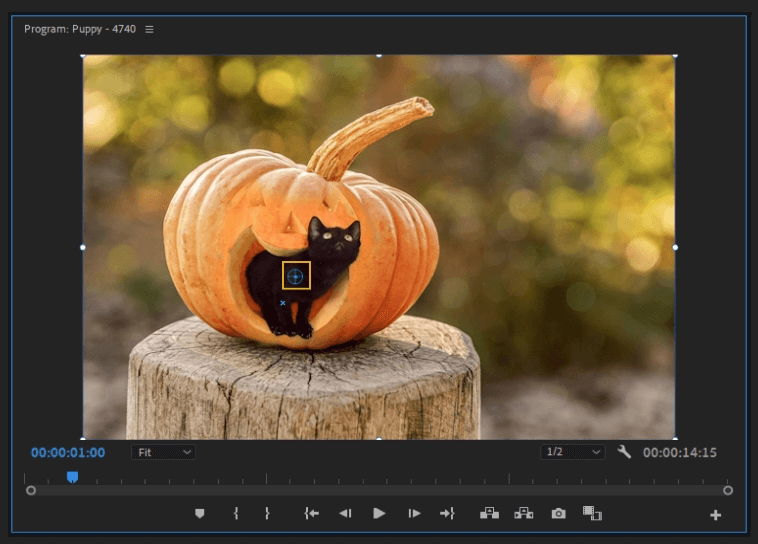
- Set your play head where you want your zoom to start. To make the zoom exact, I am going to set the time at 00:00:01:00. You can either type it manually or drag the play head to the correct time.
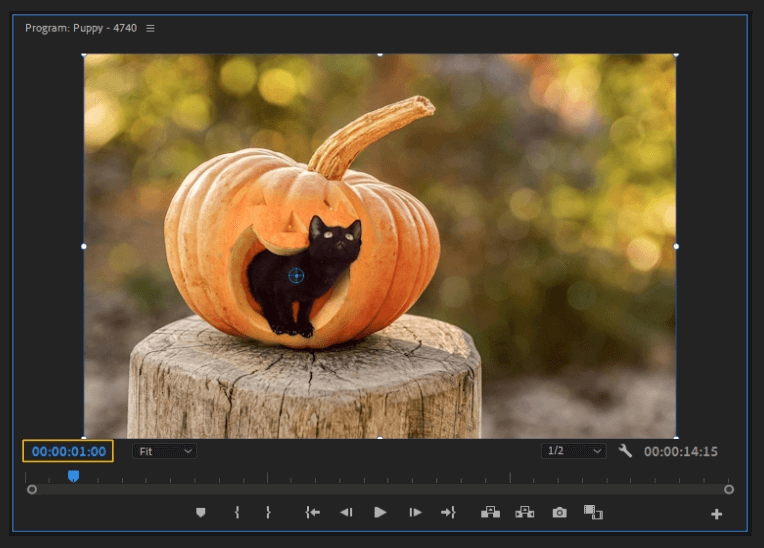
- Next, I’m setting the first keyframe for Scale. I do this by hitting the stopwatch icon.
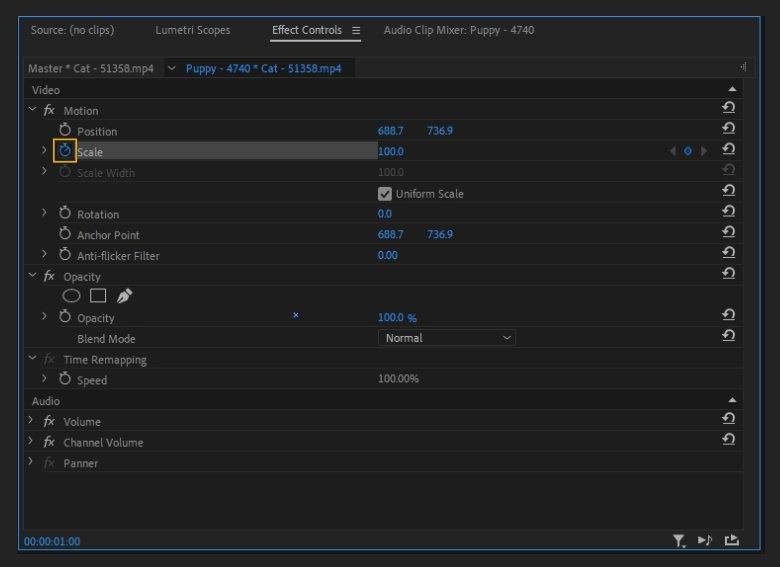
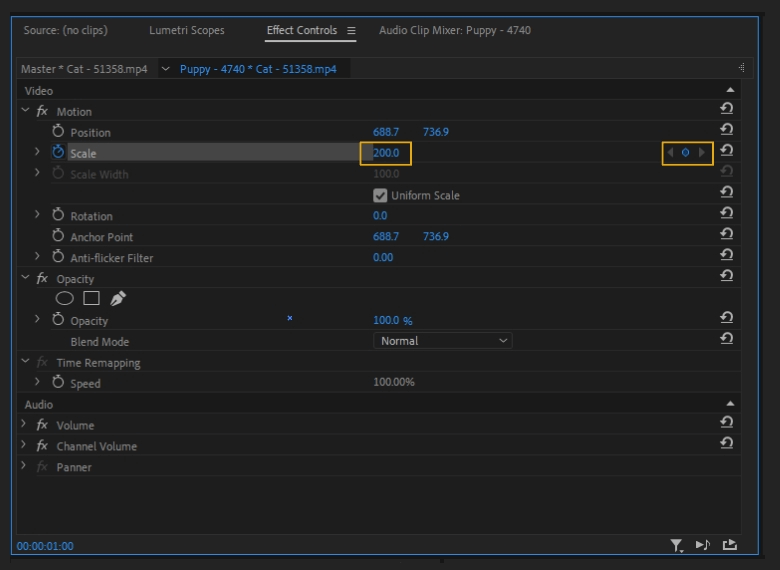
- Set your play head to the end of the zoom, click the diamond icon, and set the new Scale parameter for the zoom. The changed anchor point sets the zoom to be focused on the correct part of the image automatically. Your zoom is complete!
#2 Method: Zoom in Premiere Pro with Scale and Position
- Select your clip.
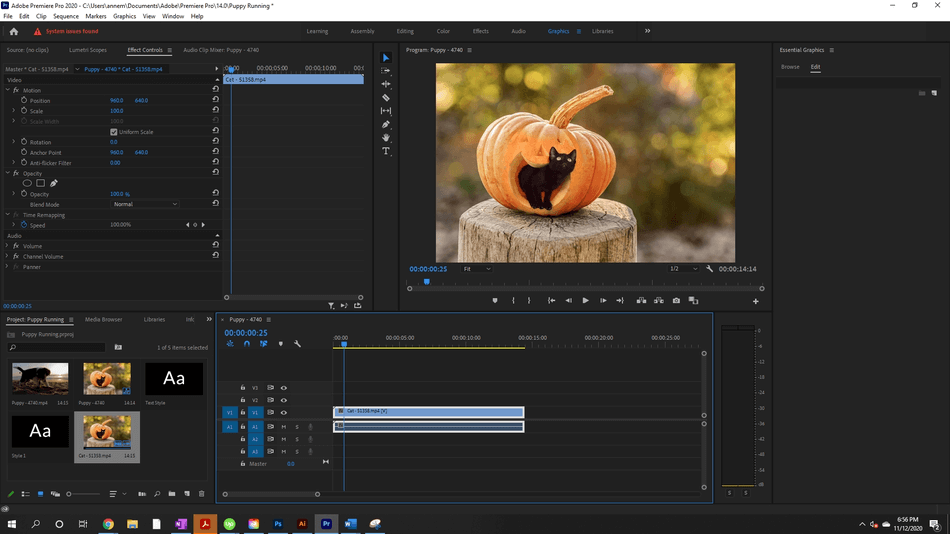
- When selected, the Effect Controls Panel should pop up. If it isn’t showing, go to Window > and check Effect Controls.
- Change the time stamp to where you want your zoom to begin. We’ll start at 00:00:01:00.
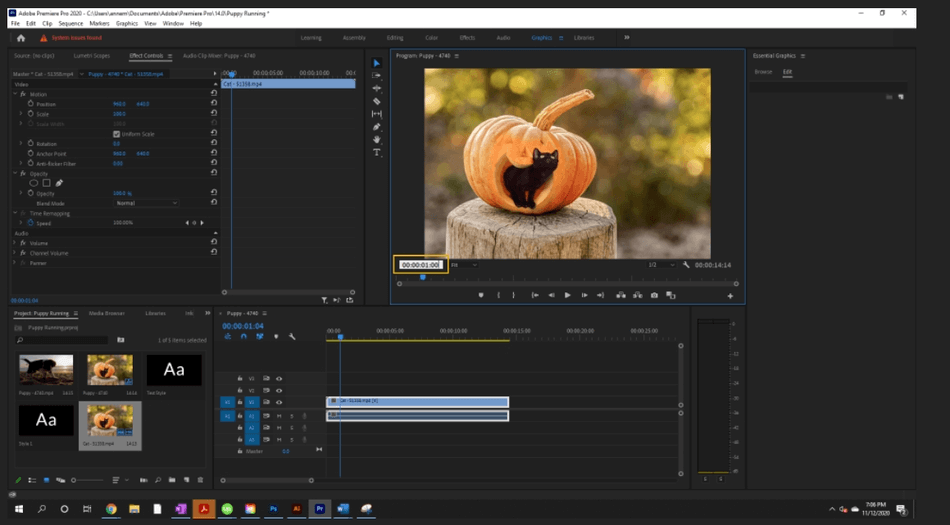
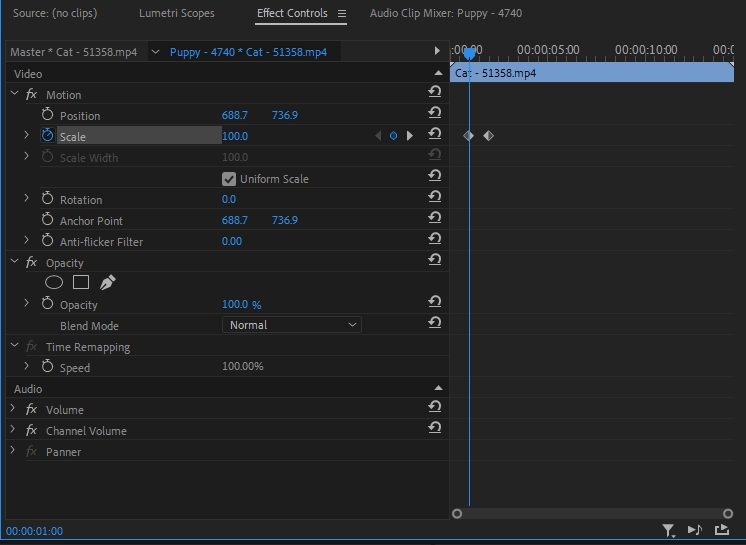
- Hit the stopwatch to create your first keyframe for Scale.
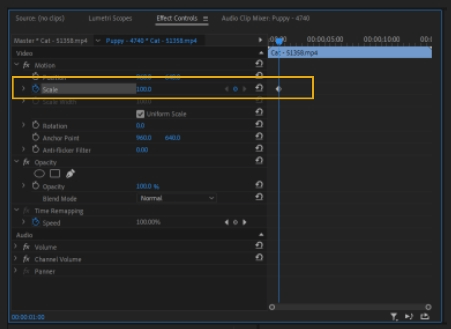
- I will then set the time to 00:00:02:00 and hit the diamond icon to set another keyframe.
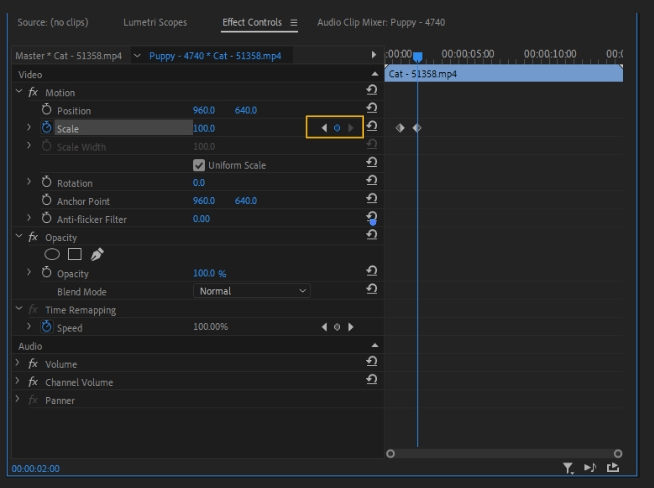
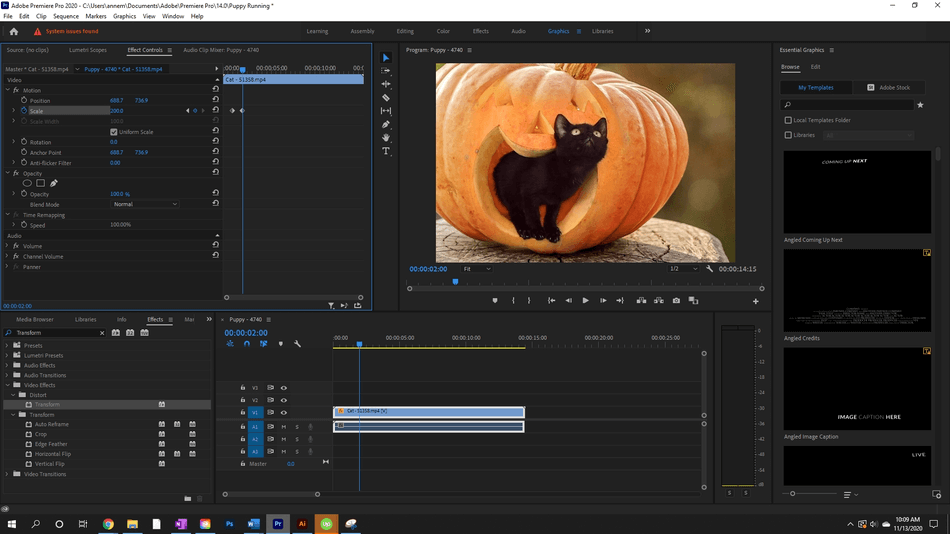
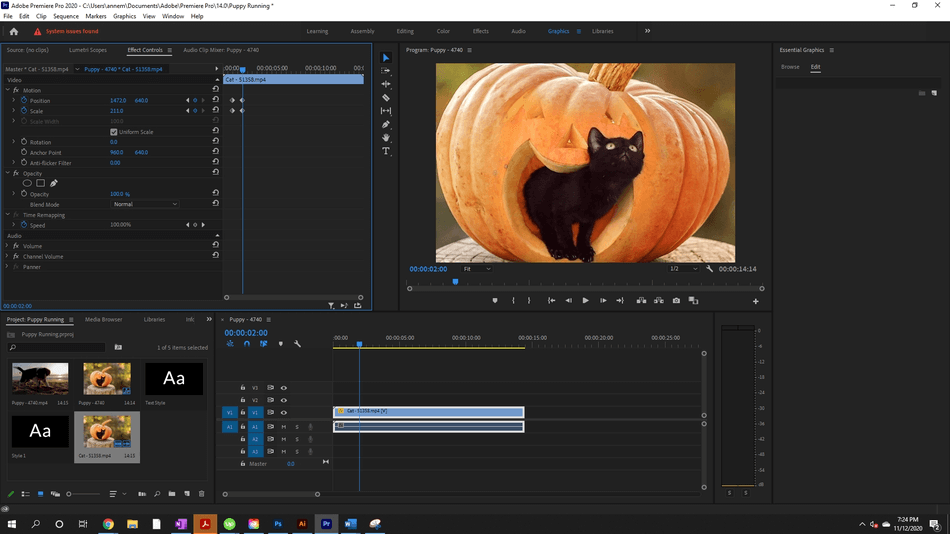
- At this point, I will increase the Scale parameter to the zoom amount that I want. Here, I’ve increased the zoom to 211.0.
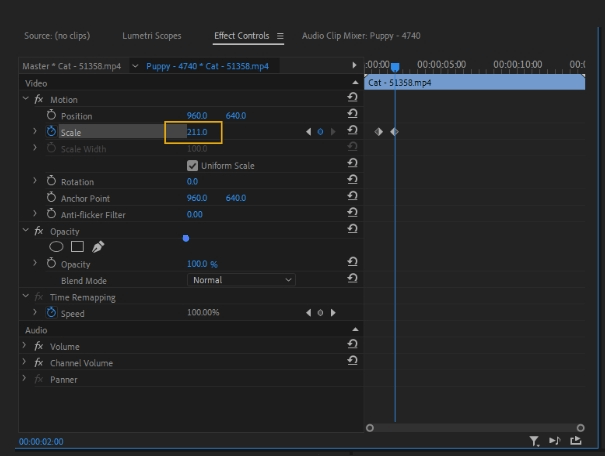
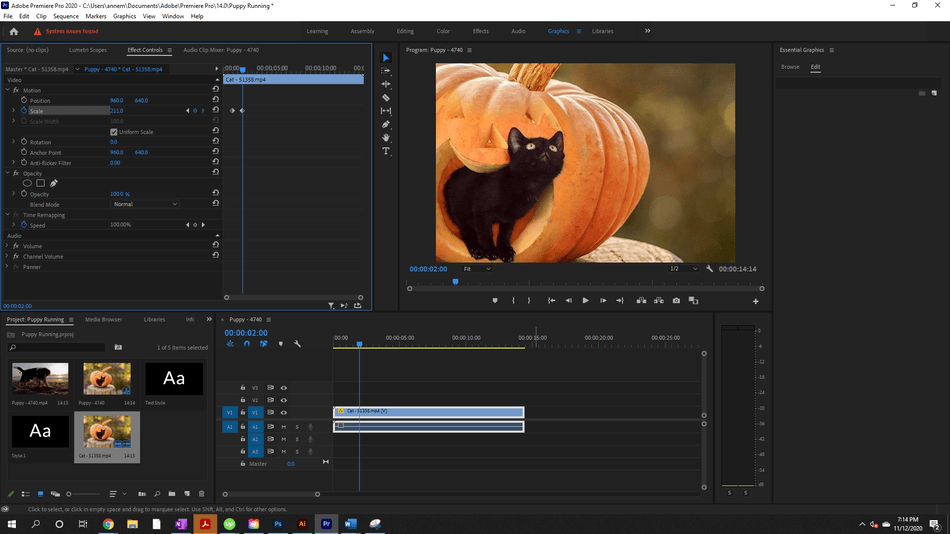
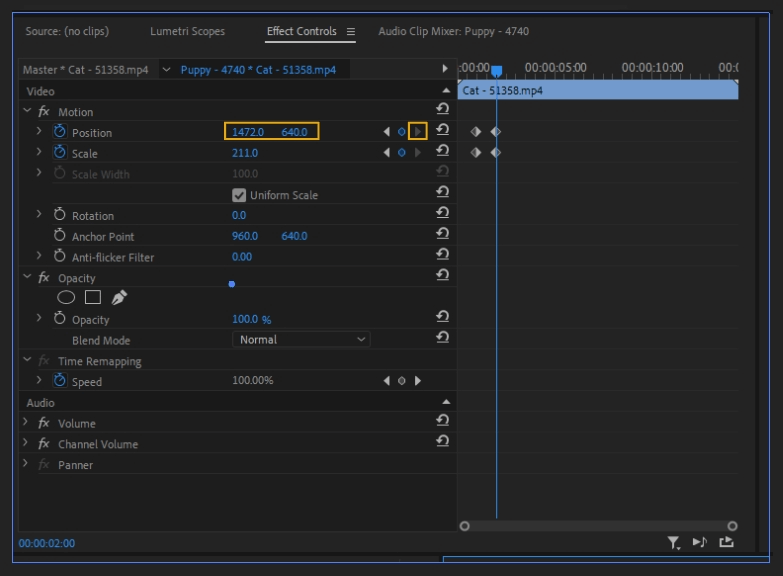
- The scaling looks great. However, the position isn’t quite right for me yet, so I’m going to set another keyframe for Position. Again, I hit the stopwatch to create a keyframe.
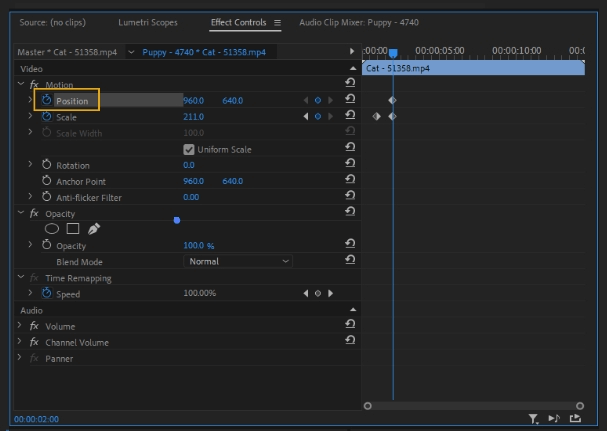
- Before I change the Position value, I need to add another keyframe at the beginning of the zoom sequence because the position is good in the beginning. To do this, Hit the back arrow in the Scale keyframe. Hitting the back arrow will take you to the first position. Now, I hit the diamond for Position to set a keyframe.
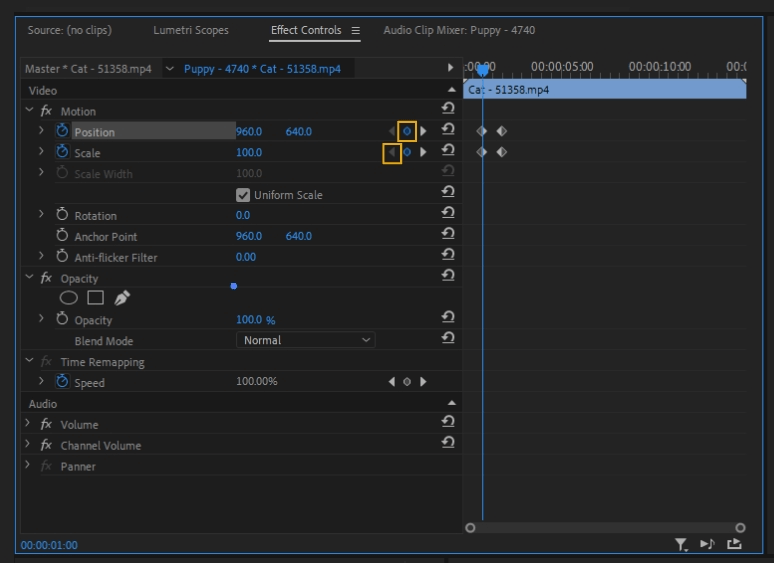
- I hit the arrow forward to go to the last keyframe for Position and then change its value. I changed the x-value to 1472.0. Now the kitten is centered in the frame. And with this, you have a successful zoom edit.
Keyframe Interpolation
With the instructions above, you have created a basic zoom. The keyframes automatically are set to Temporal Interpolation Linear and Spatial Interpolation Auto Bezier. You can change the interpolation between the keyframes, giving you precise control over the animation.
You can choose between Temporal and Spatial Interpolation. Temporal Interpolation applies the interpolation method to changes in motion and time, while Spatial Interpolation applies the method in shape.
Types of Interpolation:
- Linear Interpolation: Creates an evenly-paced change between keyframes, changing at a constant rate. The start and stop of motion feels abrupt.
- Bezier Interpolation: Accelerates and decelerates the motion at the beginning and end of the change. Bezier Interpolation creates a gentler start and stop.
Methods of Interpolation that you can choose from:
- Linear: Even motion from start to finish between the keyframes. Feels abrupt.
- Bezier: Manually change the rate of acceleration at the beginning and end of a keyframe. Feels smooth.
- Auto Bezier: Smooth rate of change through a keyframe with the program automatically adjusting the transition to be even as you change the value.
- Continuous Bezier: Smooth rate of change through a keyframe that lets you adjust the curves manually. As you change one side, the program fixes the other to maintain a smooth motion.
- Hold: Creates a sudden change in motion.
- Ease In: Slows the value changes as you enter the keyframe.
- Ease Out: Accelerates the value as you leave the keyframe.
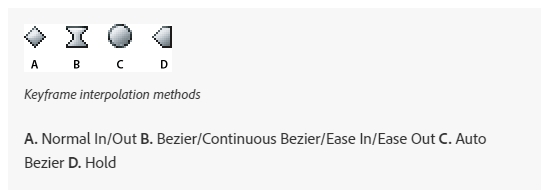
The keyframes will change to the following symbols as you alter them:
To change the interpolation
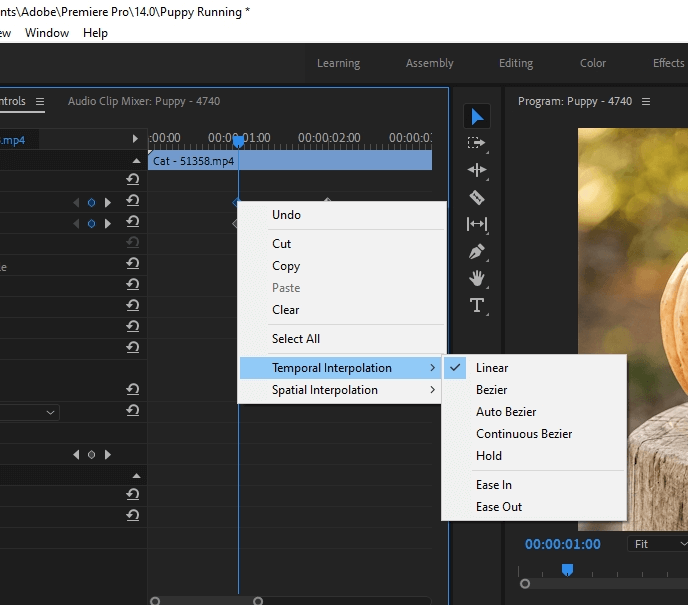
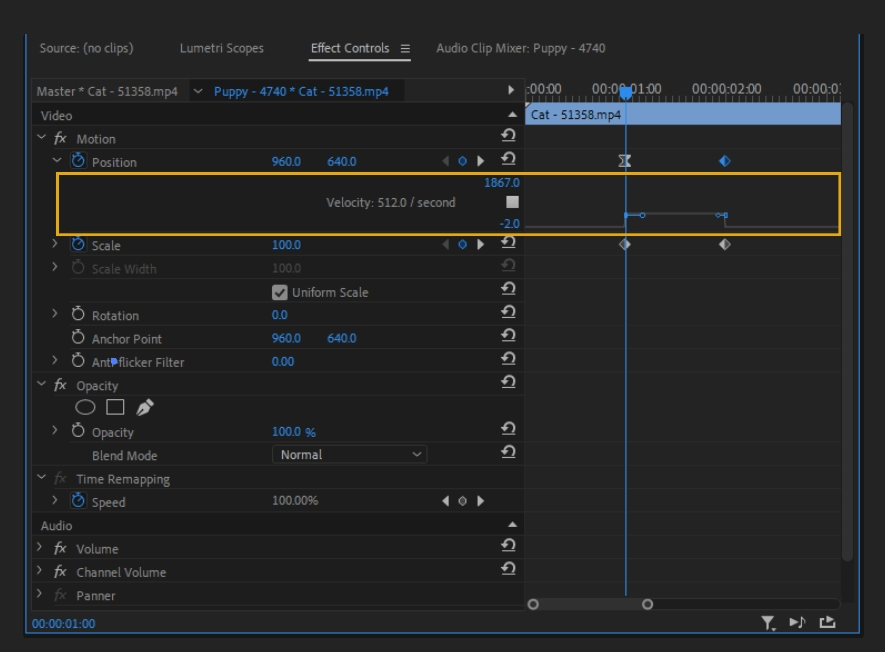
- Right-click the keyframe and select the interpolation. For this example, I’m going to change the Position keyframe to Bezier.
- Click down the Position tab to see the Velocity Controls. Here, you can adjust the graph and Velocity to change the keyframes with precision.
To Adjust Further
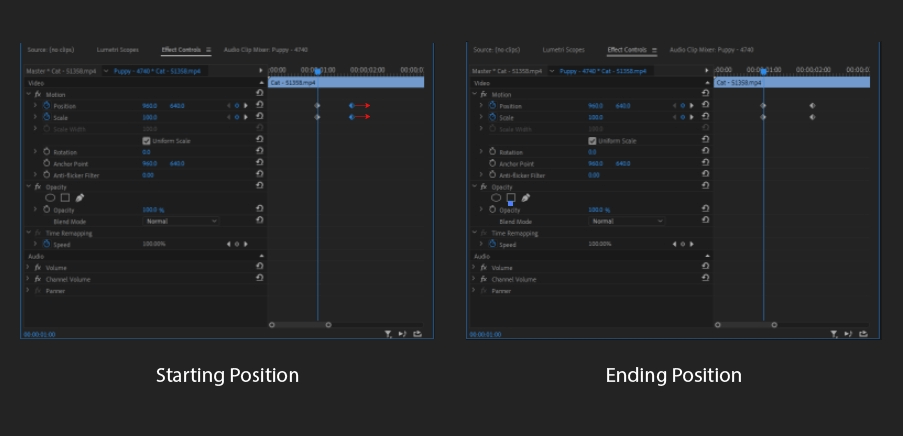
To make the zoom go faster, move the keyframes closer together.

To make the zoom go slower, move the keyframes further apart.
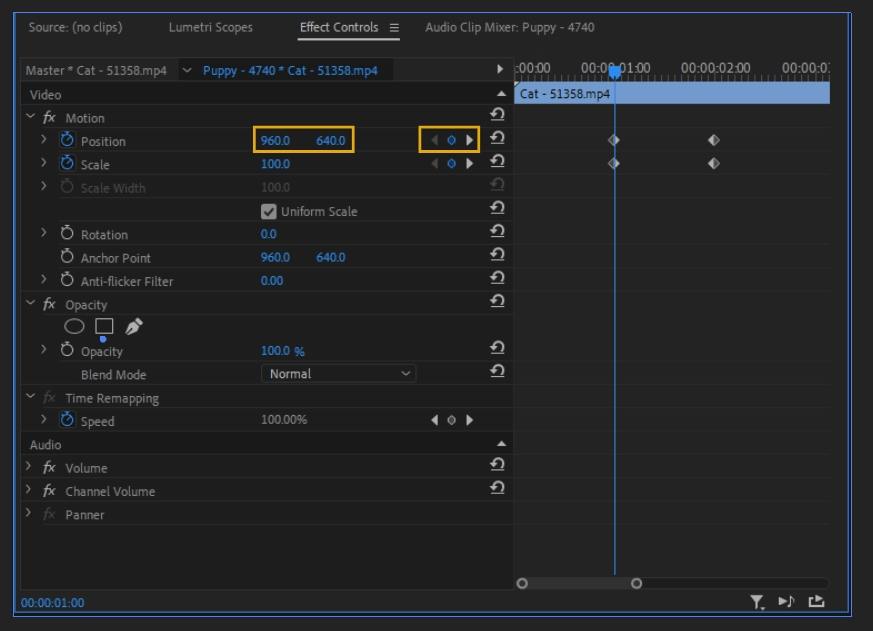
To adjust the keyframes directly, changing a parameter here like Scale or Position, first, click into the arrows, lining you up directly on a keyframe. Then, change the value of the parameter by either entering numbers manually or dragging the value up/down, right/left.
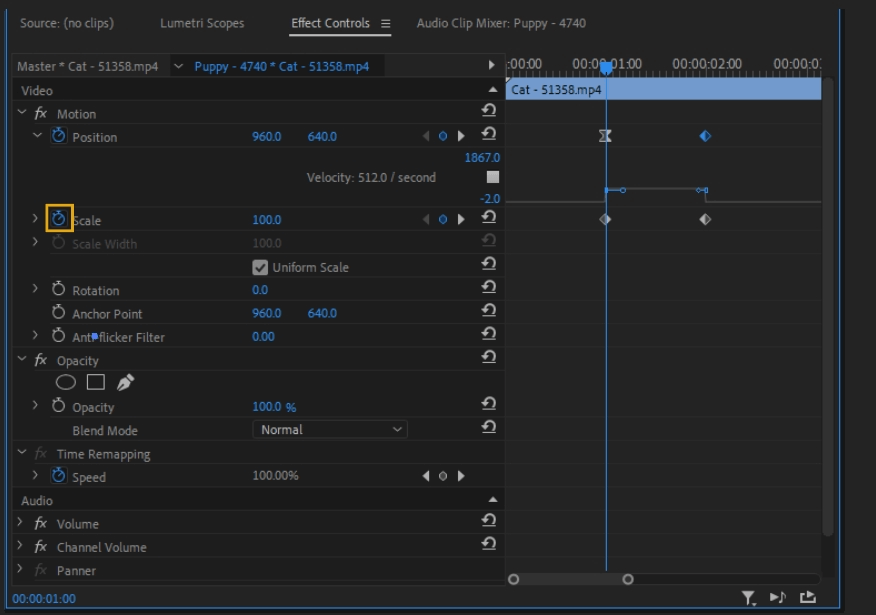
To clear out the keyframes, click the stopwatch icon. Toggling off the stopwatch icon will clear the keyframes out and give you a clean slate.
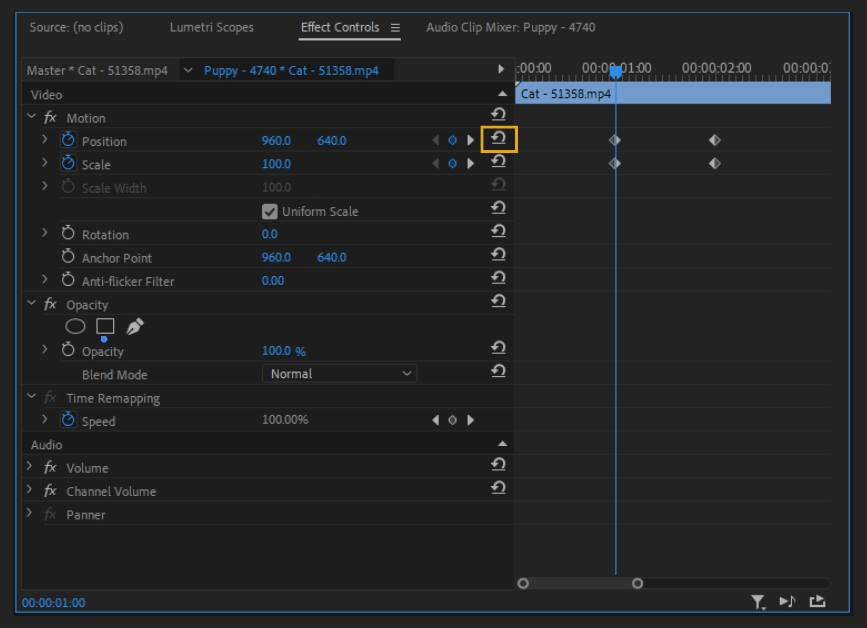
To add a keyframe with the origin parameters, click the Reset button.
Adding Effects
To give your zoom effect extra oomph, try the Transform Effect. This effect will give your zoom a more realistic camera blur.
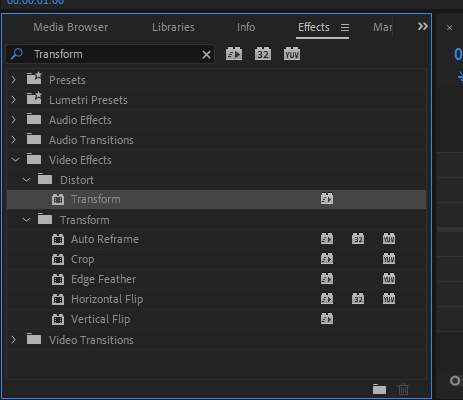
- Go to the Effects Panel. If the panel isn’t pulled up, go to Window > check the Effects tab. From here, search for the Transform effect. Select and drag to apply to your footage.
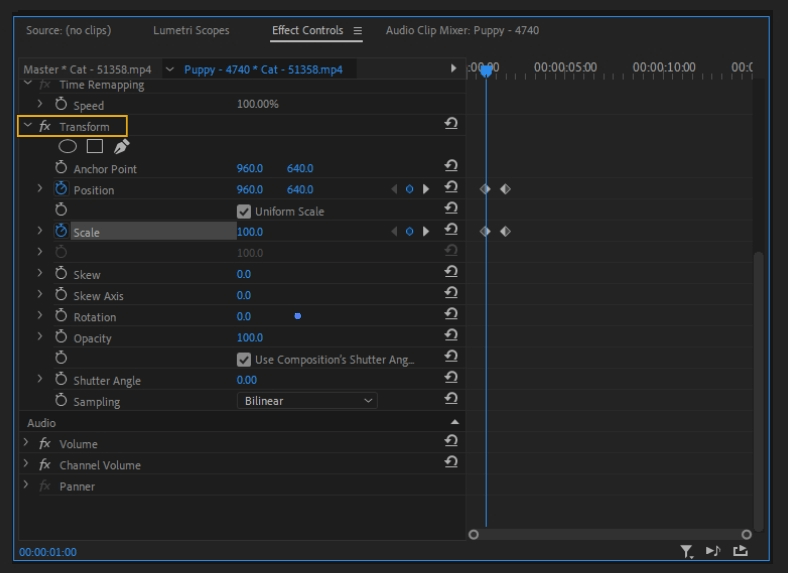
- Set your keyframes the same way as we did before, but instead, set the Position and Scale under the Transform Effect.
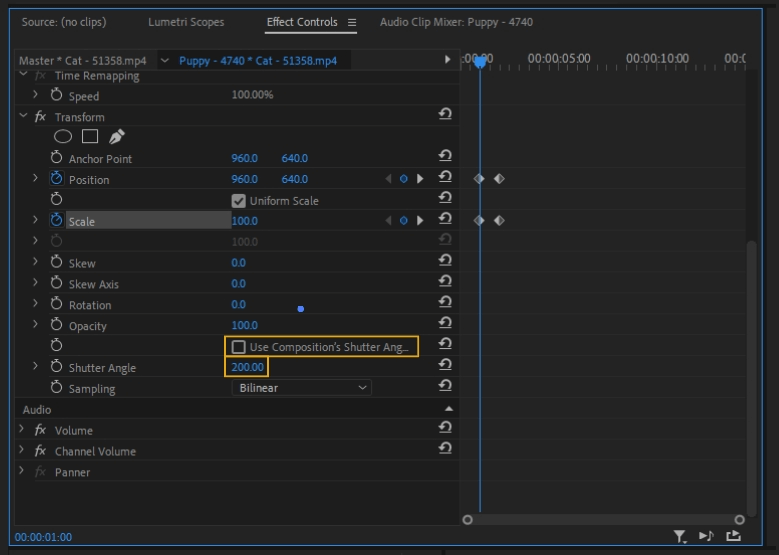
- From here, uncheck Use Composition Shutter Angle and set your angle manually.
Final Thoughts
These are all the basics for doing a zoom-in Adobe Premiere Pro. If you have additional questions, go to www.adobe.com to look up written lessons and video tutorials.
There is also an extensive community forum organized by program and relevancy, where you can ask and find the answers to any question that you may have. Adobe provides a ton of resources to help you.

Anne is a filmmaker and writer with a passion to bring stories to life. She has created several short films, specializing in stop-motion animation. Anne has over eight years of filmmaking experience, and she is always ready to share her knowledge with other creators. She started her company Anne Gets Creative in 2020.
Anne is extremely familiar with many Adobe programs: Photoshop, Illustrator, InDesign, After Effects, Premiere, and Audition, to name a few. She has also worked with other programs such as Procreate, Canva, iMovie, and Final Cut Pro. She always strives to give the best software reviews, researching diligently so her readers don’t have to.
