(Last updated on November 1st, 2022)
Have you ever seen vignette photographs online? Would you like to develop one for your own personal project or business? If so, you’ll want to read this detailed article about how to create a vignette in Photoshop.
The vignette is recognized in art as a small illustration or portrait photograph which fades into its background without a definite border. It can create a specific focus while still maintaining a softness by placing an understated rim around a subject.
Creating a vignette in Photoshop can be beneficial for a number of reasons. You may want a white vignette to make a wedding photo more light. You may want a black vignette to replicate the effect of an older photograph or duplicate a slide from a silent movie.
Related: Adobe Photoshop Torrent | Pros, Cons & Risks (Explained)
There are a lot of unique applications for such an effect. The good news is that this effect is not too difficult to pull off in Photoshop. It doesn’t even take long to implement, making it a solid choice for sprucing up a photograph at the last minute.
How to Add a Vignette in Photoshop?
1. Selecting The Area
Let’s start with an image with a central object or person we want to focus on the most. It could be a person in a portrait, a car amid a landscape, or a specific building in a city. For the purposes of this tutorial, we’ll choose something simple like a flower.
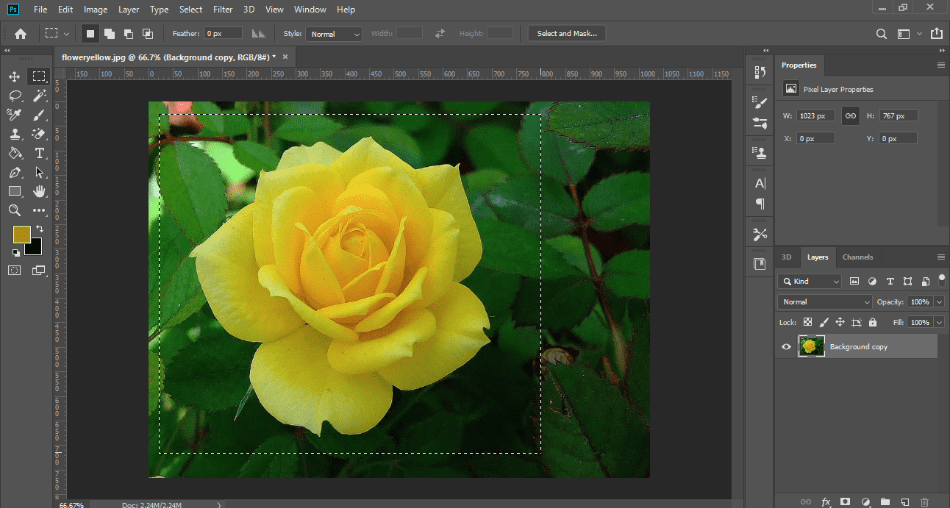
In this particular photograph, we want to highlight the big flower in the foreground. It’s essential to keep in mind just how much of the area we want to focus on, eyeballing how much falloff we think we might need when it comes to creating our vignette.
2. Creating a Shape
Now it’s time to start creating the shape for our area. Select the rectangle or sphere shape tool from your toolbar. Select what color you want your vignette border to be. These are typically either black or white but you’re free to choose whatever color you wish.
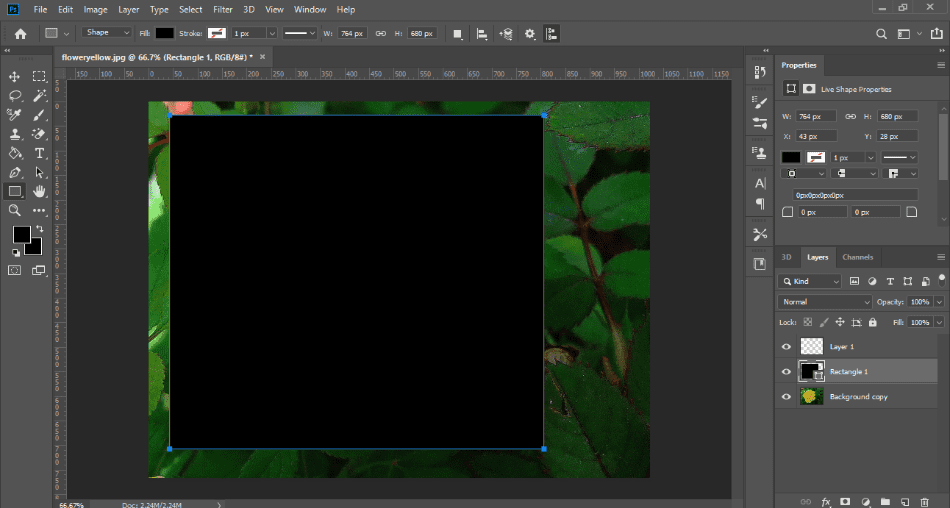
Drag the rectangular box around the area you want to be highlighted with the vignette. If it looks like you just placed a colored box over your subject, you’re on the right track. This might not look like a vignette yet but that’s because we have just a few more altercations to make.
3. Subtracting the Color
As you may have guessed by the placement of the shape, we want to have the opposite effect. We want the color to surround the subject and not cover it up. In order to accomplish this task, all we have to do is subtract the shape’s influence over the photograph.
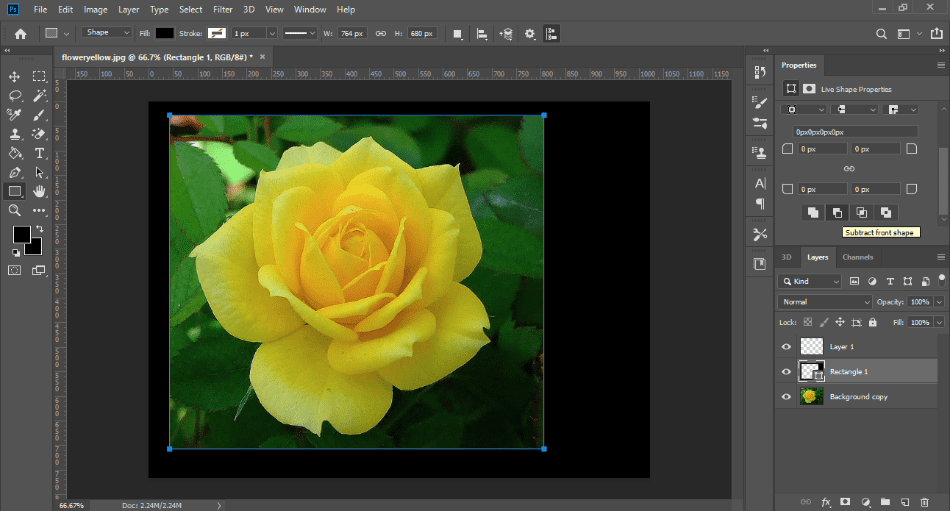
With your shape layer selected, click on the Properties tab for your shape. Scroll down on this tap to find the button for Subtract Front Shape. The button should look like a black box in front of a white box.
Once you’ve applied this option, you’ll notice the layer reverses the influence of the color. The color now surrounds the subject instead of covering it up with the shape. So now we have our border for the image.
But it doesn’t quite look like a vignette, does it? The border is too harsh and crisp, making it look like the photo is just popping out around a strict border of color. To give this area a vignette effect, we still have some properties to adjust.
4. Feathering the Area
For the final touch to our shape, we need to adjust the feathering. In your properties tab, select the Mask button on the top of the tab. It should look like a white background with a black circle in the middle. Opening this will give us options for tweaking the look of the mask.

Find the Feathering feature and start playing with the slider. You’ll notice that pushing up the feathering will create more of the vignette effect that we’re looking for at this time. The adjustments are previewed in real-time so try out some different levels to see what works best.
You’ll notice now that the flower has more of a lighter quality to it for being highlighted amid the black with a natural and gradational falloff. It’s a rough example, but you should understand how a rigid shape can quickly turn into a much more fluid vignette border.
These are just the essential components of trying to apply a vignette. If you look further in the properties tab, you can find all sorts of tools to play around with and create a different effect. It’s all just a matter of how you rework a shape to your heart’s content.
Alternative: Post Crop Vignetting
Photoshop comes with the Camera RAW Filter which provides a wealth of photo editing tools made easy. With sliders, one can easily change everything from the contrast to the temperature of the photograph.
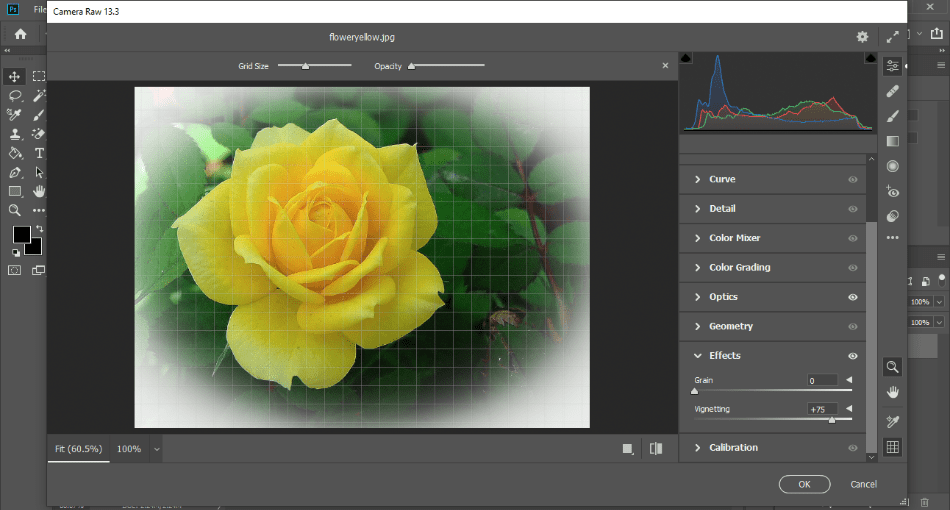
To apply this filter, navigate your way through the upper toolbar to select Filters > Camera RAW Filter. Once you click this, you will be brought to a new menu with your photograph present and a host of photo-altering tools, muck akin to Adobe Lightroom.
Among the many slide features present is an option for creating vignettes as well. While in the Camera RAW Filter window, navigate your way down to the Effects submenu. You’ll then find the option for creating a vignette in the form of a slider.
Drag the slider along, and you’ll notice a soft, white border will begin to appear around the edges of your photograph. You can tailor this vignette to be as big or small as you like with a simple drag that generates real-time results.
It should be noted this tool is somewhat limited in terms of placement and density. So you might want to consider the filter-free version for better control if you don’t need something quick and dirty for a vignette.
Once you’re happy with the vignette, simply click OK, and you’ll be taken out of the filter window with your changes applied to the layer. If you ever need to change this aspect, just reopen the Camera RAW Filter the same way you opened it.
Conclusion
Vignettes can add quite a bit of character to a photograph or your Photoshop project, and it doesn’t require an expert level of skill to implement. It’s a task that can be accomplished simply as either creating a shape or opening up the effects of the Camera RAW Filter.
You can use this technique in a variety of ways to improve your photos or develop a specific tone you’re seeking. White vignettes are a simple touch to making wedding photos all the brighter, and a rustic color can give the sense of a burnt depiction of the old west.
There are so many uses for this technique that you don’t even have to stick to the traditional methods of vignettes to create something even more lavish and creative. Take the skills you’ve learned here and try out different techniques and options to find out just what you’re capable of producing.
Frequently Asked Questions
Creating a Photoshop vignette is a relatively simple procedure. Simply use the oval selection tool to select the key area you want to focus on. Turn up the feathering of the selection area and then invert it. You can then add an adjustment curve layer to tweak just how your vignette will appear. You can additionally create a vignette using the vignette slider inside the Camera RAW Filter under the Effects section.
Creating a black vignette in Photoshop is as simple as cutting a hole in a background. While you could certainly go that route, it’s far easier to use the subtract shape method. Create a black shape on top of your image around the area you want to be showcased in the vignette. Then subtract that shape’s color on its layer and feather the edges. This will create a vignette with a lot of control over how much gradual falloff you want for your subject.
Vignettes can often be found in small illustration or portrait photograph with fades into its background without a definite border. You may have noticed such framing in old photos and even some modern pictures that want to create a specific effect with an edge, whether it’s a crisp black or flowing white. You can also find this vignette effect in older movies where a specific aspect of a scene needs to highlight or
The vignette effect creates a specific border around an image circular and has a gradual falloff. It’s used to create particular moods and themes and zero in on what is most important. Placing a vignette can make everything from a dreamlike state of whimsy for wedding photos or a sharp look of distinction for something more serious. All of this depends on the image you’re working with and the depths of how much or how little you want your vignette to be pronounced.

Mark McPherson has been working as a video editor and content writer for over ten years. His background started in animation and video editing before shifting into the realm of web development. He also branched out into content writing for various online publications. Mark is an expert in video editing, content writing, and 2D/3D animation.