(Last updated on November 2nd, 2022)
Want to know how to Fix Scratch Disk Full Error in Photoshop? You have come to the right place!
- First off, What Is Scratch Disk Full Error?
- Fix #1: Check Your Storage and Clean Up
- Fix #2: Let Photoshop Use More RAM
- Fix #3: Delete Cache or Temp Files from Photoshop
- Fix #4: Defragment Your Hard Drive
- Fix #5: Disable the Auto Recovery Feature in Photoshop
- Fix #6: Reset Photoshop Preferences
- Fix #7: Ask for Help
- Lastly, a Reason You DON’T Want to Hear
- Frequently Asked Questions
You’re working in Photoshop. Everything’s fine. Then suddenly, you get the dreaded message. “Your scratch disk is full.” How do you resolve this? Follow along as I go through fixes, step-by-step.
Related: Affinity Photo vs Photoshop: Head-to-Head Comparison (2023)
First off, What Is Scratch Disk Full Error?
The scratch disk is your computer’s hard drive space that Photoshop uses as virtual memory when there is not enough RAM to do an operation. To simplify, if you run out of RAM, Photoshop uses your hard drive as a temporary memory space. And this space, the scratch disk, can fill up with data and prevents Photoshop from working properly.
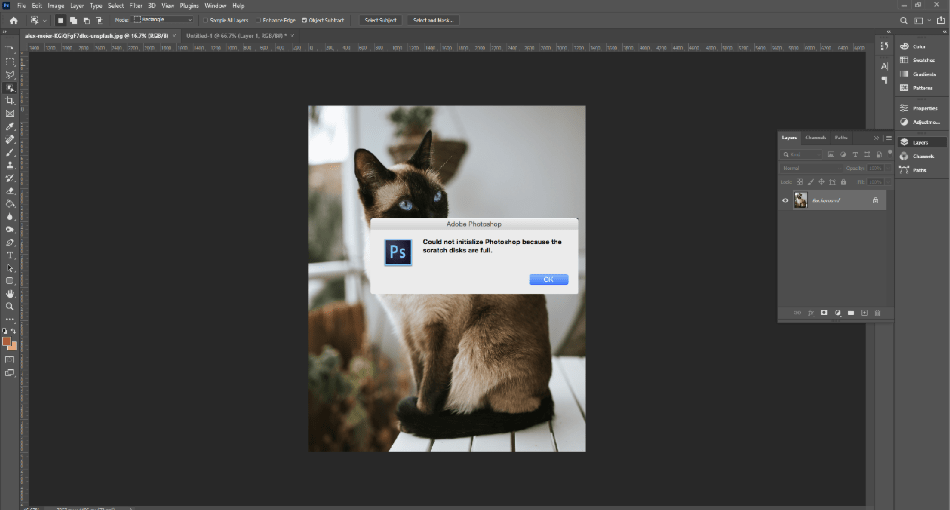
Run Out of Ram à Run Out of Space on Scratch Disk à Error because Photoshop can’t function.
If the RAM is used up and the scratch disk is used up, this will cause a full stop, preventing you from using Photoshop. So, how do we fix this? By deleting files off the scratch disk, allocating more RAM to Photoshop, and more. One of these steps may be enough to fix your issue. Let’s go over all the choices.
Fix #1: Check Your Storage and Clean Up
If your computer’s memory is over 80% full, you could be drastically slowing down your computer and causing programs like Adobe Photoshop to stop working temporarily. You may be holding on to a lot more junk files than you’d think. And, you may want to transfer files off of your computer to free up storage anyway.
I recommend getting external hard drives and making a transfer of old files off your old computer every so often. You will have faster performance and clear up space!
First, check your storage
Windows:
- Go to Settings > System > Storage. Here, you will see exactly what is taking up space and where it is stored. For example, my highest storage usage is in my documents folder.
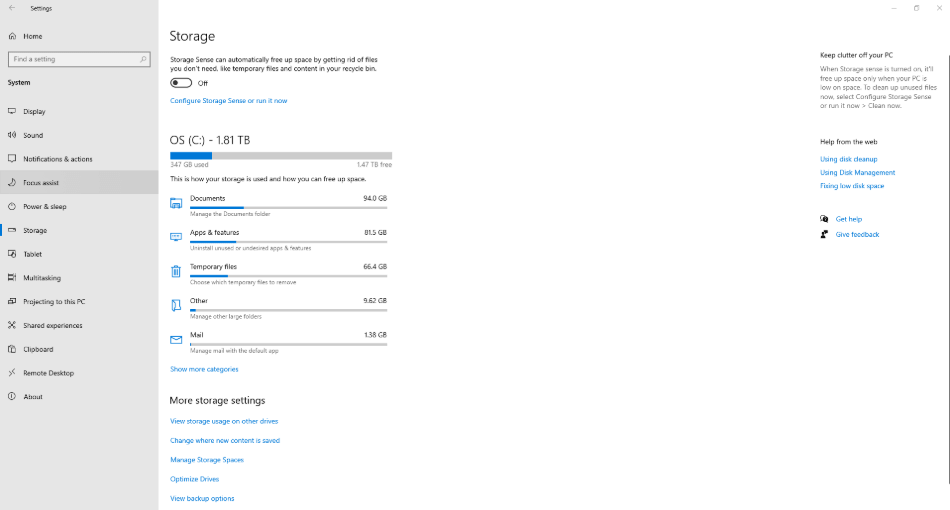
To immediately start cleaning files, you can manually go through the Temporary Files section, deleting unnecessary files. You can also toggle on Storage Sense, a setting that will automatically remove temporary files and empty the recycle bin.
Mac:
- Go to the Apple icon in the upper left corner of your screen and select About This Mac > Storage. Here, you will see what is taking up space and how much storage you have left.
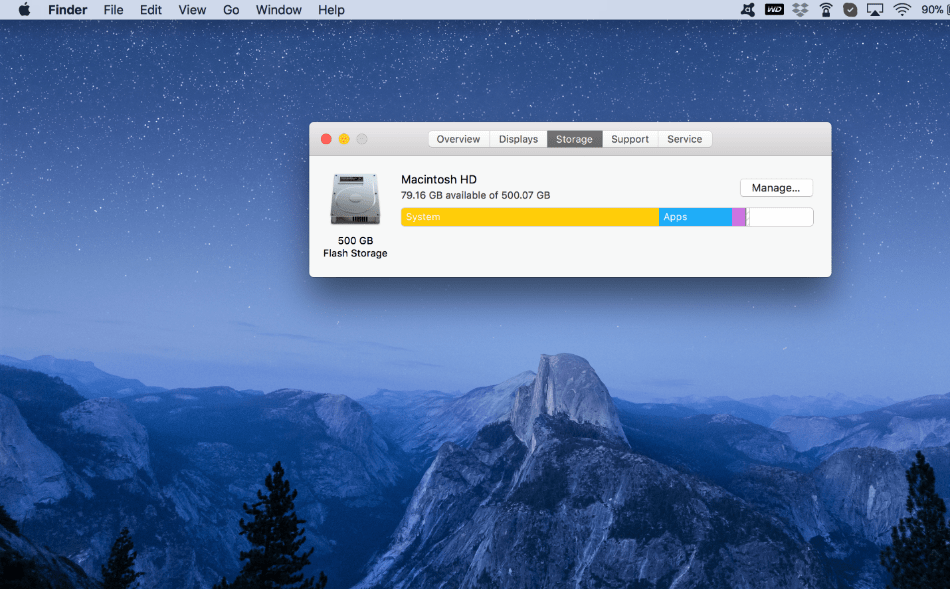
- From here, go to Manage…. This panel will tell you the specifics of where space is being used. Mac will also give you options to free up memory, such as storing files in iCloud, removing already watched content, emptying trash automatically, and walk you through reducing clutter.
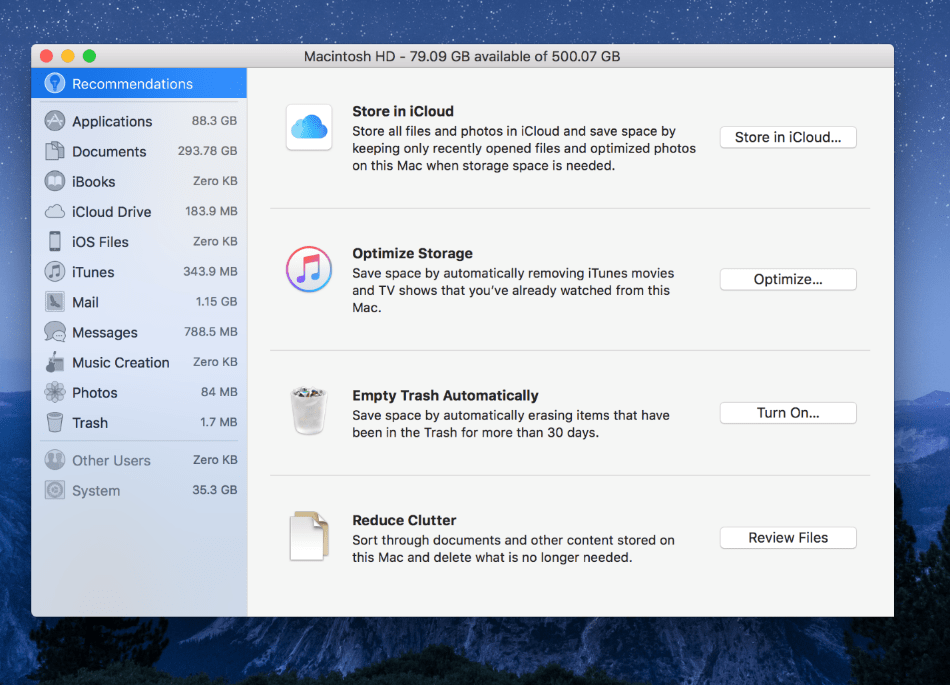
Remove Your Files & Store Elsewhere
What are the options for storage? Thankfully, there are many solutions.
For Both:
- External Hard Drive: This is a physical copy of all of your files. There are two types, HDD and SSD. HDD is the less expensive, traditional storage solution that uses mechanical platters and a moving read/write head to store data. SSD is a more expensive but much faster, newer type of device that stores data on memory chips.
For Windows:
- OneDrive: This online storage solution can back up your work and personal files. You can sync Windows devices to OneDrive, keeping your access to all files across all devices. Your content is secure and protected.
For Mac:
- iCloud Storage: This is an online storage solution that allows you to keep all of your data in the cloud, only keeping recent files on your computer. iCloud stores your content securely and keeps your storage up to date. Meaning, new photos and content added will automatically be added to iCloud, and you can access this data across devices. A note you started on your phone can be continued on your computer without you having to transfer anything manually.
Fix #2: Let Photoshop Use More RAM
If you let Photoshop use more RAM, you will increase your temporary storage.
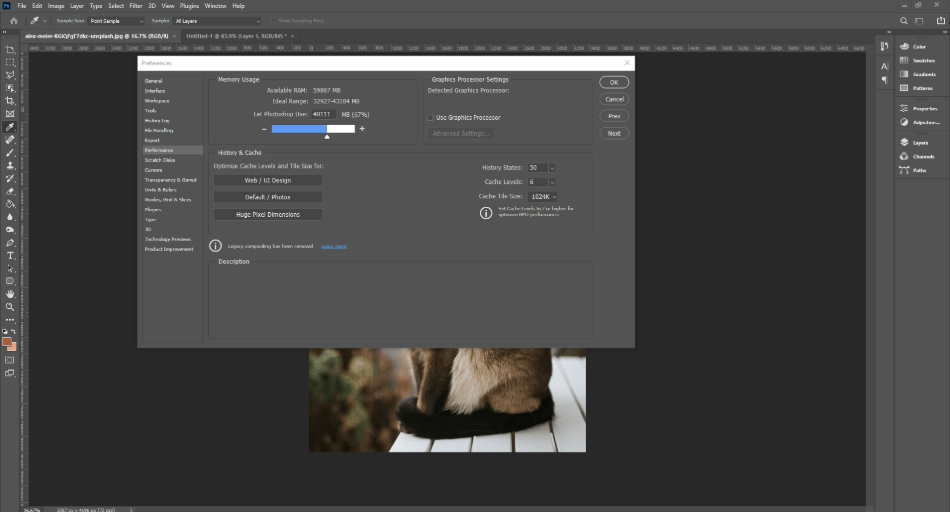
- Go to Edit > Preferences > Performance > Memory Usage.
- In the Let Photoshop Use section, allocate more RAM space. Typically, Photoshop starts with 70% usage. Increasing this will increase your temporary storage space.
Fix #3: Delete Cache or Temp Files from Photoshop
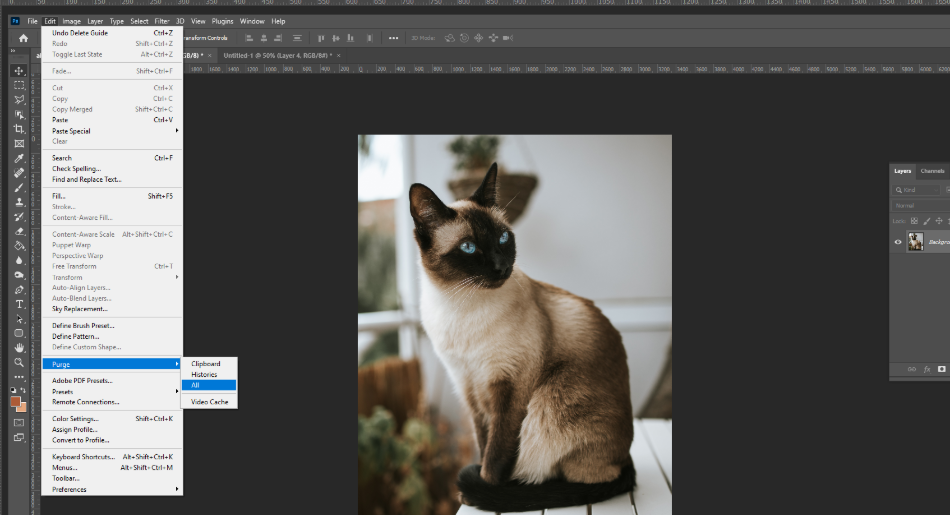
You can clear the temp files from your scratch disk, freeing up storage.
- Go to Edit > Purge > All. You can also delete some files, selectively just choosing Clipboard files, histories, or video cache.
Fix #4: Defragment Your Hard Drive
Defragmenting your hard drive sounds like a daunting, complicated process, but it’s actually pretty simple. It’s the process of reorganizing data stored on your hard drive, so it’s lined up in a continuous place rather than scattered all over. It’s worth noting that Macs actually don’t need to be defragmented because they have anti-fragmenting built-in. So, we will just go over how to defragment Windows.
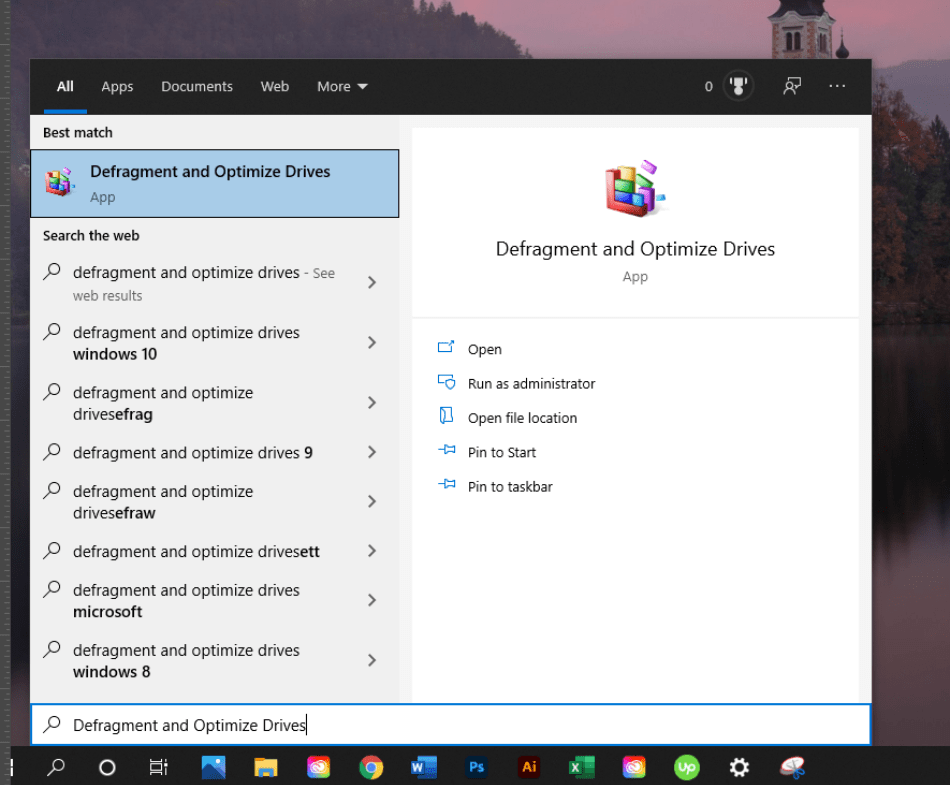
- In the Search Bar, search for Defragment and Optimize Drives.
- In the pop-up window, you will see the Hard Drive partitions on your computer. Select the one you will be using as a Scratch Disk and hit Analyze. This action will determine whether or not your drive needs optimization. If needed, hit Optimize and let it run.
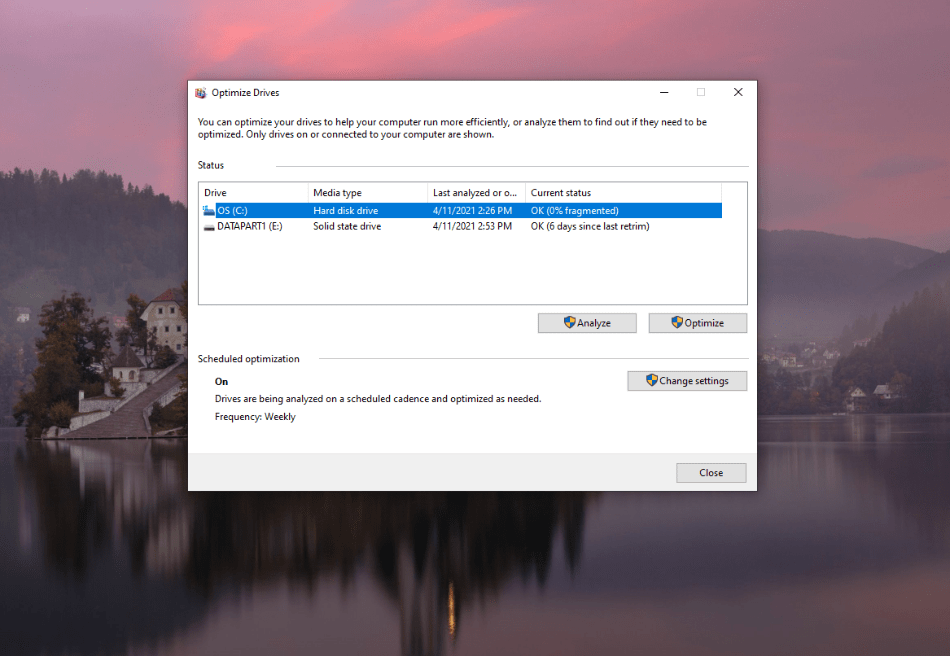
- Once the process is finished, the current status will say “0% fragmented”. And you’re done!
It is worth noting that this process can take quite a long time to finish. You can also set the optimization schedule’s frequency to daily, weekly, or monthly. You can set notifications to pop up if consecutive runs are missed.
Fix #5: Disable the Auto Recovery Feature in Photoshop
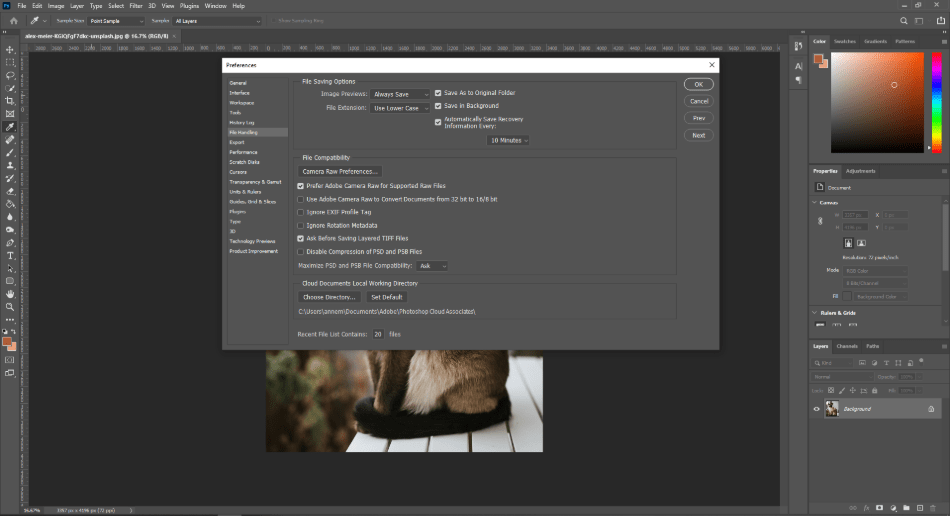
When you work in Photoshop, you automatically get saves of your project as you go. If you disable this feature, you will save some space on your scratch disk. (Not ideal if you do like that extra protection in case of a crash.) If you don’t care about auto-saving, full steam ahead.
- Go to Edit > Preferences > File Handling and untick the box that says Automatically Save Recovery Information Every:
Fix #6: Reset Photoshop Preferences
Resetting your Photoshop preferences to their default state may resolve the issue for you. Changing a setting can sometimes cause a domino effect of issues for you, so resetting can be a great option to give you a clean, fresh start.
However, it is also worth noting that when you reset your preferences, you will also be resetting your color settings as well as custom workspaces and shortcuts. If you’ve spent a lot of time crafting this to perfection, this may be an annoying detriment. This fix is the last stop after you’ve exhausted the other choices.
- Go to Edit > Preferences > General and press Reset Preferences on Quit, hitting OK at the pop-up.
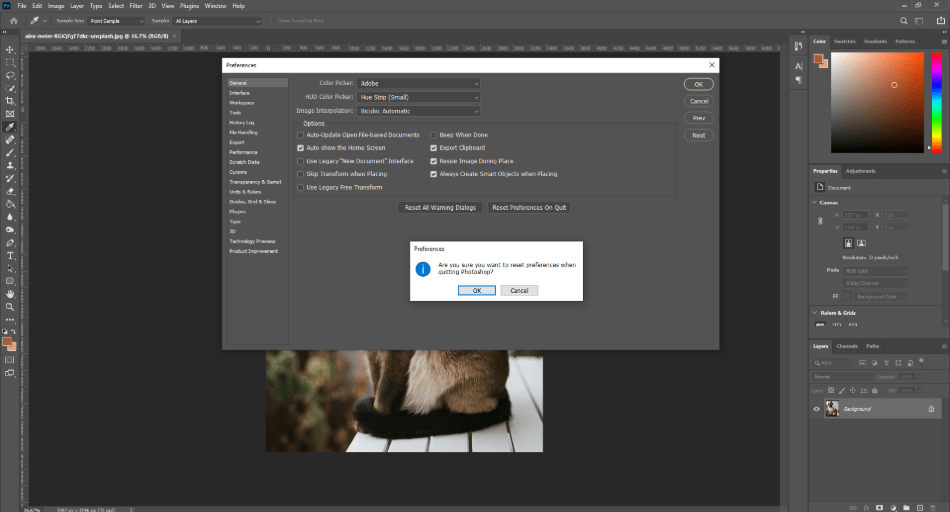
- Quit and Restart Photoshop. Everything is now reset.
Fix #7: Ask for Help
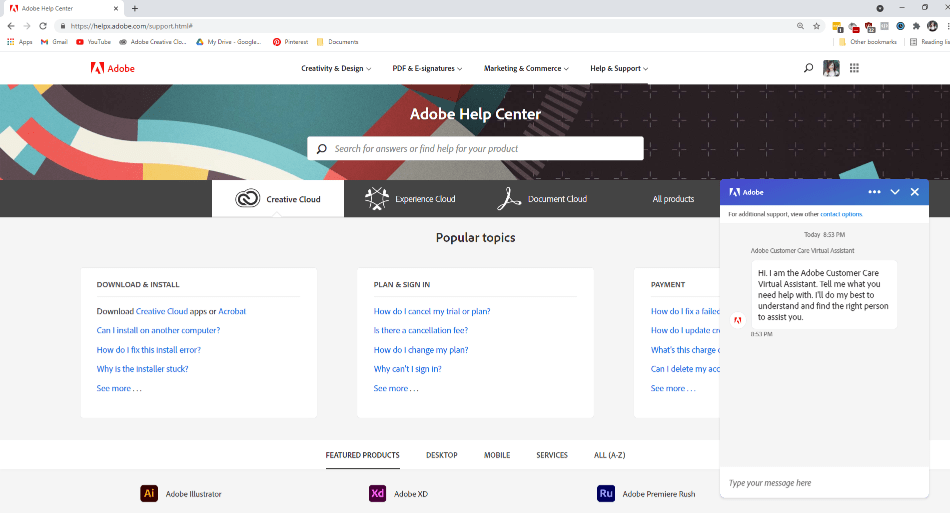
If you’ve done 1-6 and Adobe Photoshop is still not working properly, you may want to see a specialist. Adobe offers a great support system online. They have available helpers 24/5, available for call and chat to walk you through errors that happen with any Adobe Program. You are not alone!
Lastly, a Reason You DON’T Want to Hear
At the end of the day, your computer specifically might not be powerful enough to support a tech-sucking machine like Adobe Photoshop. Here Adobe walks you through the standard software requirements for scratch disks to support its program; here is the requirements list for each individual program. Talk to an Adobe specialist, though, before giving up hope. There are many resources to try before calling it quits.
Frequently Asked Questions
To empty your scratch disk, go to Edit > Purge > All.
Also called clearing your cache, go to Edit > Purge > All. You can also choose to just delete Clipboard, Histories, or Video Cache.
Go to Edit > Preferences > Scratch Disks. Here, you disable/enable your scratch disk.
You can increase the RAM allocation by changing the value in the “Let Photoshop Use” box in Edit > Preferences > Performance > Memory Usage. Normally, Photoshop uses 70% of available RAM.

Anne is a filmmaker and writer with a passion to bring stories to life. She has created several short films, specializing in stop-motion animation. Anne has over eight years of filmmaking experience, and she is always ready to share her knowledge with other creators. She started her company Anne Gets Creative in 2020.
Anne is extremely familiar with many Adobe programs: Photoshop, Illustrator, InDesign, After Effects, Premiere, and Audition, to name a few. She has also worked with other programs such as Procreate, Canva, iMovie, and Final Cut Pro. She always strives to give the best software reviews, researching diligently so her readers don’t have to.
